Getting Started
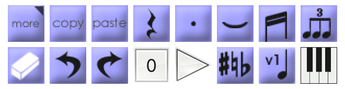
1. ToolBox
All Notation Tools are here. More (top left) will show Additional Tools.

2. PageView
Open PageView, chage the layout to print or share it.

3. Menu
Open Menu for all Settings (Score, Track, Playback, App), File Access, Data Exportion & Help.
OneFlick Entry Method
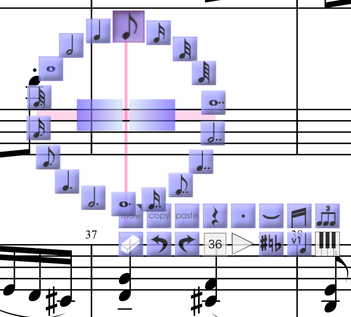
- The choices will appear when you touch the screen.
- Select a location & the value at once.
- The selection will change as you slide your finger to left/right.
- Recommended to those who are familiar with music notation apps and looking for faster and more efficient entry system.
Traditional Entry Method
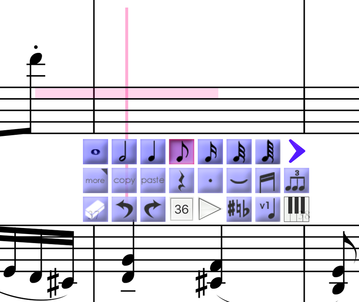
- The choices will appear with ToolBox.
- Select a value & the location separately.
- Recommended to those who are not yet familiar with any music notation apps.
To open Score Settings, select Menu - ScoreSettings in EditorView.
This video will explain about:
- How to set primary Time Signature
- How to set primary Key Signature
- How to set primary Tempo Mark
To open Track Settings, select Menu - ScoreSettings - TrackSettings in EditorView.
Contents Timetable
- 0:00 Add a track
- 0:08 Reorder tracks
- 0:18 Show/Hide tracks (in Editor View)
- 0:30 Delete a tracks
which has a slightly different look and feel,
but the operations related to this topic remain the same.
This video will explain about:
- How to add tracks
- How to change primary Clef
- How to group tracks
by showing the process of making Piano Grand Staff.
Please use CC for explanation
(no audio commentary for multi-language support).
From 3.6.0, Touch + Hold the selected Instrument/Percussion will play Sample Sound.
Contents Timetable
- 0:00 Introduction
- 0:08 Sample Sound: Melody Instruments
- 0:42 Sample Sound: Percussion
This video will explain about:
- How to set a track of transposing insturment (ex. trumpet in Bb) shown as transposed while it is played in concert key on playback
(no audio commentary for multi-language support).
Created with Galaxy S22 Ultra (Android Phone).
Appears little differently in iPhone and iPad.
This app handles Song Title and Filename separately.
Contents Timetable
- 0:00 Introduction
- 0:10 Filename vs Song Title
- 0:50 Title and Credits
- 1:45 Title Space Adjustment
- 2:10 Footer
When you set Song Title before you Save it for the 1st time, you will be prompted you to use the Song Title as the Filename.
Command (Tool) Lock
(no audio commentary for multi-language support).
Location Slider
(no audio commentary for multi-language support).
Please use CC for explanation
(no audio commentary for multi-language support).
Created with Galaxy S22 Ultra (Android Phone).
Appears little differently in iPhone and iPad.
Contents Timetable
- 0:00 Introduction
- 0:23 Finger Entry (Traditional Mode)
- 1:20 Auto Scroll
- 1:43 Gesture of entry cancellation
- 1:58 How to add harmonies
- 2:10 How to change Note Duration
- 2:18 How to insert a Note
- 2:26 Long Press to move note head Up/Down
- 3:03 Rest Entry
- 3:14 Double Tap to Lock the tool for continuous use
- 3:30 Eraser
- 4:18 Input with Pen
- 4:58 Accidental
- 5:49 Beam, Tie and Tuplet
- 6:27 Finger Entry (One Flick Mode)
- 7:36 Keyboard Entry (Traditional Mode)
- 8:50 Keyboard Entry (One Flick Mode)
- 9:35 Keyboard "No Entry" Mode
Please use CC for explanation
(no audio commentary for multi-language support).
Contents Timetable
- 0:00 Introduction
- 0:15 Beam
- 1:14 Tuplets
- 2:43 Tie
- 3:07 Dot
Click Here to learn about Multi Voice Writing
however, covers all of the above in about 6 minutes.
This video will explain about:
- Note Entry
- Rest Entry
- Eraser
- Undo / Redo
- Auto Scroll (Menu-Application Settings)
- Command Lock
- OneFlick Entry vs Traditional Entry
- Touch + Hold to move note pitch
- Changing Note/Rest Duration
- Dot
- Adding Harmony
- Accidental
- Beam
- Tuplet
- Tie
- Voice Change
- Multi-Bar Rest


(no audio commentary for multi-language support).
Created with Galaxy S22 Ultra (Android Phone).
Appears little differently in iPhone and iPad.
This video will explain about:
- How to use Accidental Tool not just for Sharp, Natural and Flat but also for Double Sharp/Flat.
- How to show / hide Courtesy Accidental
Additional Tools (MORE)


Please use CC for explanation
(no audio commentary for multi-language support).
Created with Galaxy S22 Ultra (Android Phone).
Appears little differently in iPhone and iPad.
Contents Timetable
- 0:00 Introduction
- 0:13 Bar Line Tools
- 0:42 Double-Tap to lock the tool
- 1:08 Bar Line Tools in One Flick Entry Mode
- 1:25 Automatic addition of bar lines
- 1:45 Red Notes (Notes exceeding the number of beats in a bar)
- 2:28 Clearing within bars and Removing bars
- 3:24 Multi-Bars Rest
Click Here to learn how to play a song with a form that's not automatically recognized by the app
(no audio commentary for multi-language support).
Contents Timetable
- 0:00 Replacing and Inserting Bar lines
- 0:30 Erasing Bar lines
- 0:50 Ending Tag
- 1:10 Segno and Dal Segno
- 1:35 Slashes
- 1:55 Clear/Delete Bar
which has a slightly different look and feel,
but the operations related to this topic remain the same.


Contents Timetable
- 0:00 Clef Tool ( Primary Clef - Clef Change )
- 0:30 Key Signature Tool ( Primary Key - Key Change )
- 1:20 Time Signature ( Primary Time - Time Change )
- 1:55 Tempo Signature ( Primary Time - Time Change )
Note
- Primary Key, Time and Tempo settings can be also changed also in Score Settings.
- Clef settings can be also changed in Track Settings.
which has a slightly different look and feel,
but the operations related to this topic remain the same.

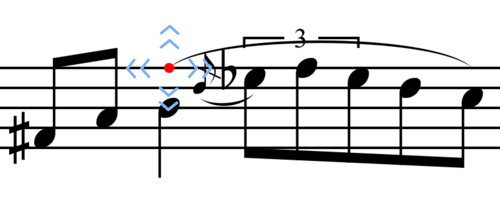
- Touch + Hold an item for a second, then arrows ( << >> ) will appear.
- Tap an arrow to move the item.
- Select other location of screen to deselect the item.
- This command is always locked until other command is selected.
- To move a note up/down quicker, check Note Command
Additional features (available from version 3)
- You can change Start/End point of Slur with Item Mover.
- You can change the stem length of Note/Grace Note.

- When you select CM7, chord entry bar will appear.
- When you select a button, Chord Selector will appear.
- Create a chord symbol, then select OK.
- To Erase a chord symbol, select Eraser, then select a chord symbol.
Go to Score Settings to change:
- Font size
- Default Location of Chord Symbols
- Minimum Devision of Harmonic Rhythm

- Select a note to start writing lyrics from, then Lyrics Writing view will appear.
- Hit 'Return' to enter / update lyrics.
- Use

 to move entry location.
 - Select 'Line' to change line1 to line 10.
- To modify, select a note and line number of the syllable you want to modify.
- To erase, select Eraser, then select a syllable.
Go Score Settings to change Font size.

- Select text input location with horizontal + vertical lines, then Text Entry View will appear.
- To modify text already entered, select the text.
- To remove, select Eraser, then select a text.
Please use CC for explanation
(no audio commentary for multi-language support).
About Italic and All Tracks Options (from 3.6.0).
Contents Timetable
- 0:00 Introduction
- 0:09 Text Entry with 'Italic Font' option.
- 0:40 Text Entry with 'All Tracks' option.
- 1:02 Each text with 'All Tracks' option can be relocated individually.
- 1:50 All texts entered with 'All Tracks' option are erased together with Eraser.
Created with Galaxy S22 Ultra (Android Phone).
Appears little differently in iPhone and iPad.

- Select two notes to set the region to transpose. then set how you want the notes to move.
- This command has no way to clear / remove. Use Undo.

- Grace Note Entry is the same as Note Entry except you don't need to select the duration.
- Select the location with horizontal + vertical line.
- The shape of Grace Note will automaticall become to 16th-type when Multiple Grace Notes are enterd.

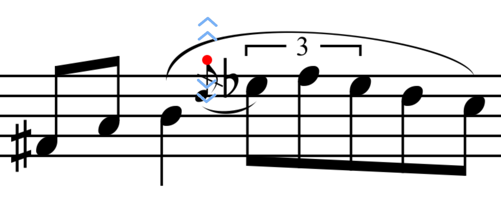
- Select first and the last notes to set the region, then select 'Apply'
- To Clear, do the same and select 'Clear'

- Select the first and the last notes to set the region.
- Can't including any rests in the group.
- To Remove it, select Eraser, then select the space between the notes.
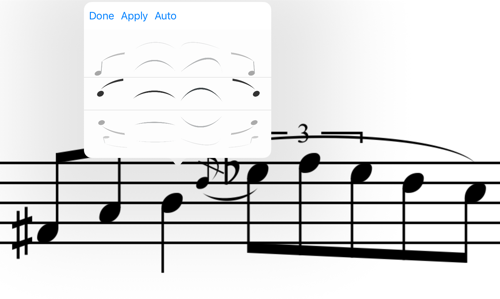
Adjusting Slur Location and Shape
- You can change Start/End point of Slur with Item Mover.
- You can change the Shape of Slur
(To show Slur Shape Box, with Slur Tool, select the first or last note of the slur group.)


Dynamics Marks
- Select a type, then select a note.
- To remove, select Eraser, then select a mark.
Dynamics Arrows
- Set start and end locations with horizontal+vertical lines.
- To remove, select Eraser, then select a mark.


- Select a type, then select a note.
- To remove, select Eraser, then select a mark.


- Select a type, then select the first and the last notes to set the region.
- To remove, select Eraser, then select a mark.


- Select a type, then select a note.
- To Erase it, Select Eraser then select a tempo mark.
- Select the first and the last bar to set the region.
- In EditorView, Multi Bar Rest doesn't appear but is shown as the indication (ex. 4/15).
- In PageView, Multi Bar Rest will appear only when you show the single track.
(In other words, Multi Bar Rest won't appear if you have more than two tracks.) - There is no way to remove Multi Bar Rest directly,
but it will be automatically removed when any modification is made on any member of the group.

- To hide a rest, select a rest with blue X mark.
- Hidden rest won't appear in PageView, but appear in blue color in EditorView.
- To set a hidden rest back to visible, use this tool and select it.
- This tool is intended to be used along with Multi-Voice Writing (Click for more details).


- Select a type, then select a note.
- To Erase it, Select Eraser then select a mark.


- Select a type, then select an empty space on staff.
- To Erase it, Select Eraser then select a mark.


- Select a notehead style, then select a note head.
- No way to remove. Apply Normal Head Style to set back to normal.
This is not for Percussion Notation
To write Percussion/Drums,
- Go to Track Settings
- Set Percussion Notation ON
- Select a type, then select staffs of the first and the last tracks to set the region
- To remove, select Eraser, then select a Brace/Bracket.
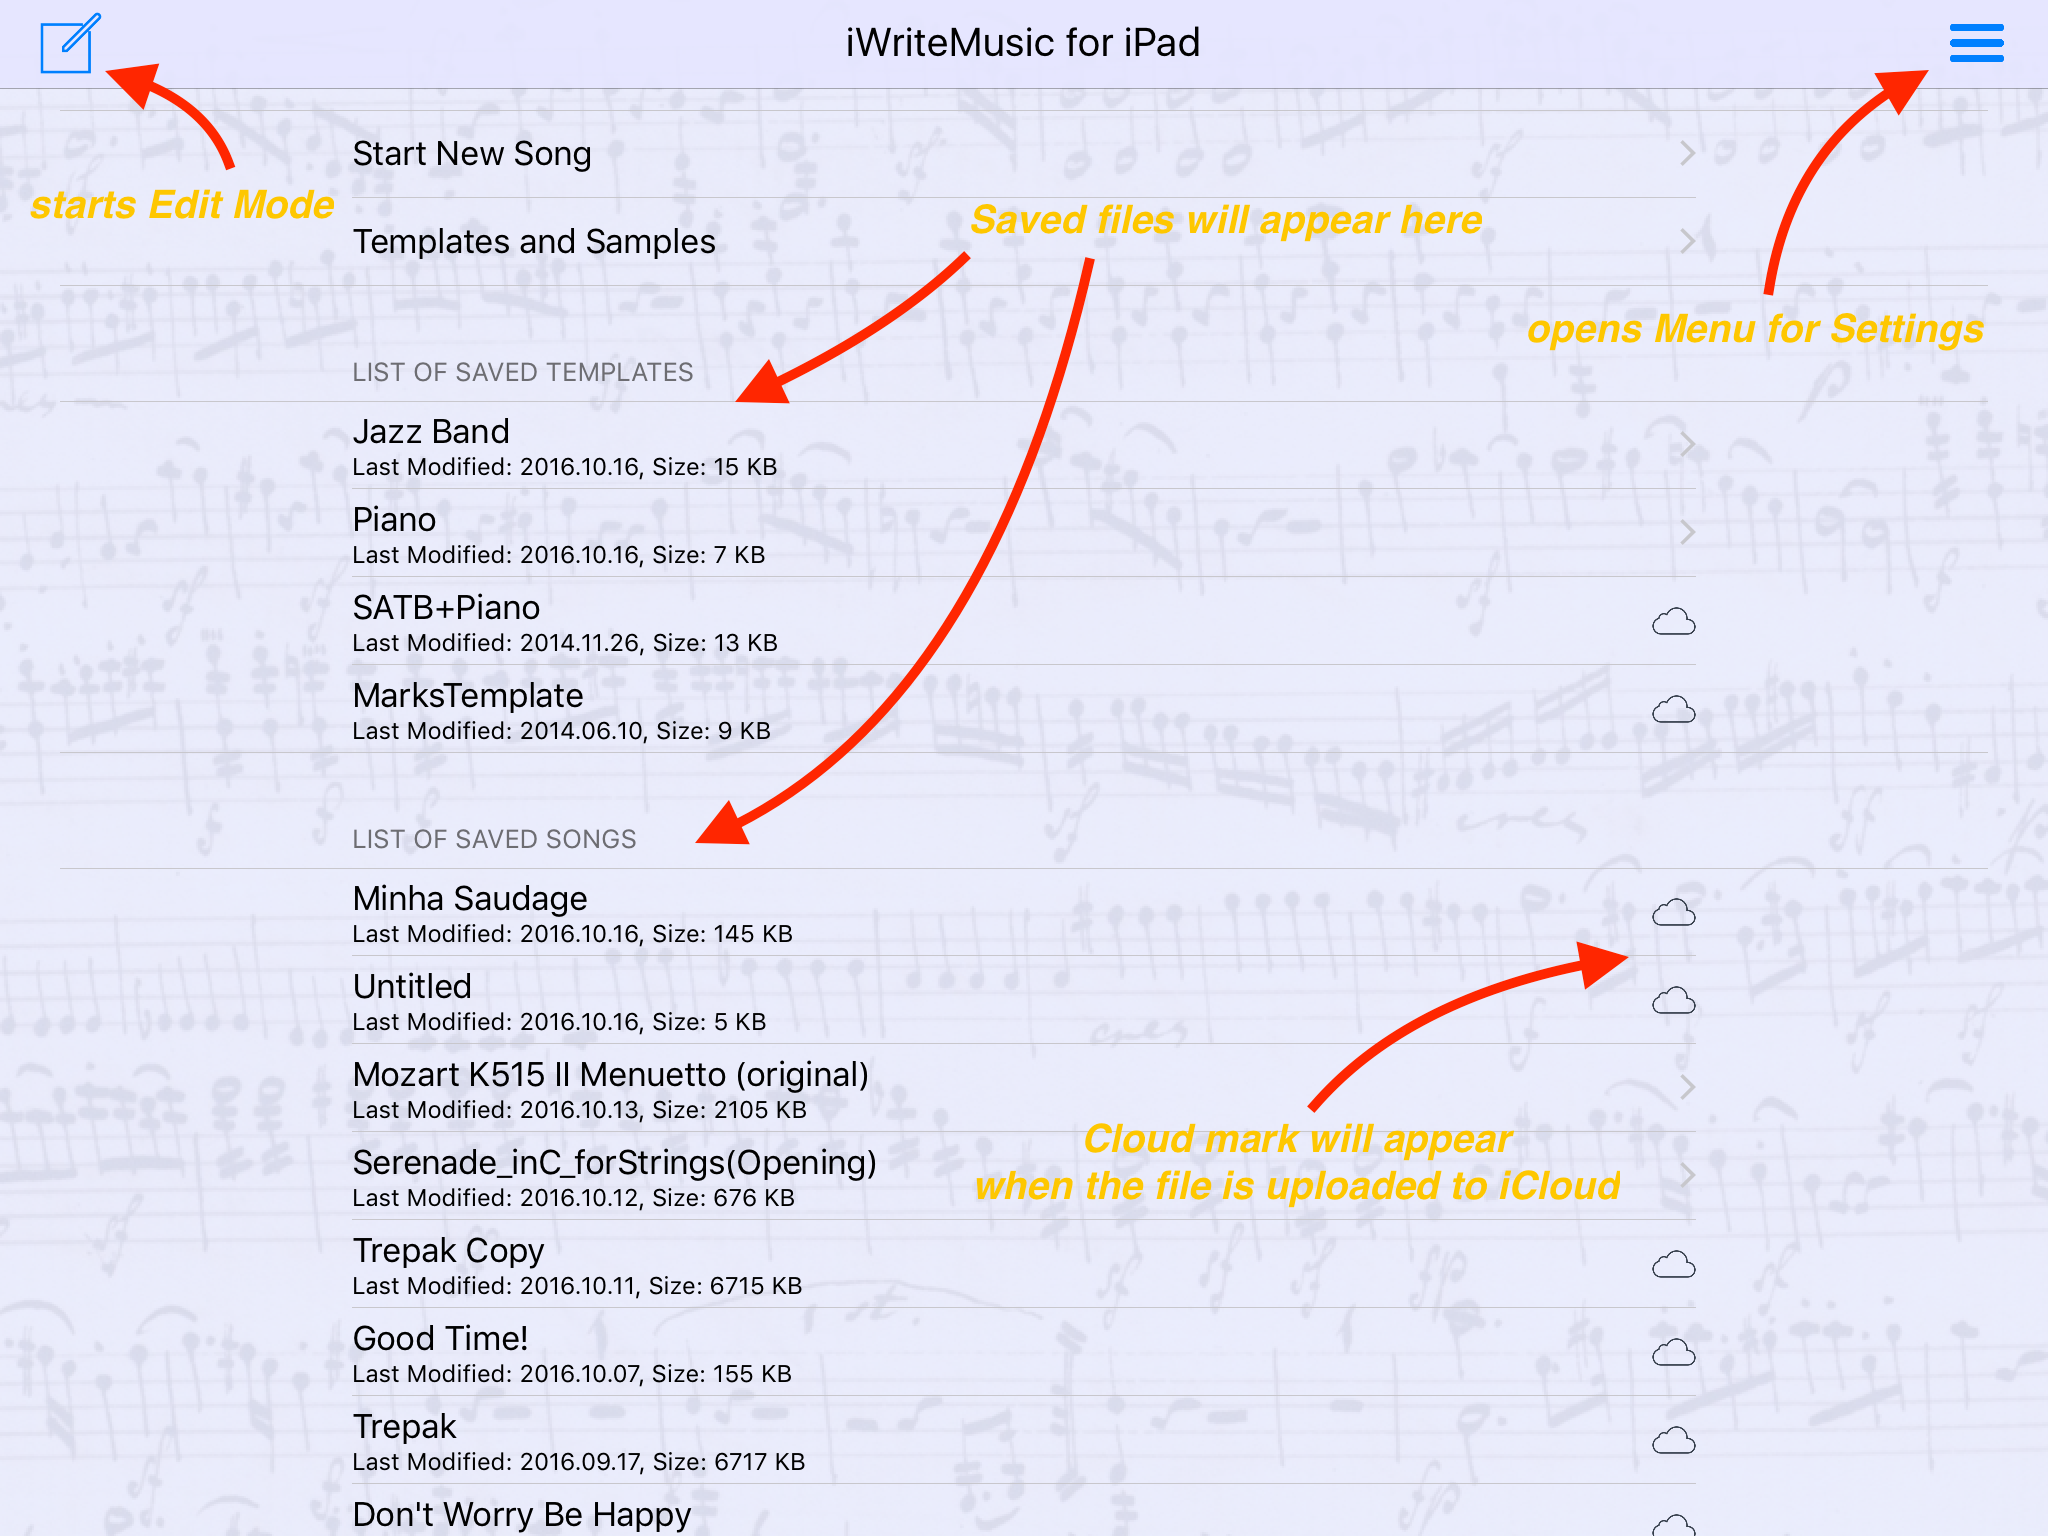
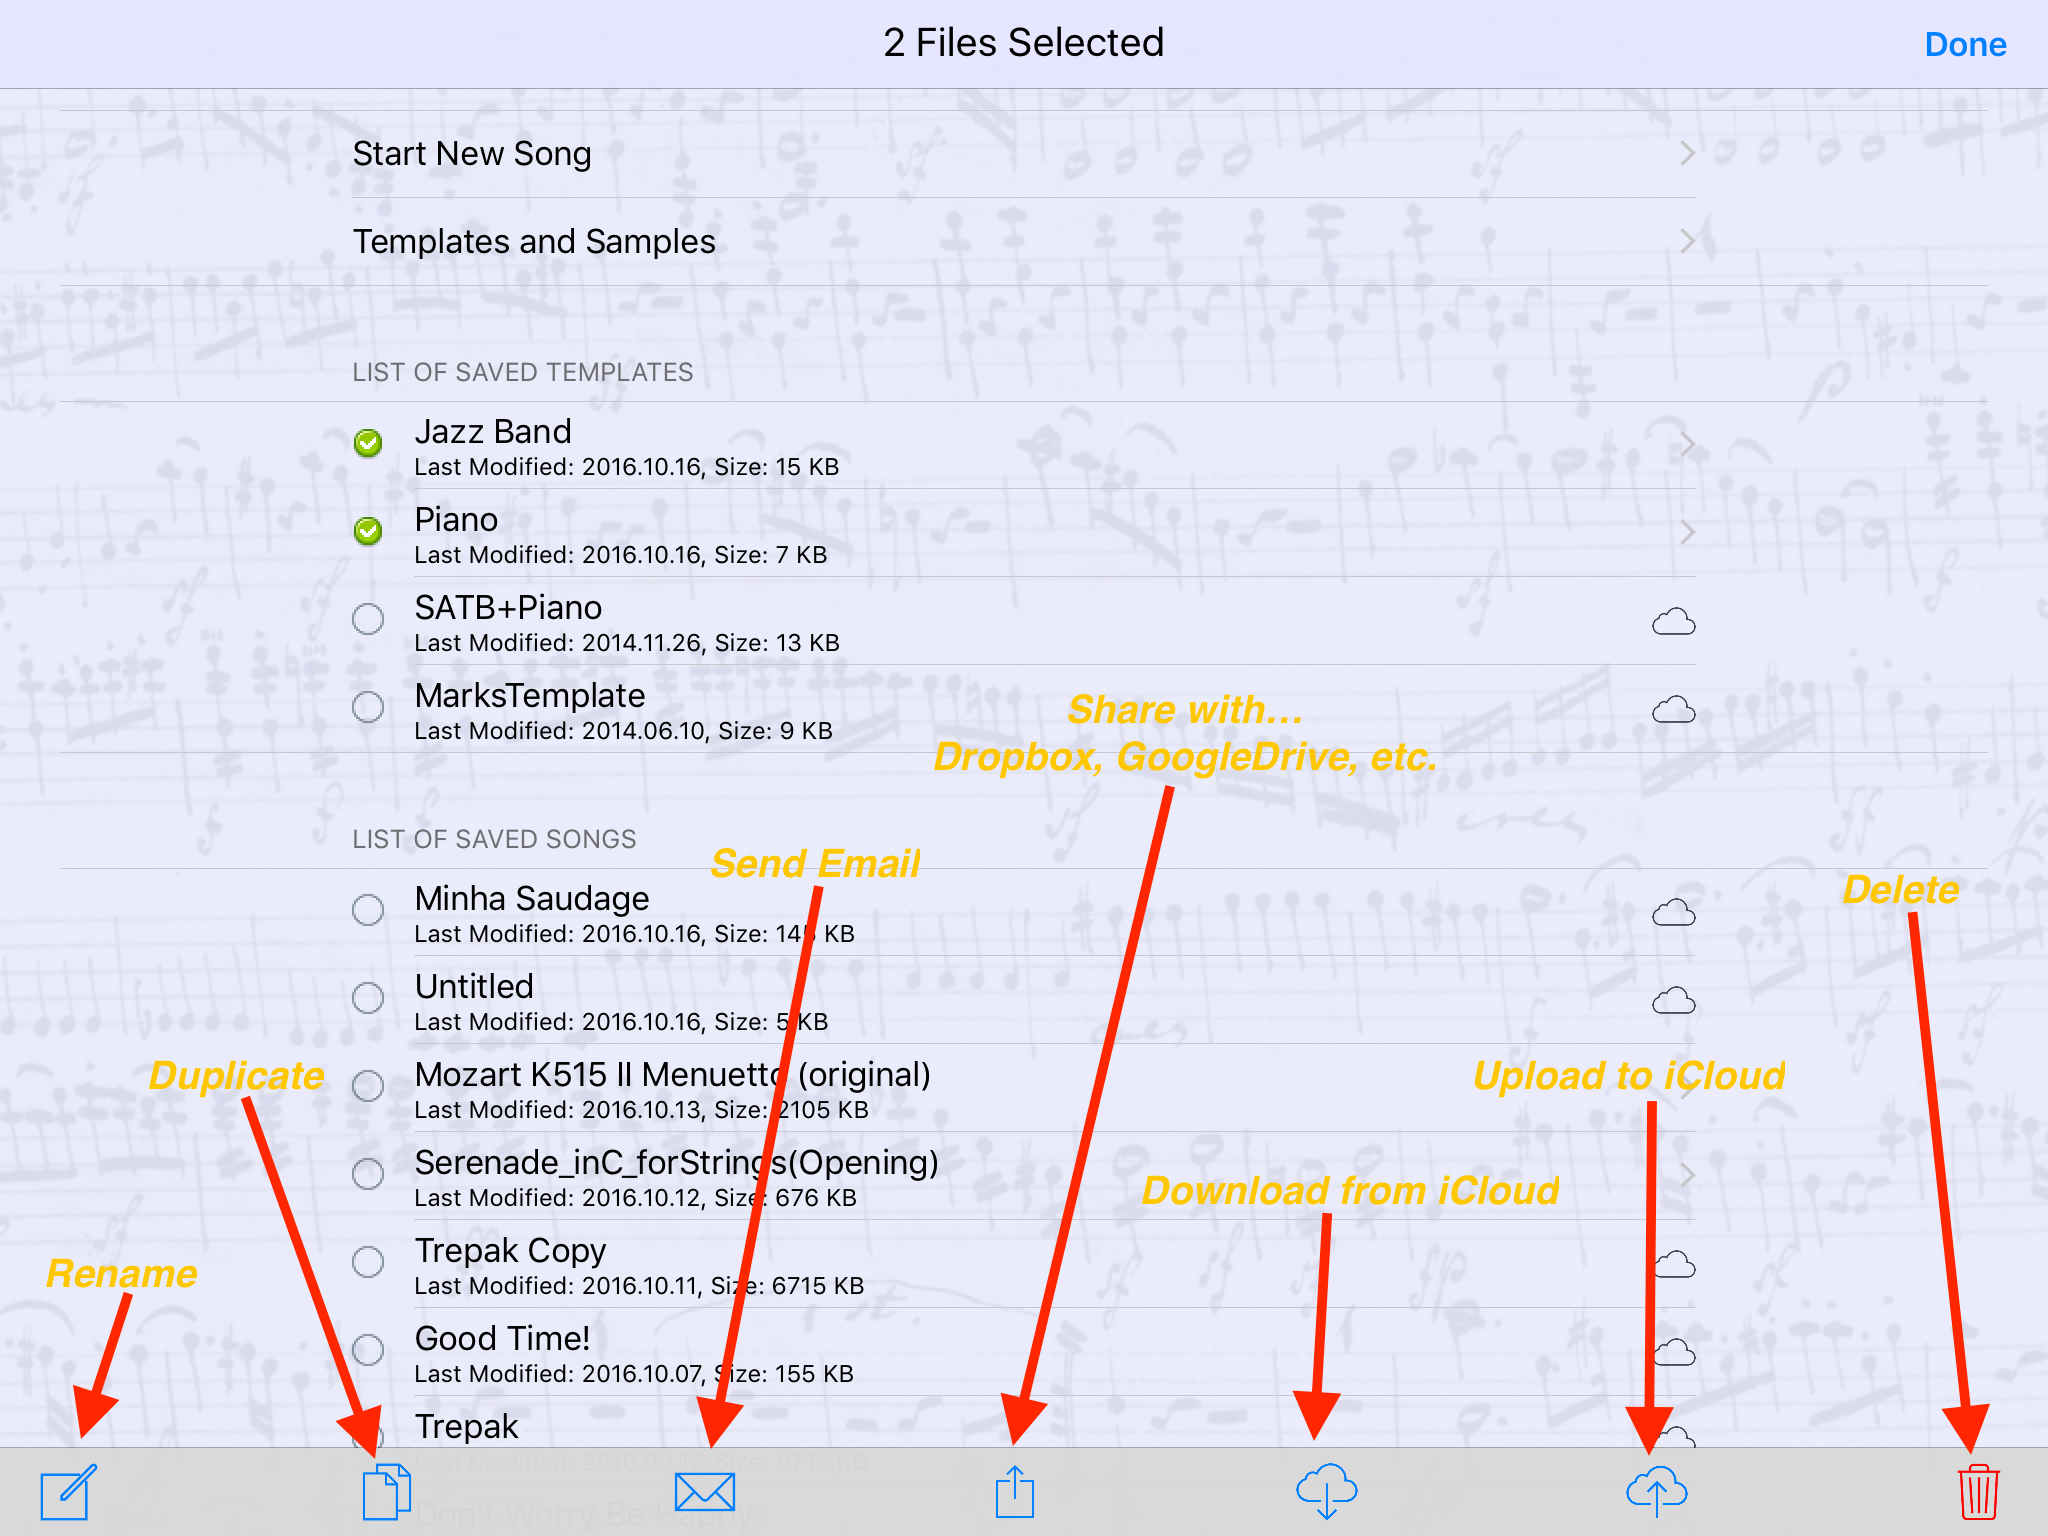
File List View
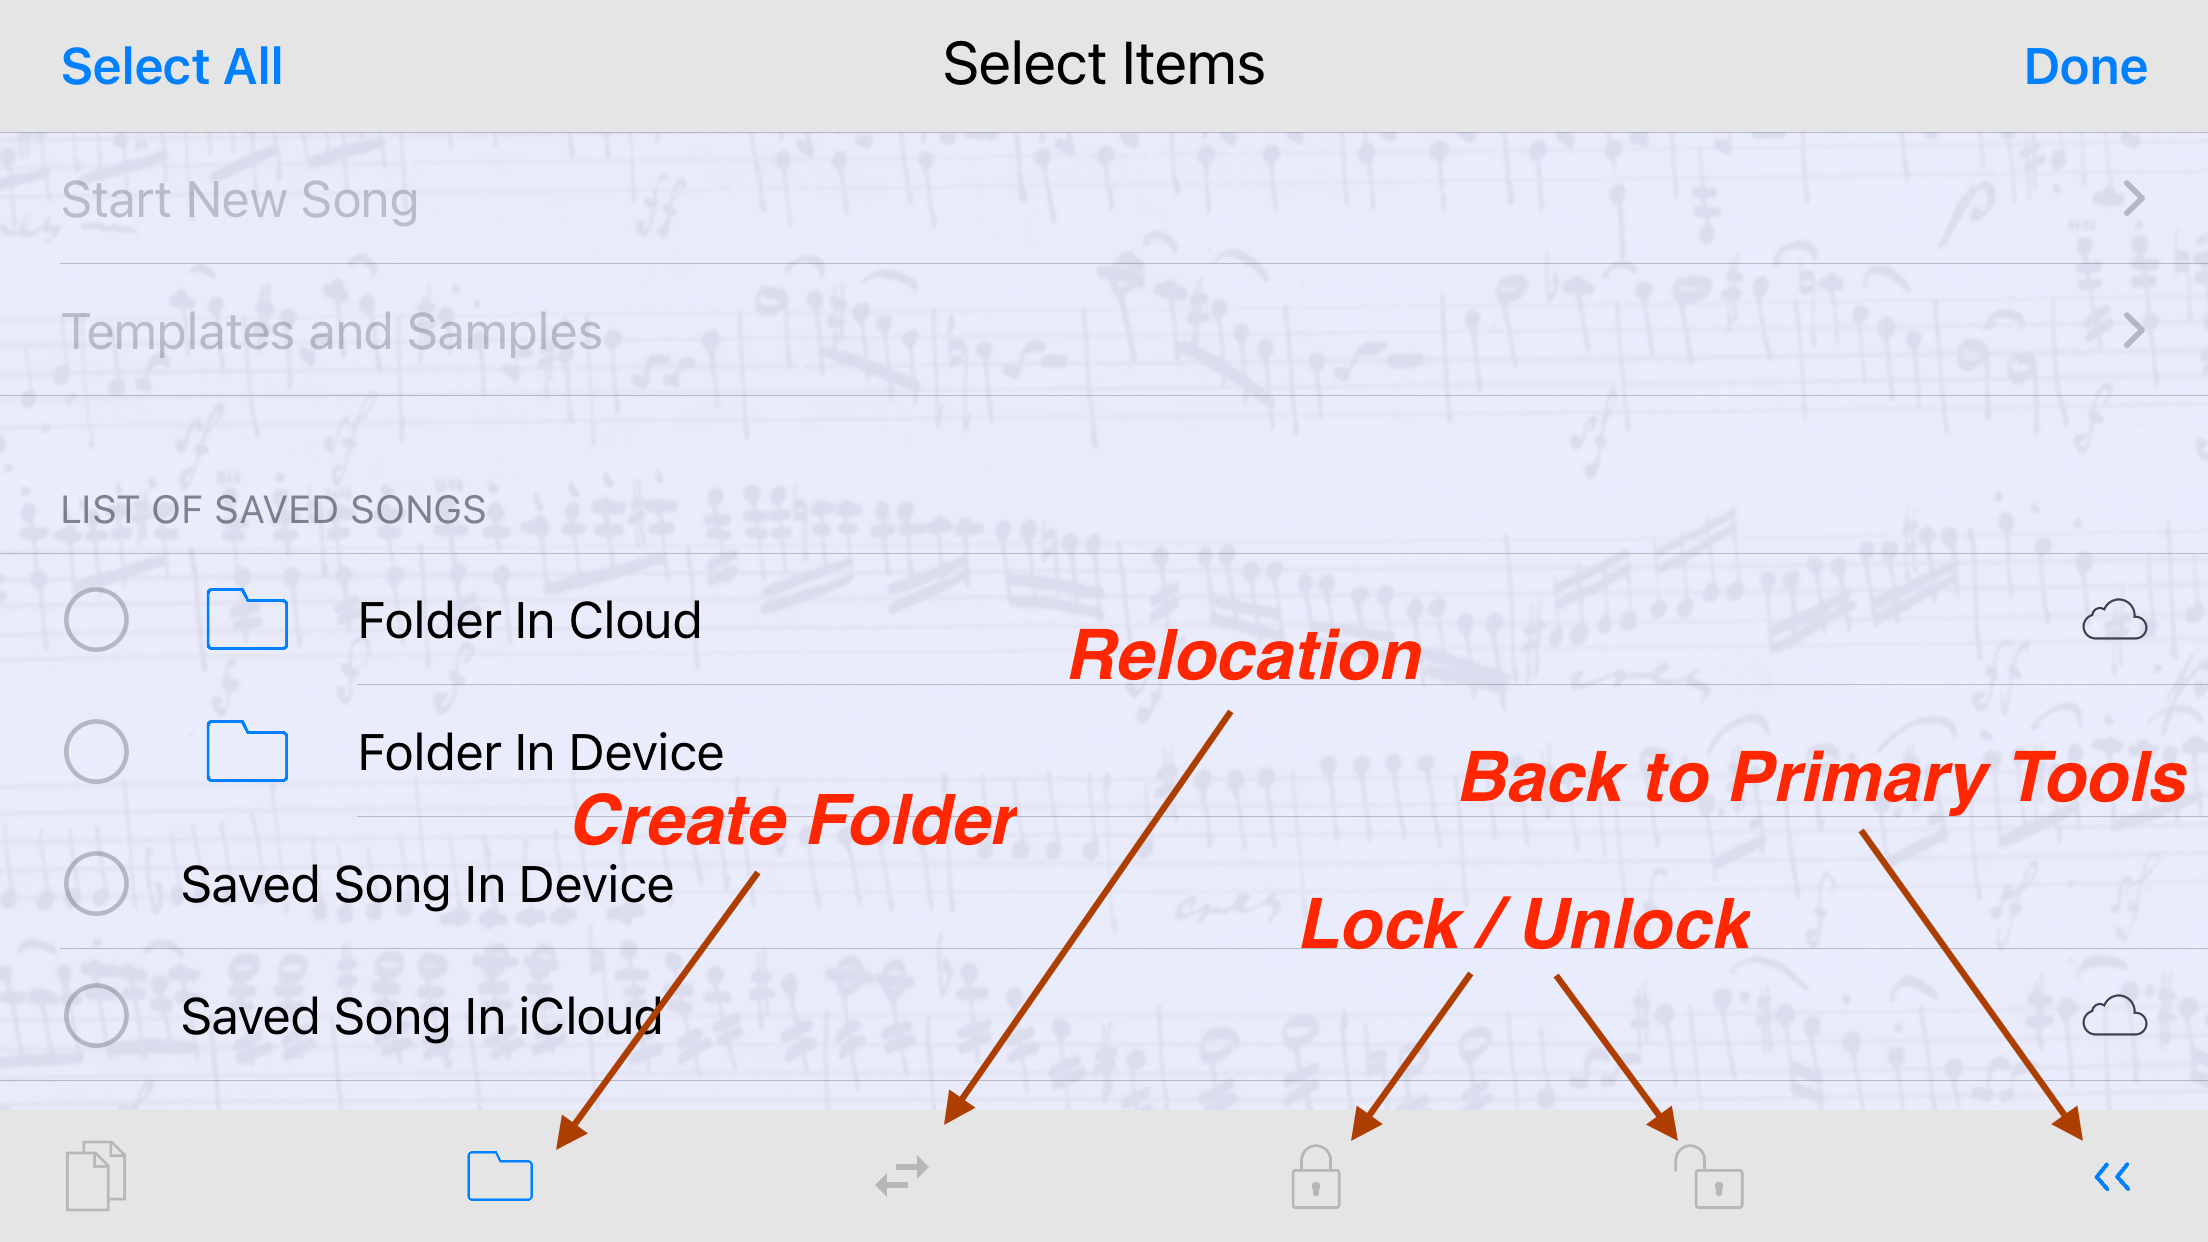
- AFM is Not Available on SE (Free version) as it doesn't support In-App Purchases.
- Non-AFM devices can can access to folders and the contents created and iCloud-shared by AFM devices (can not change them with AFM).
- Tool Layout is different on Android devices as it doesn't support iCloud.
Page View
This video will explain about:
- Parts are automatically generated.
- Layout settings are INDEPENDENT on score & each part
- How to change visible tracks on EditorView & PageView
- How to create a custom part
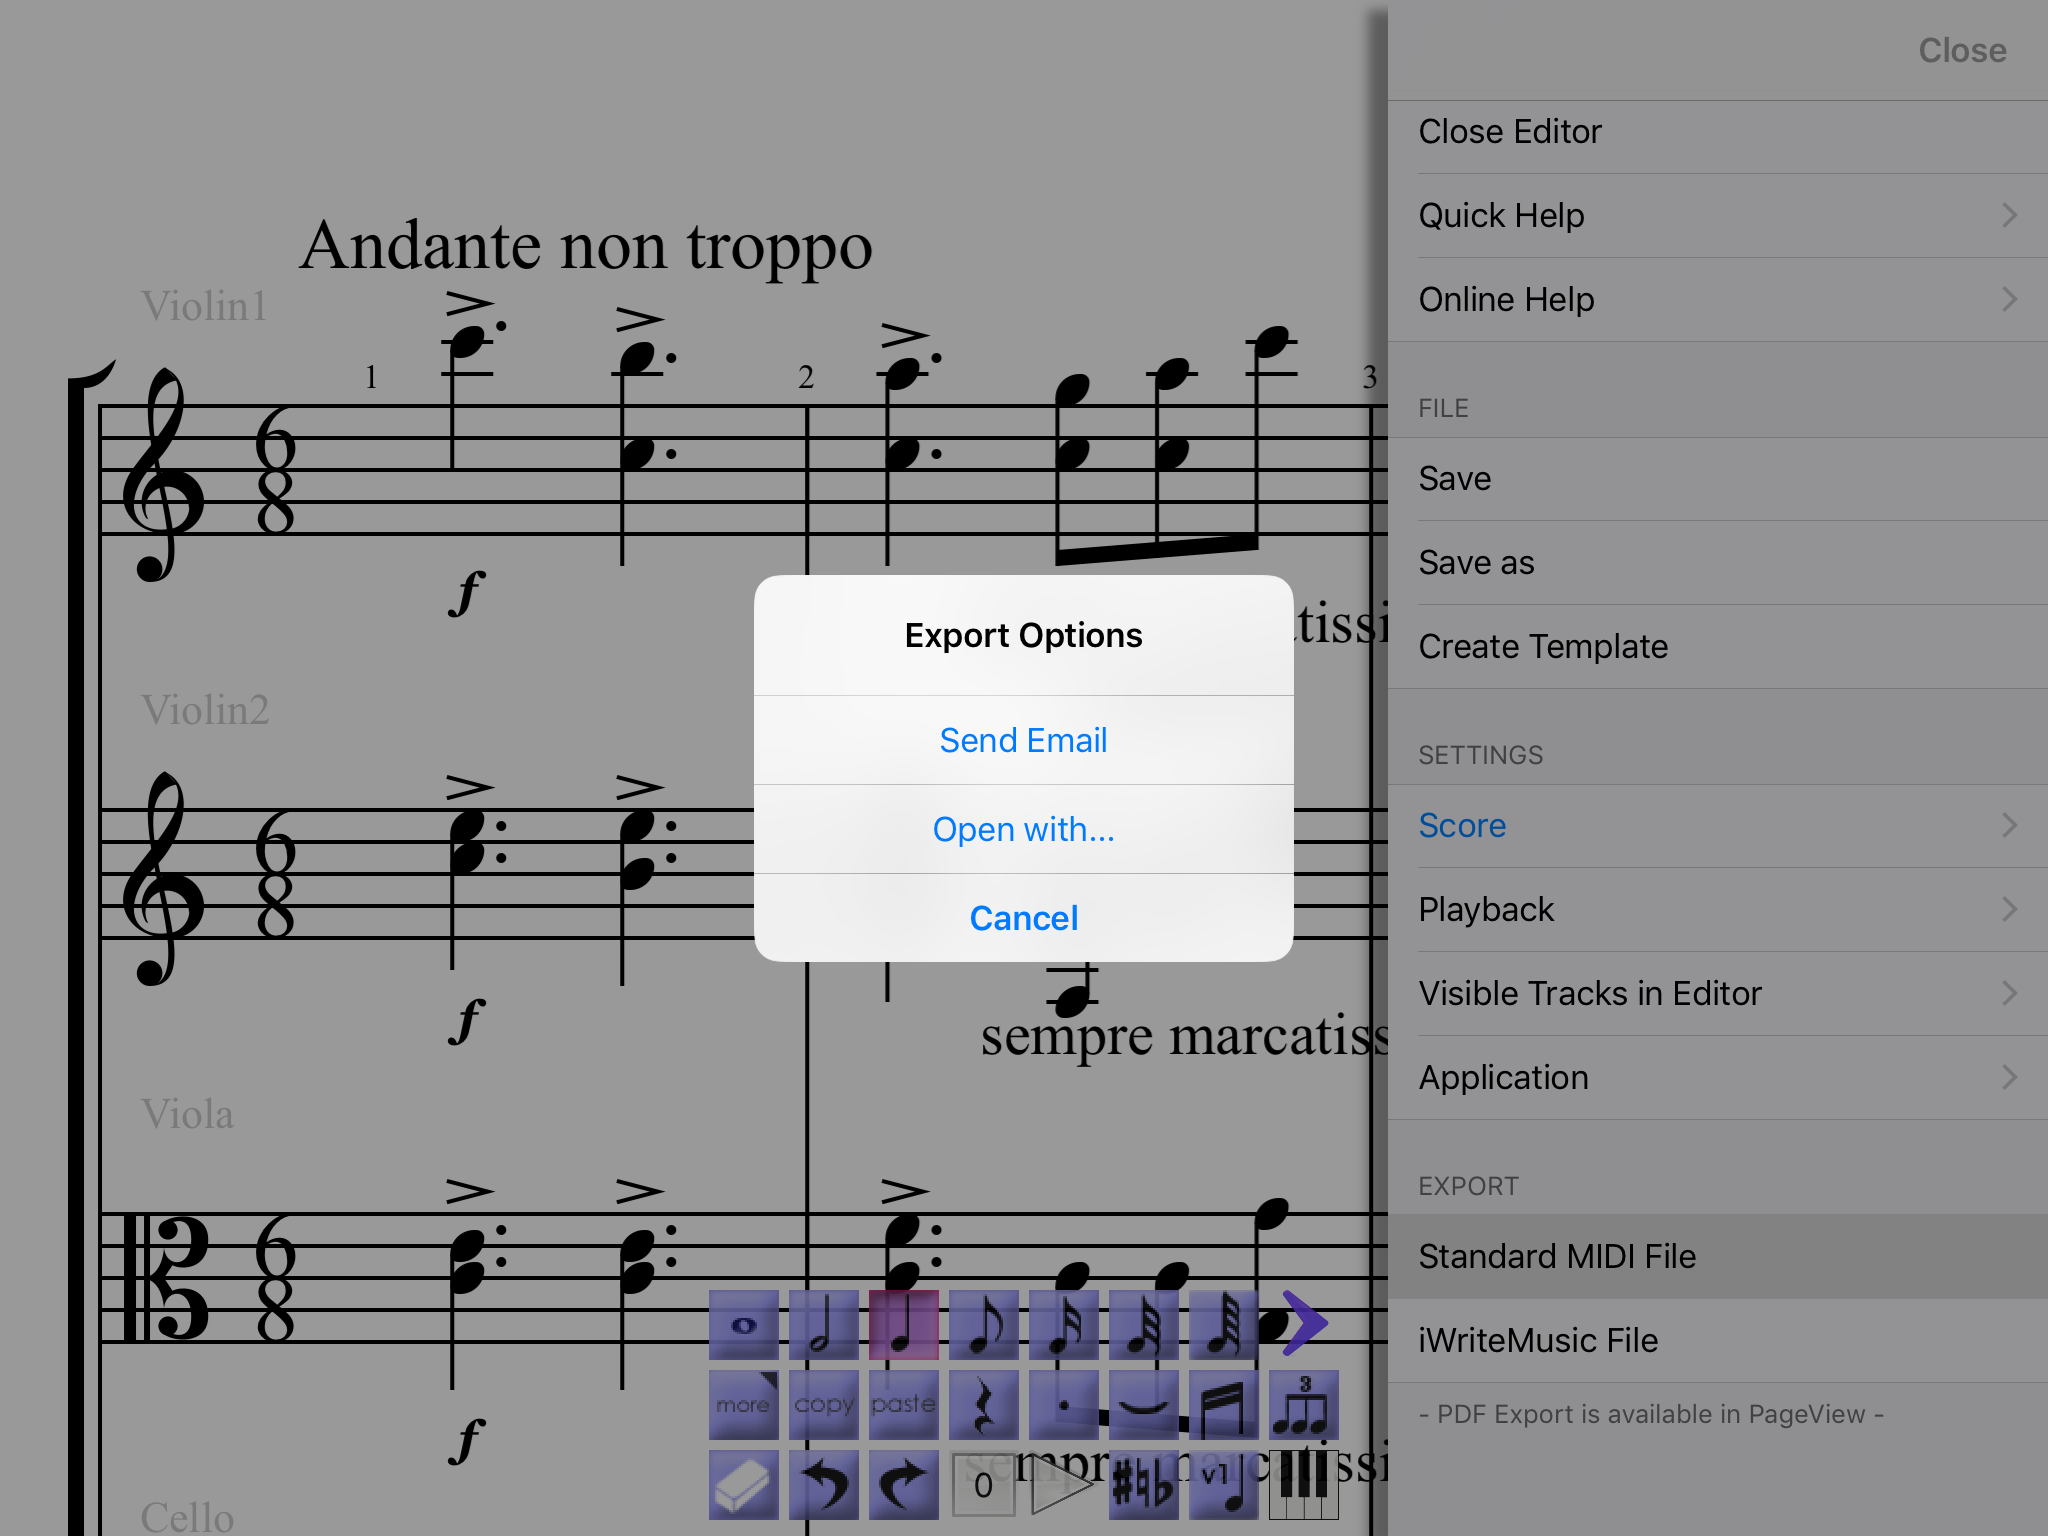
Export to GarageBand to create Audio File
- Select Standard MIDI file in Export section, then select Open with...
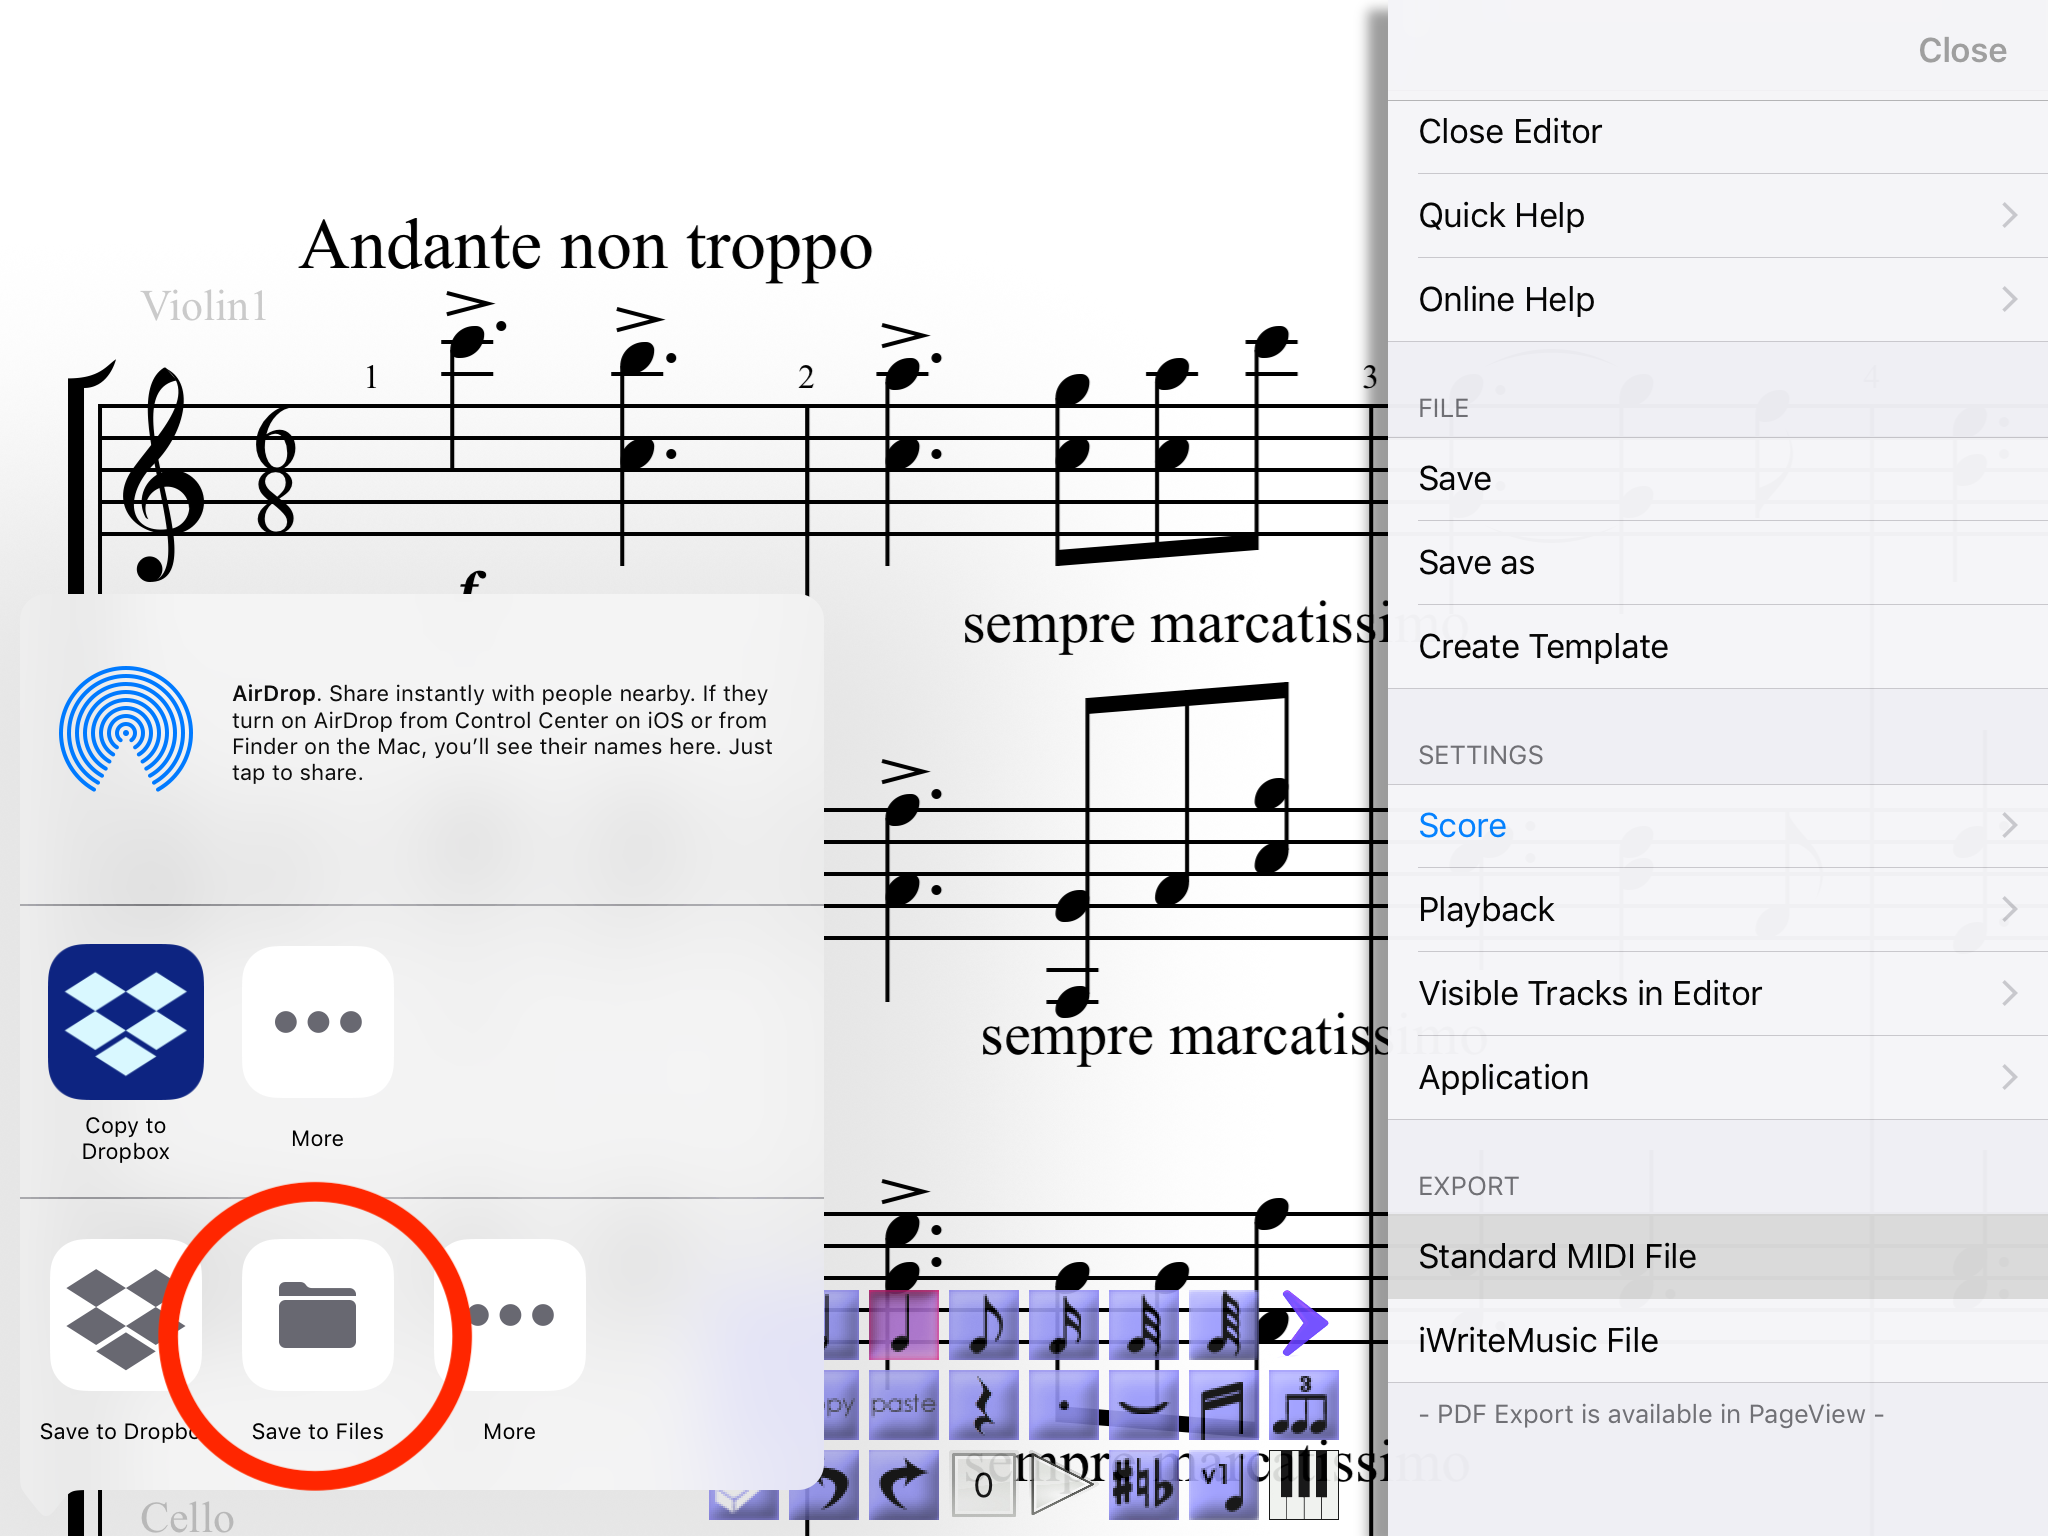
- Select Save to Files.
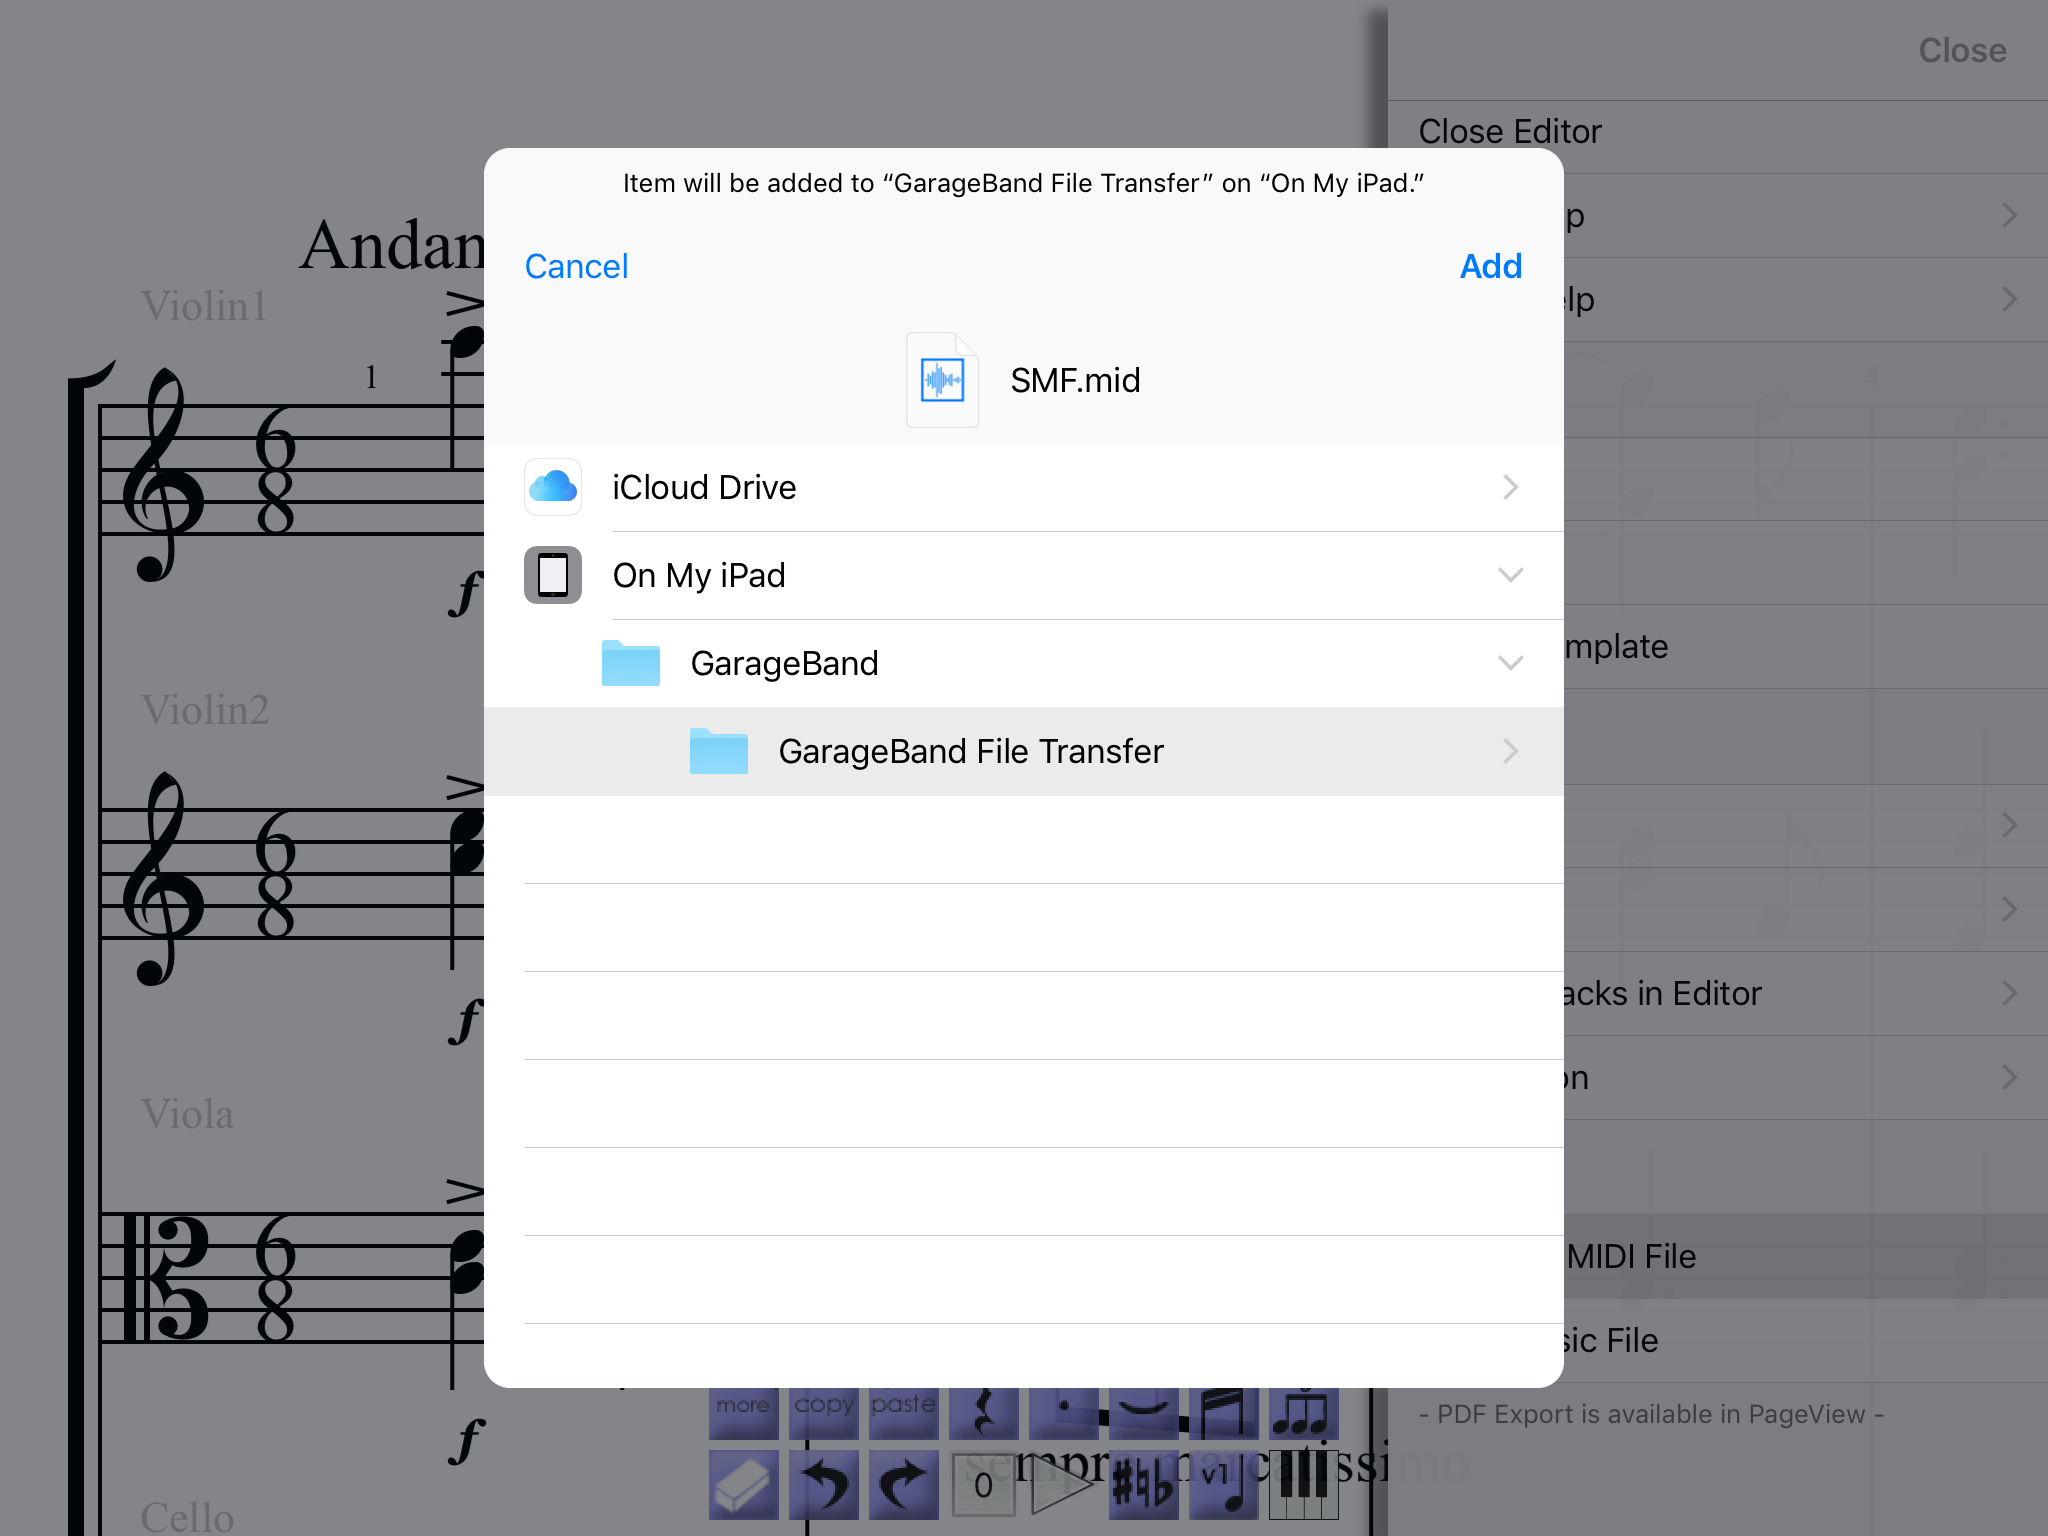
- Open My iPad/iPhone, select "GarageBand File Transfer" then select "Add".
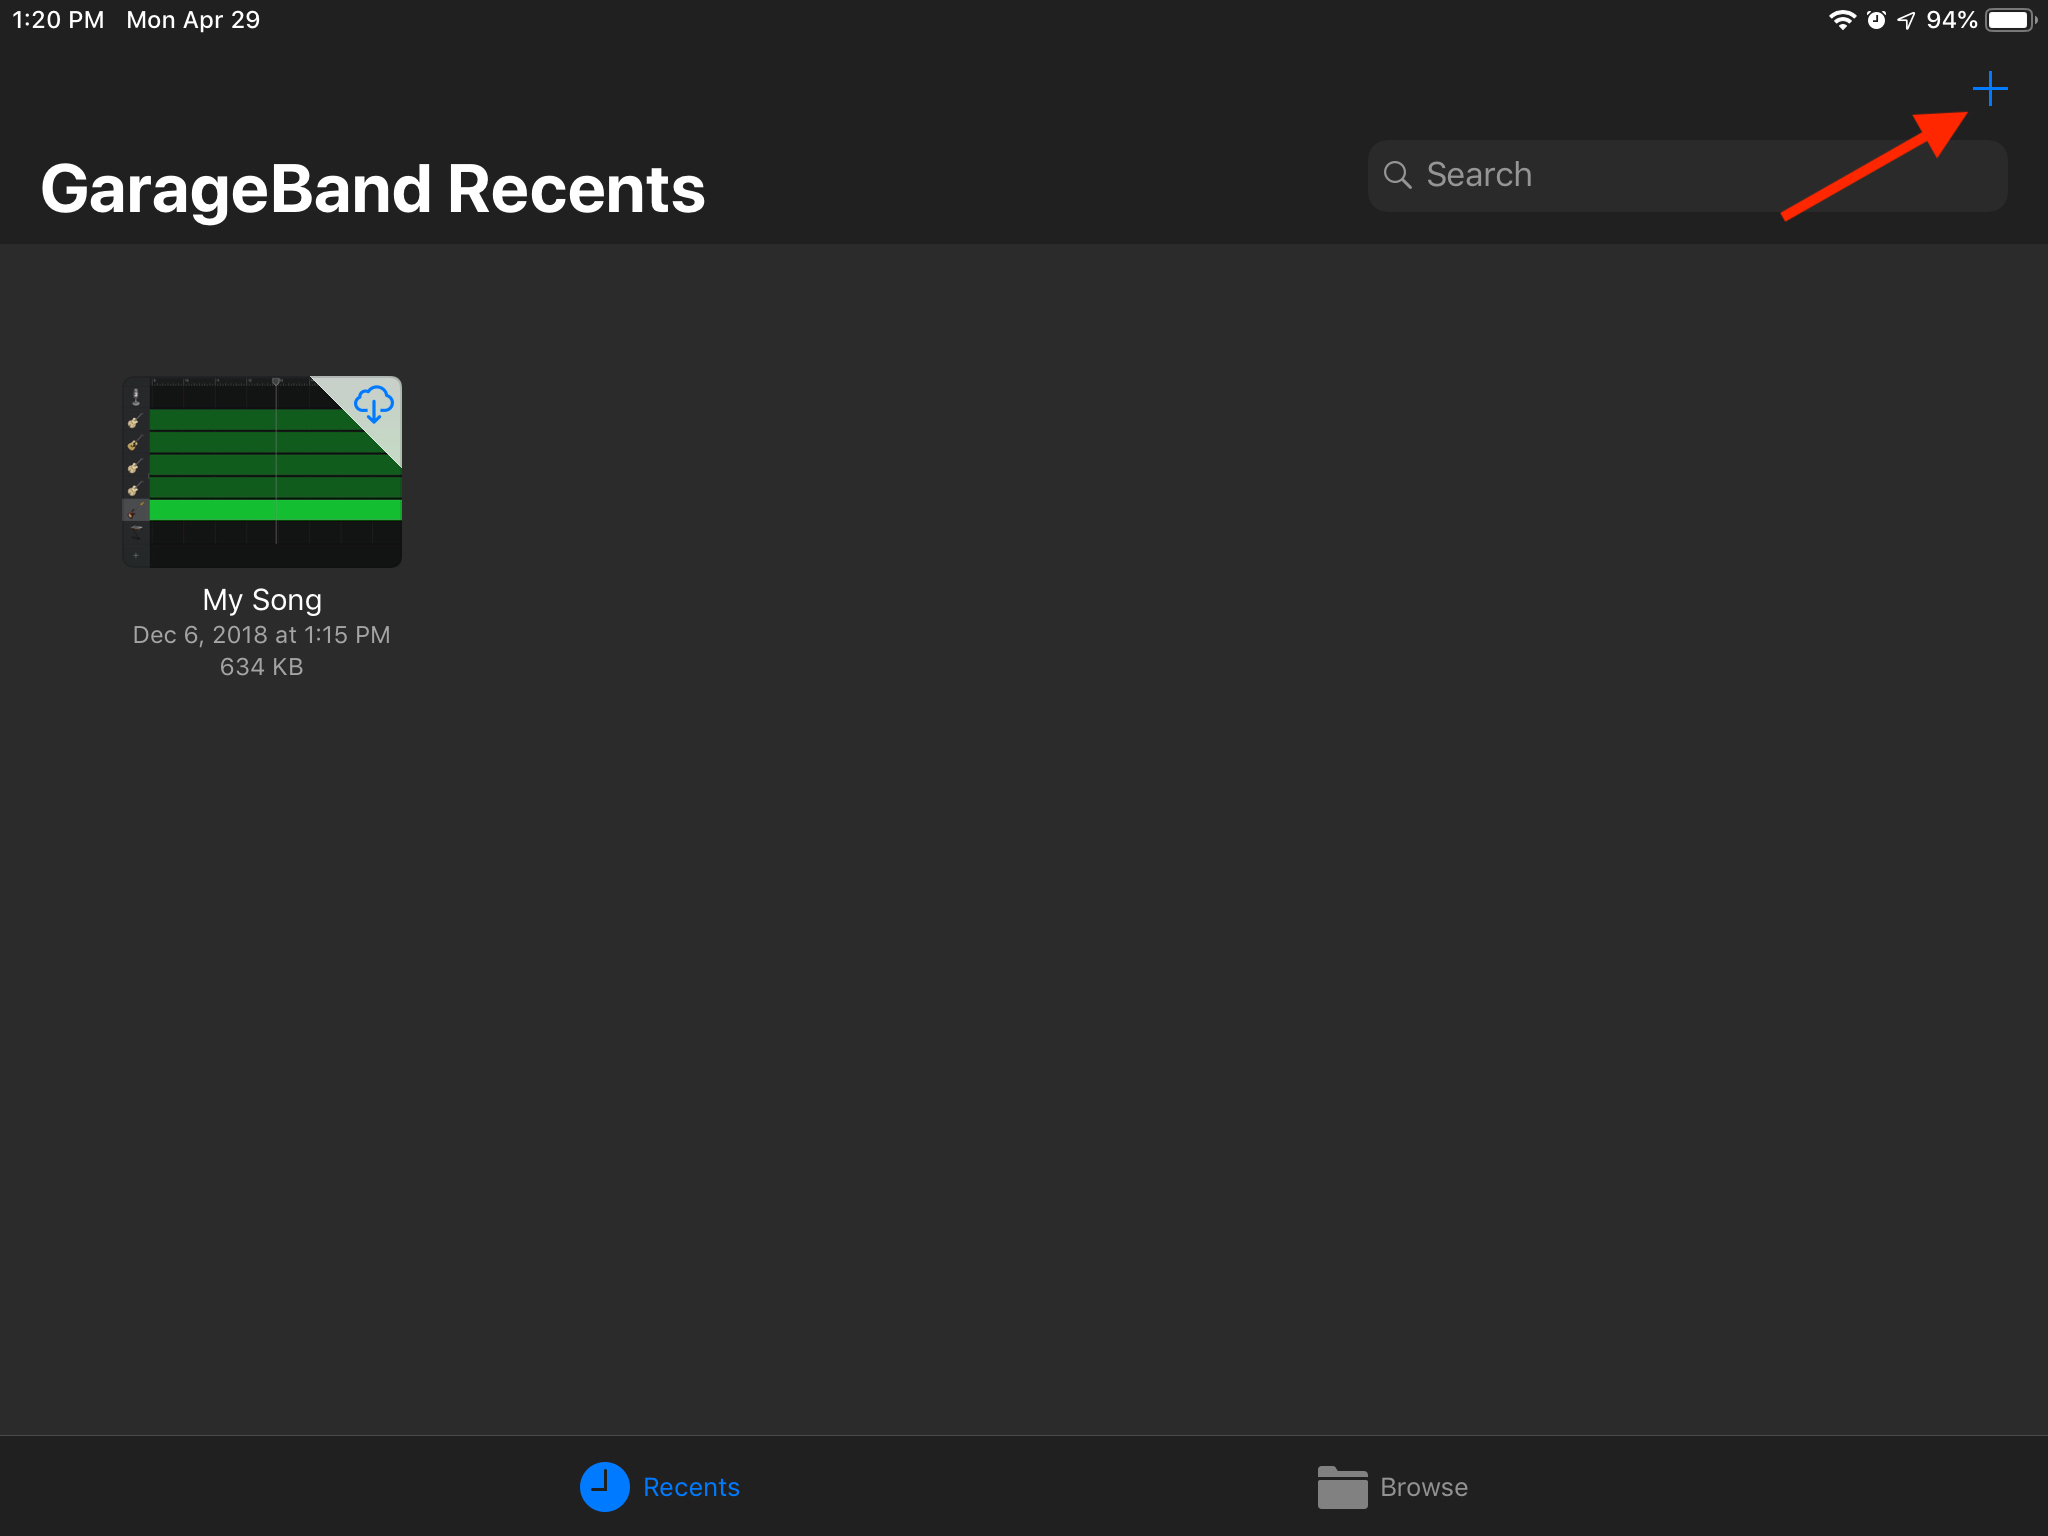
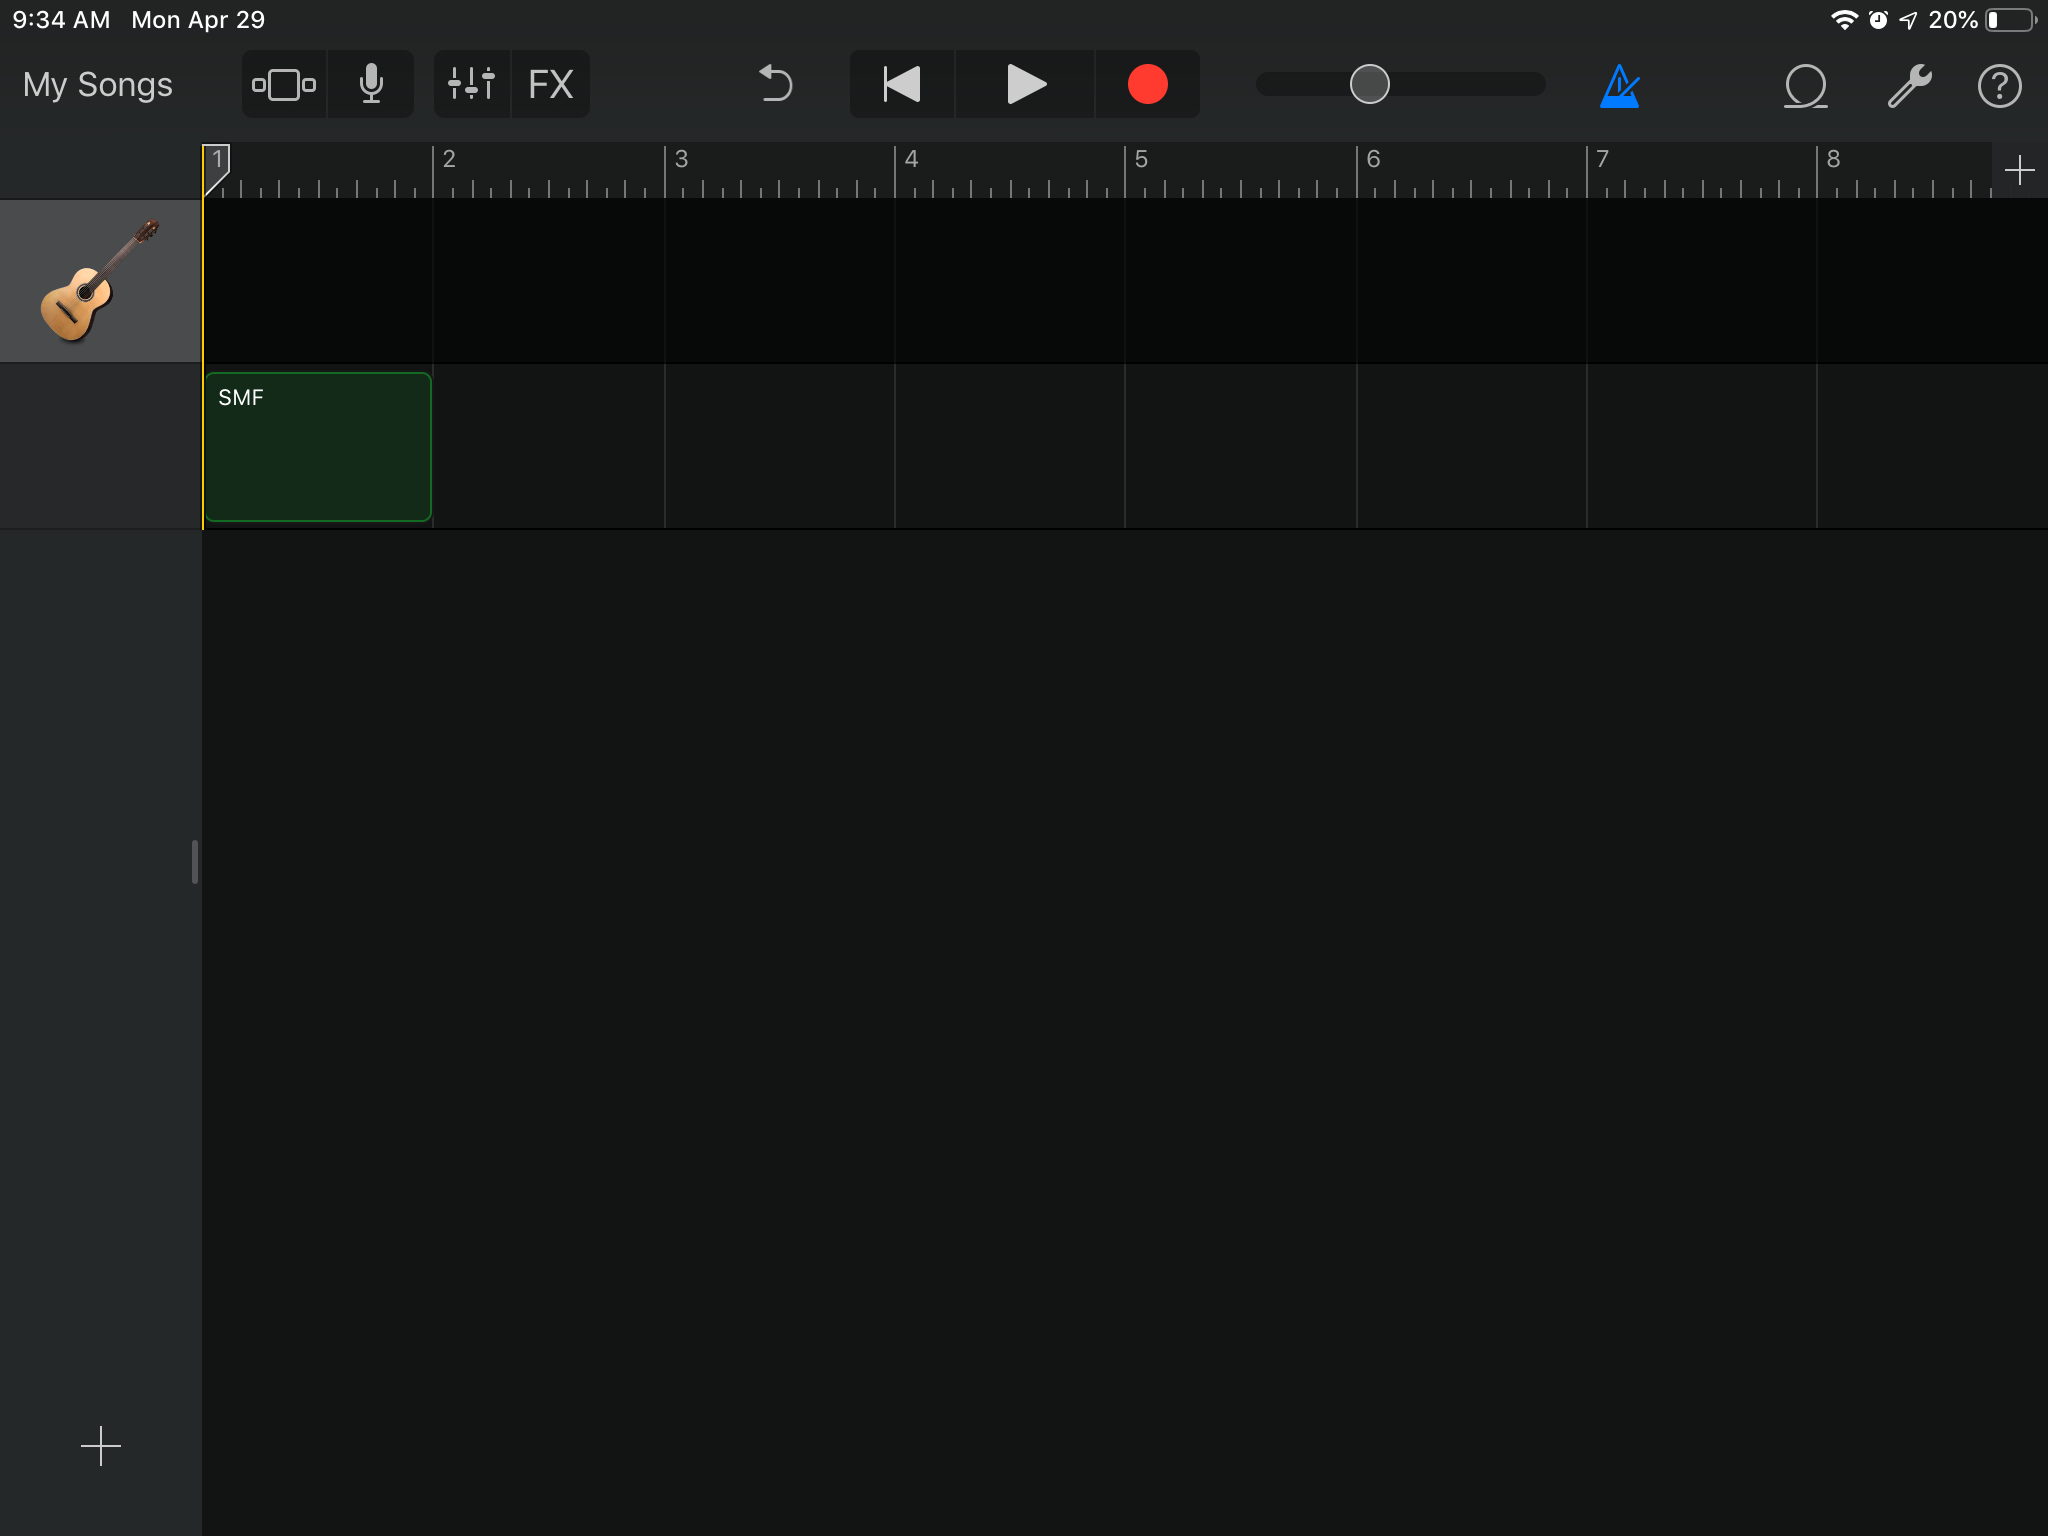
- Open GarageBand, select + at top right to create a New Song.
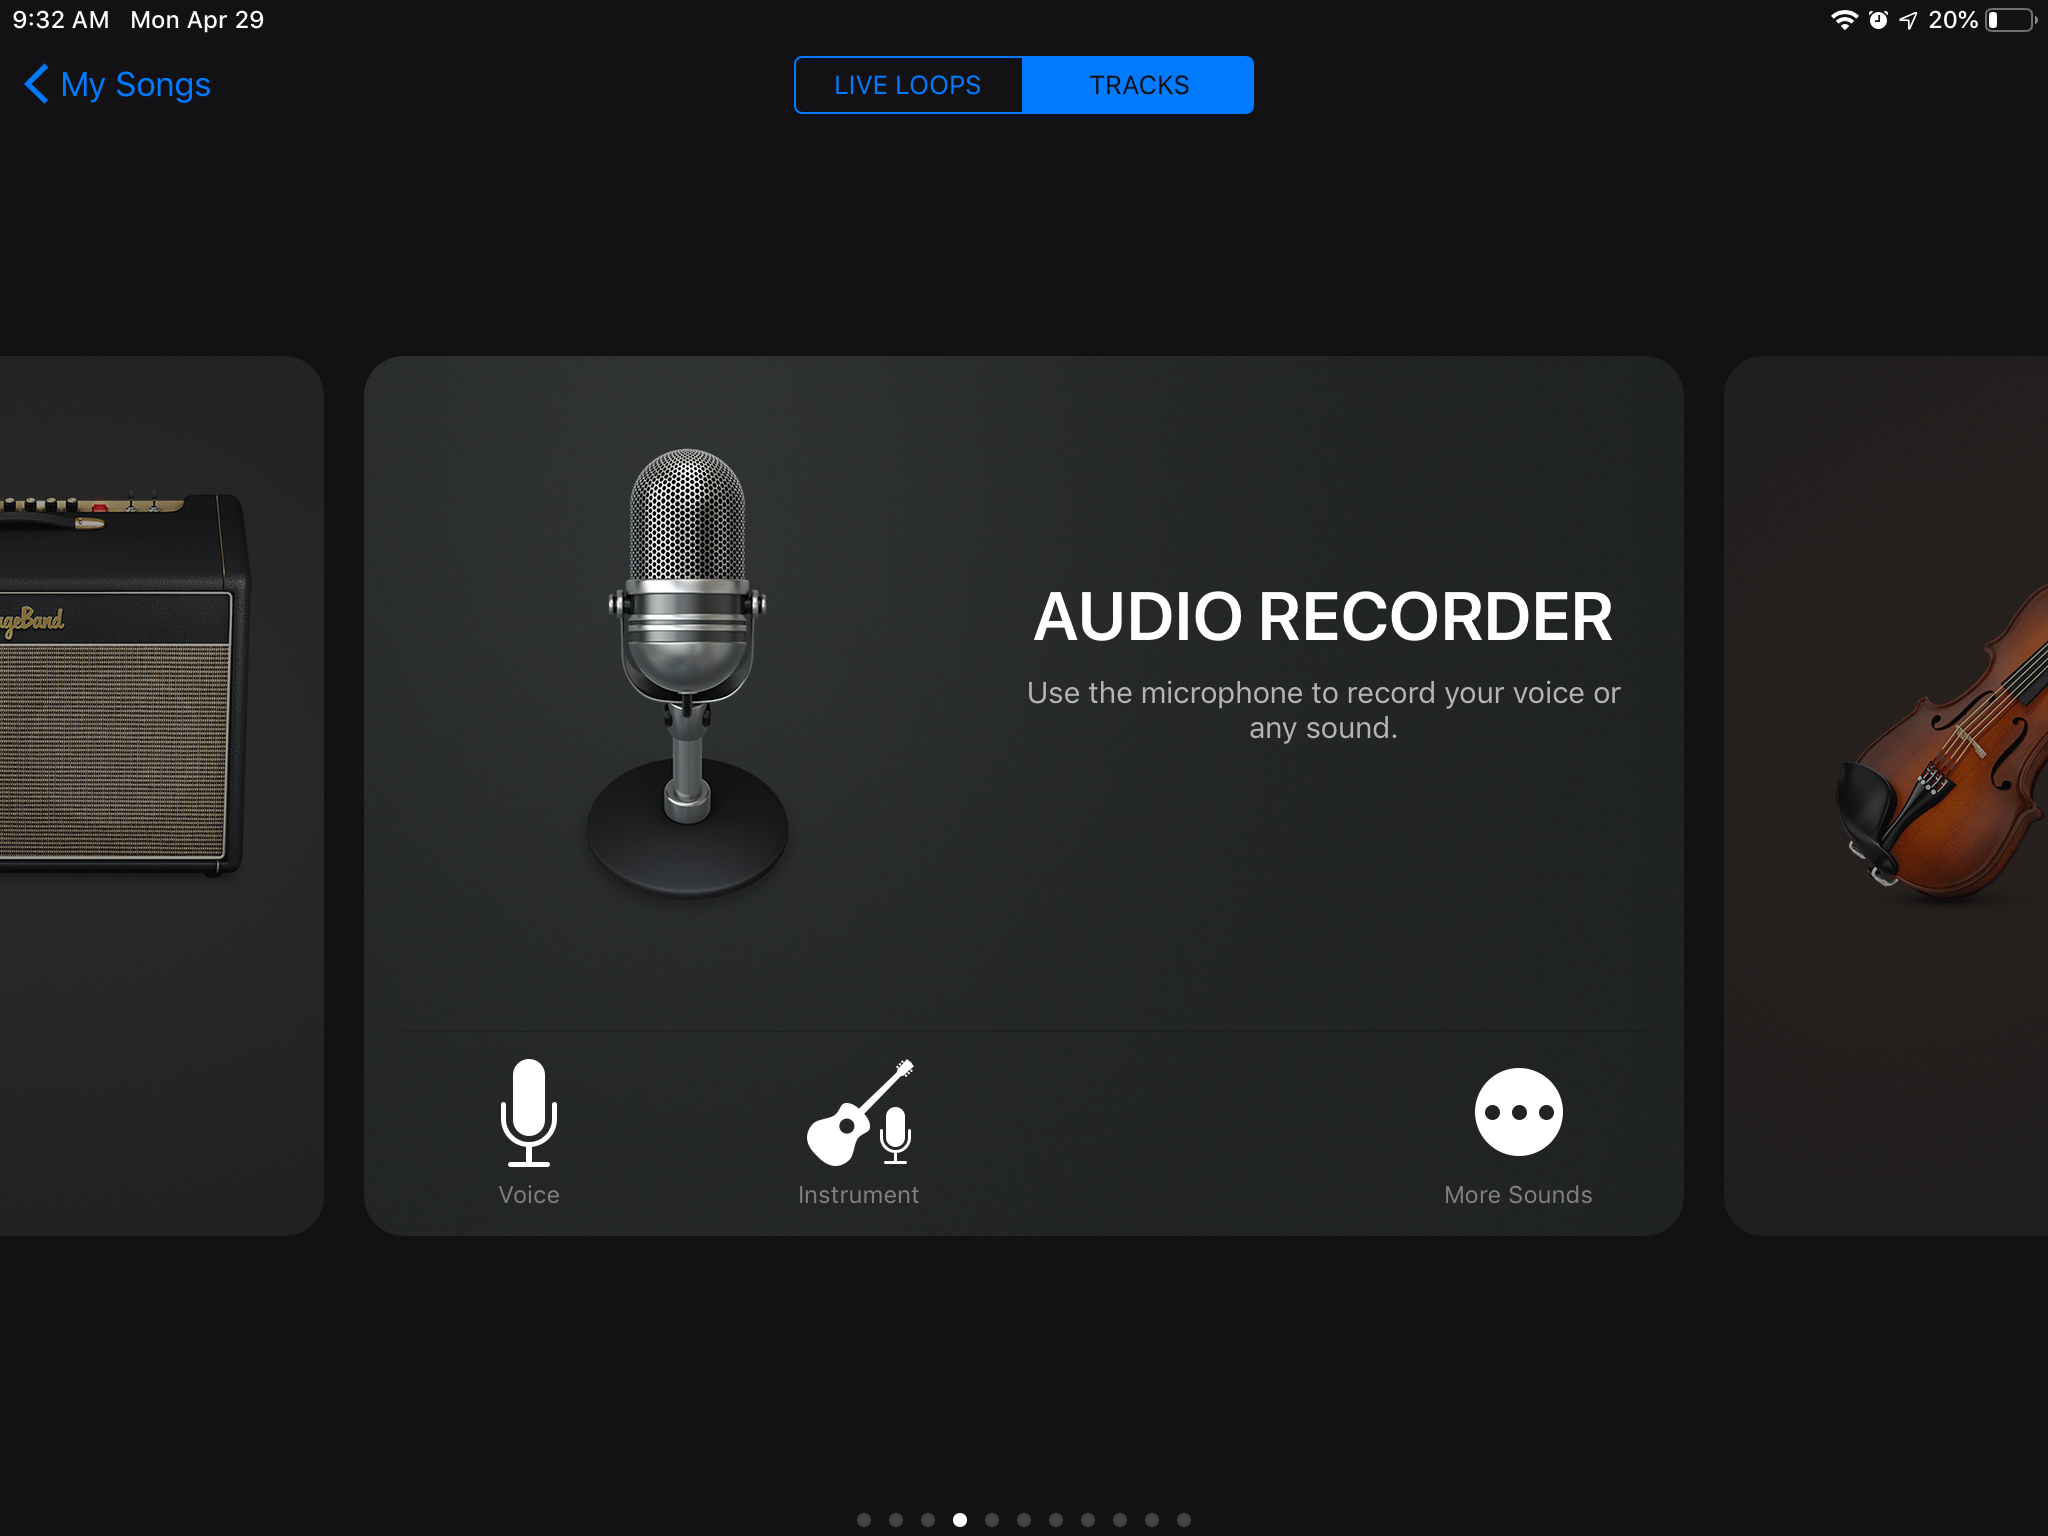
- Select Audio Recorder.
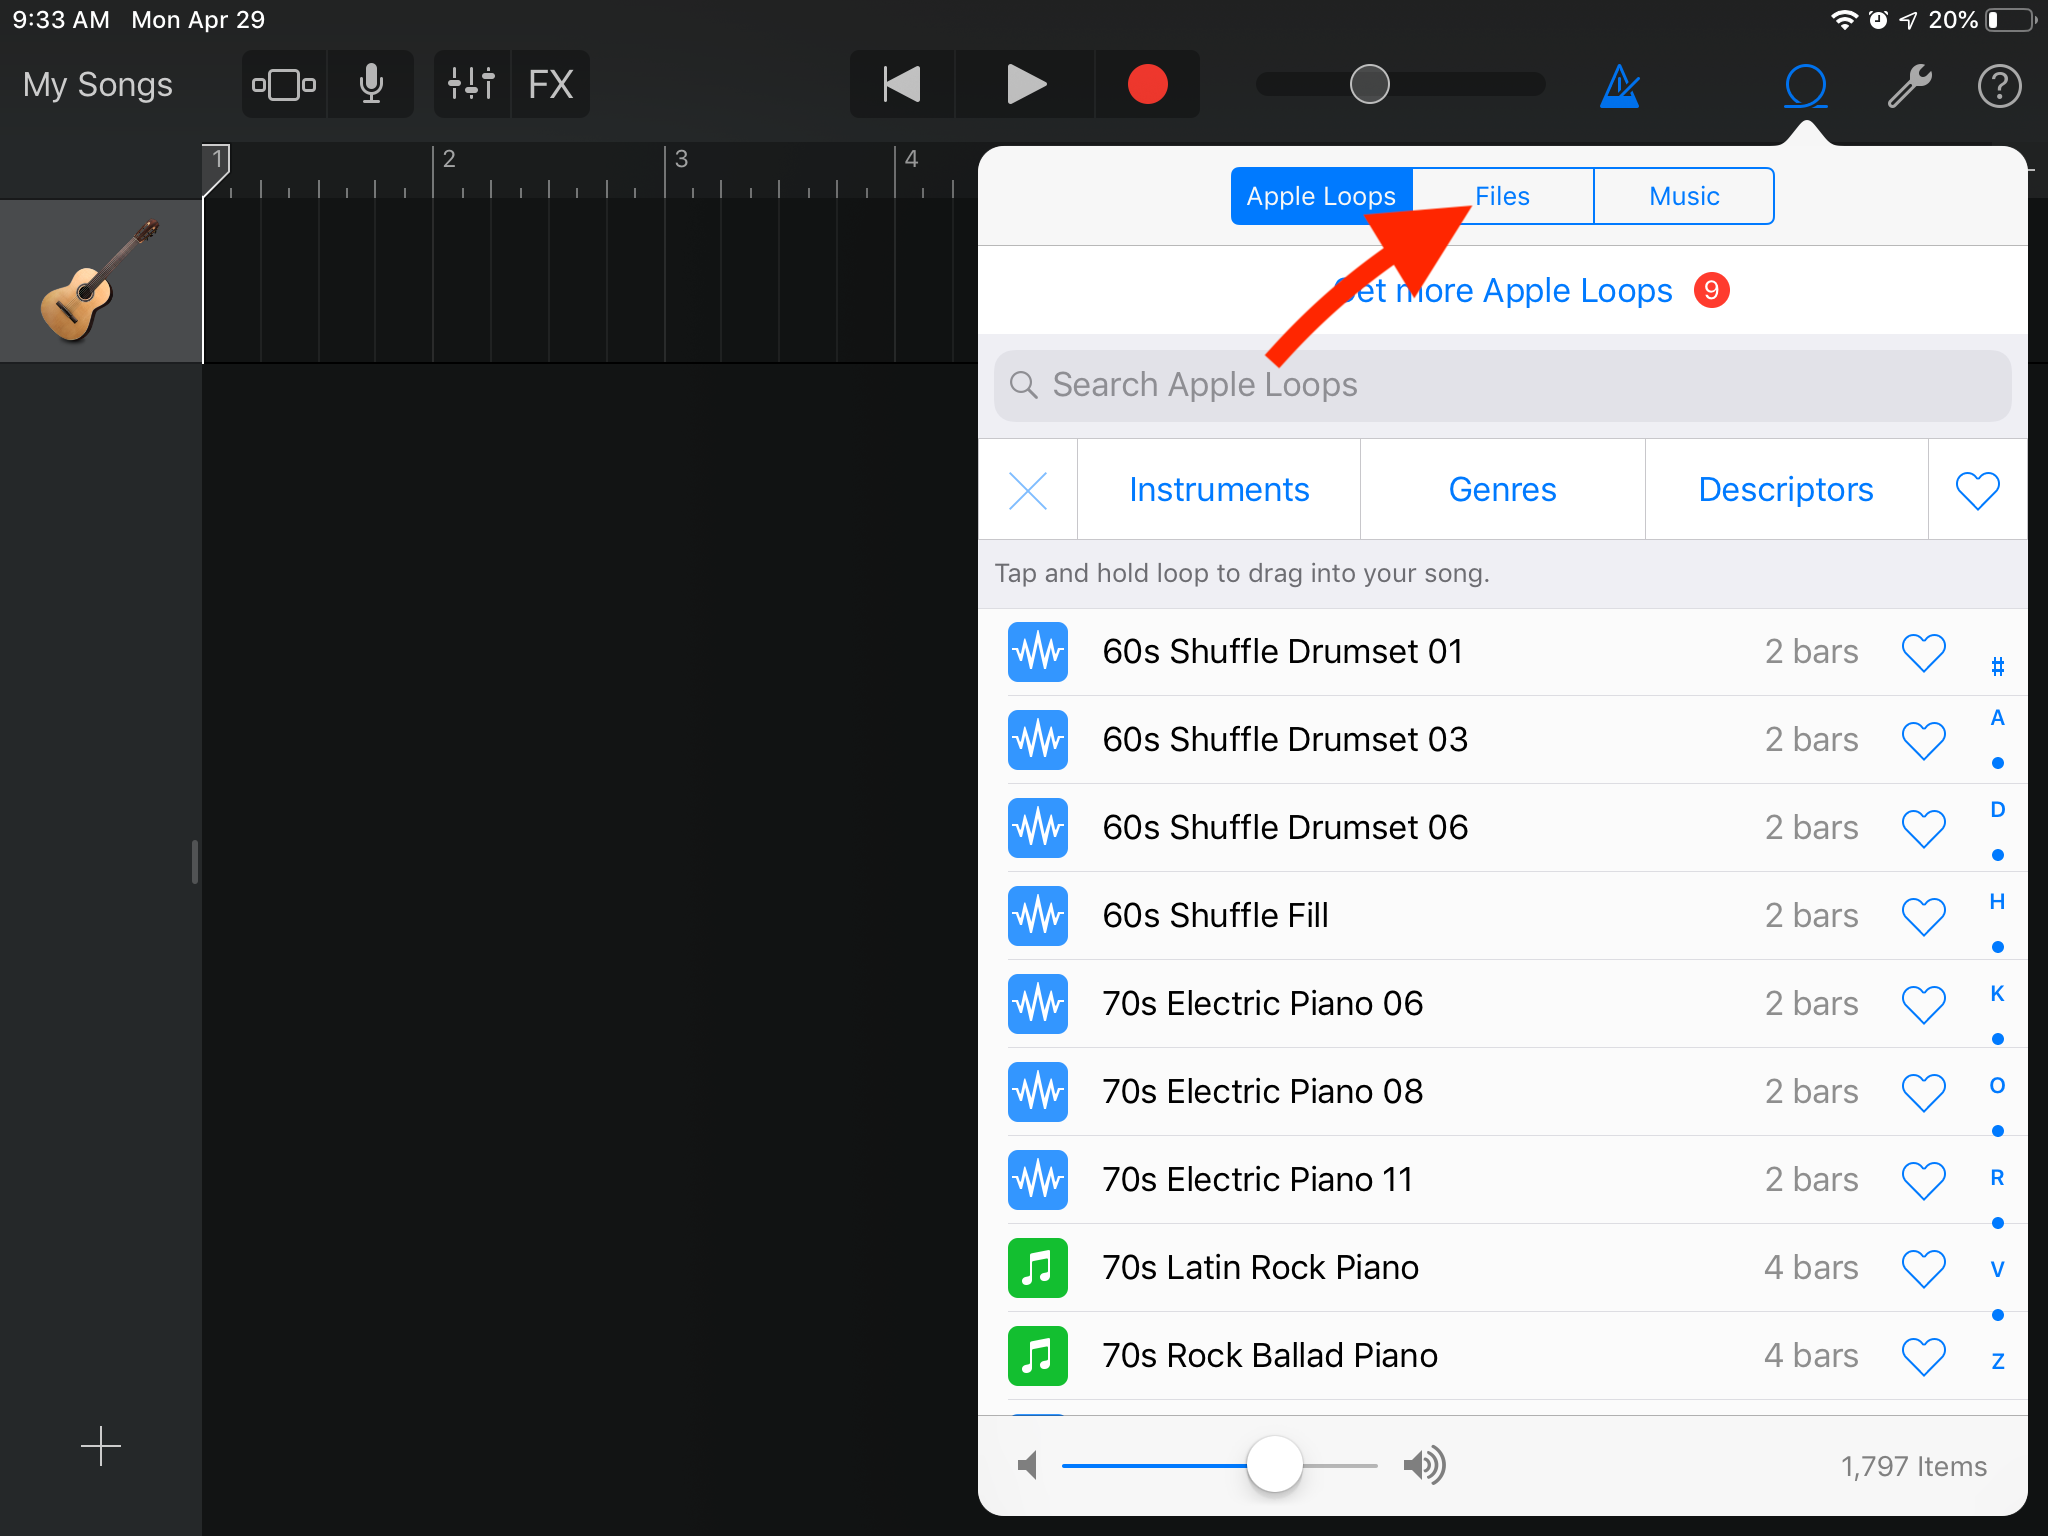
- Select Loop icon from top right, then select Files at the top of popup.
- You'll find SMF.mid, which you've just exported from iWriteMusic. Touch & Hold it.
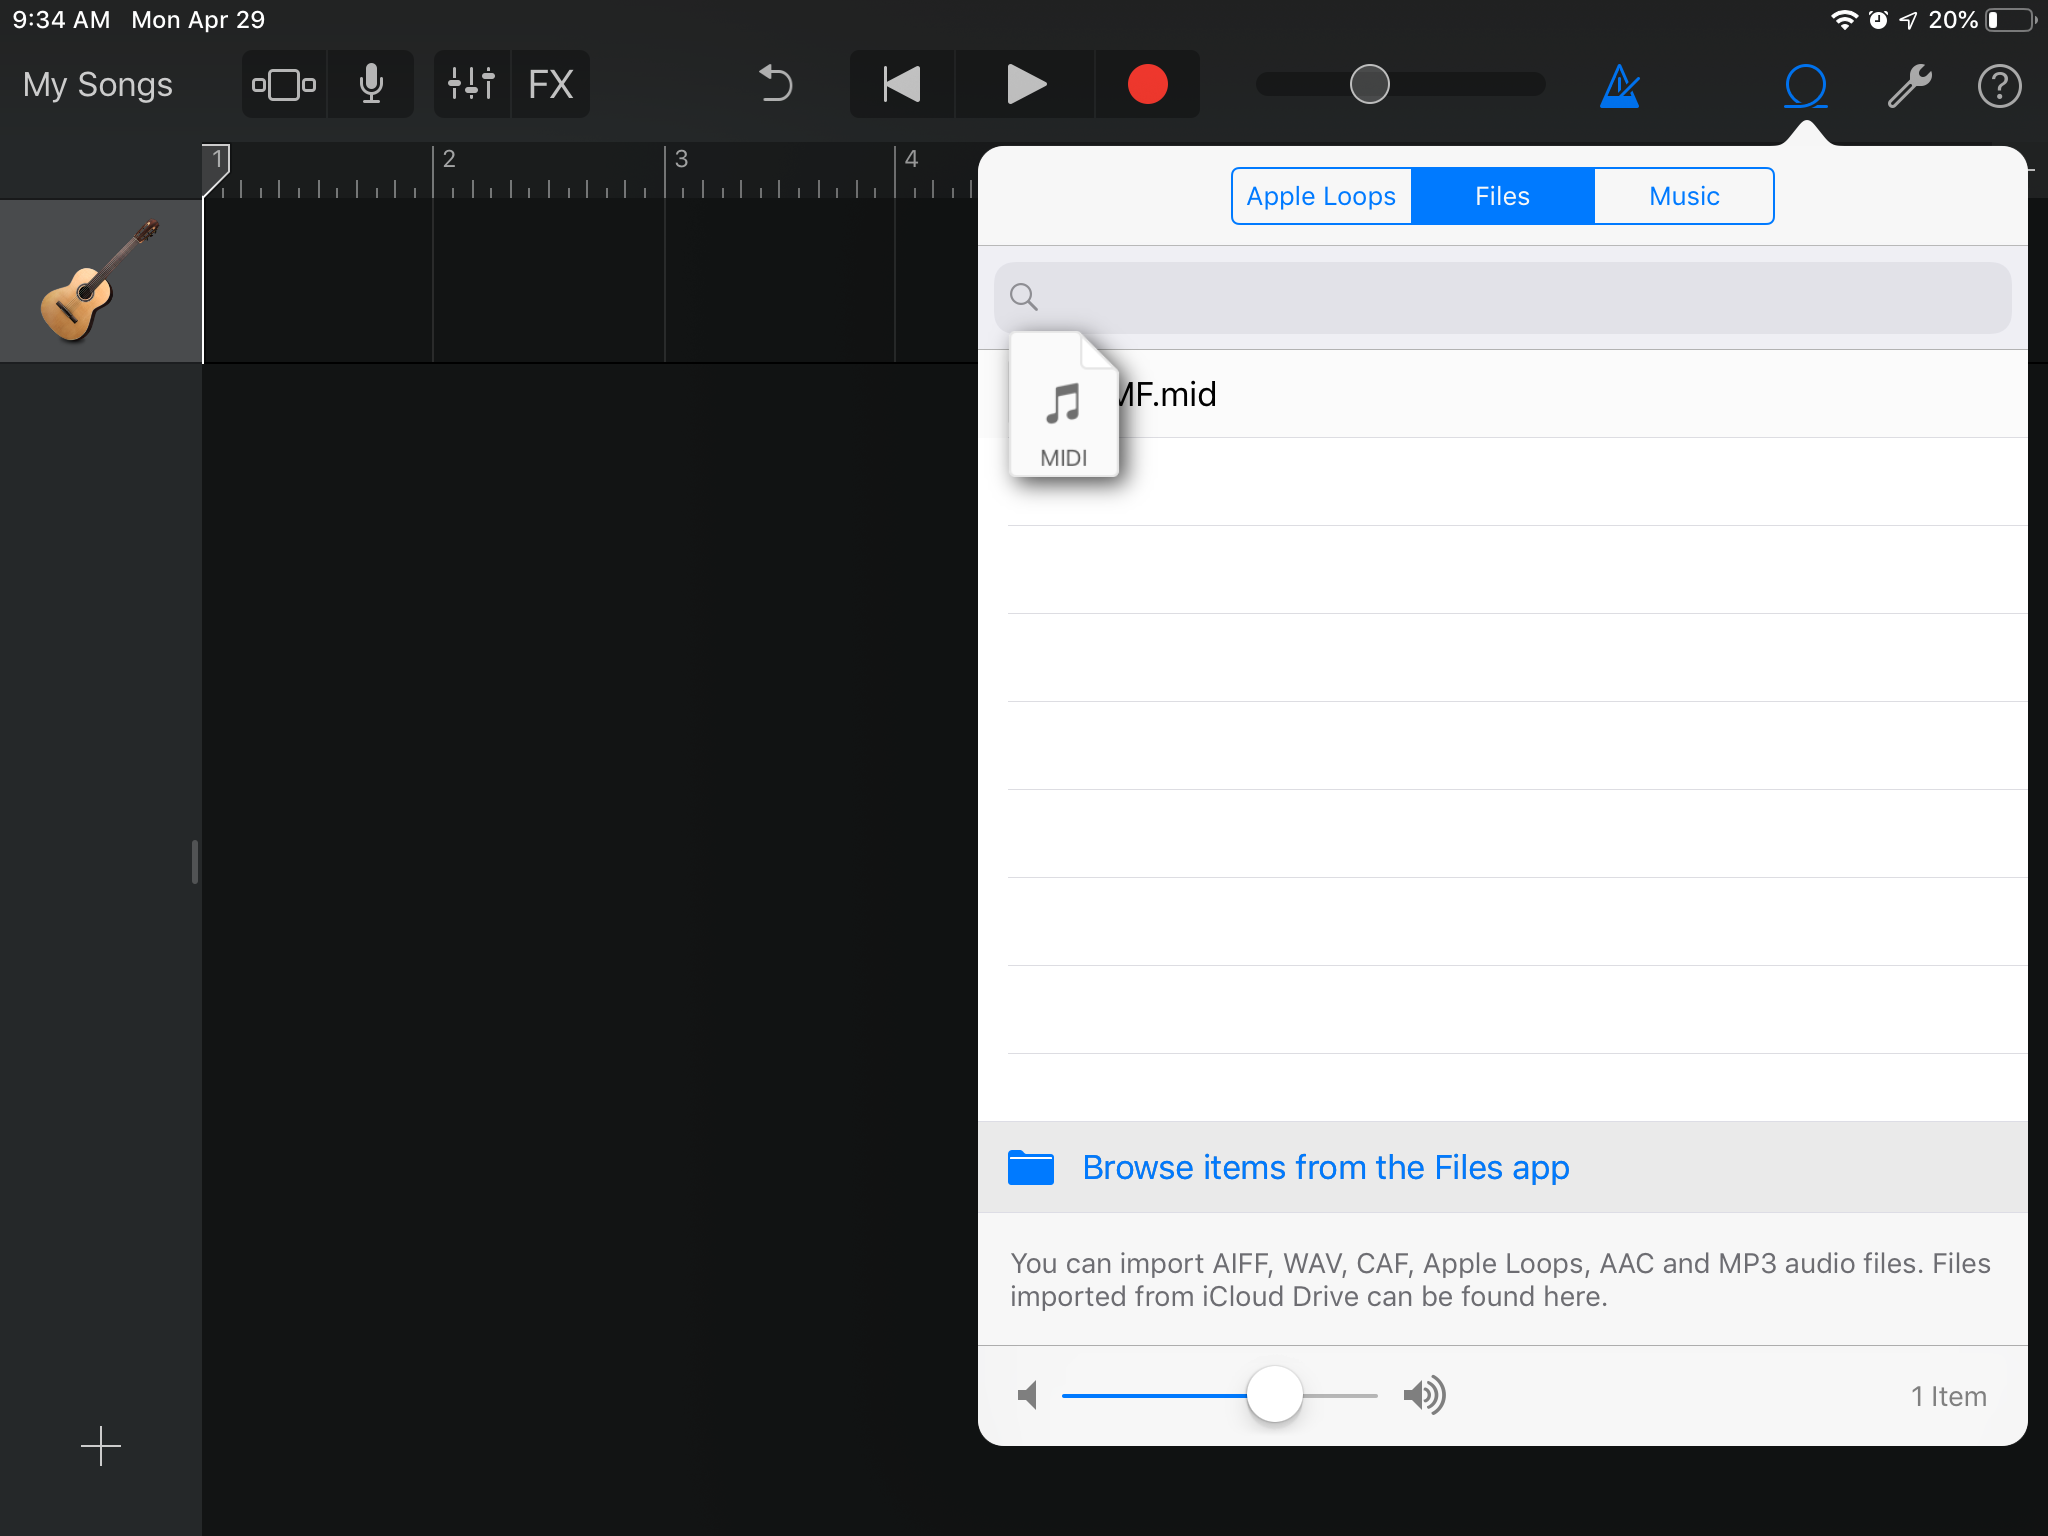
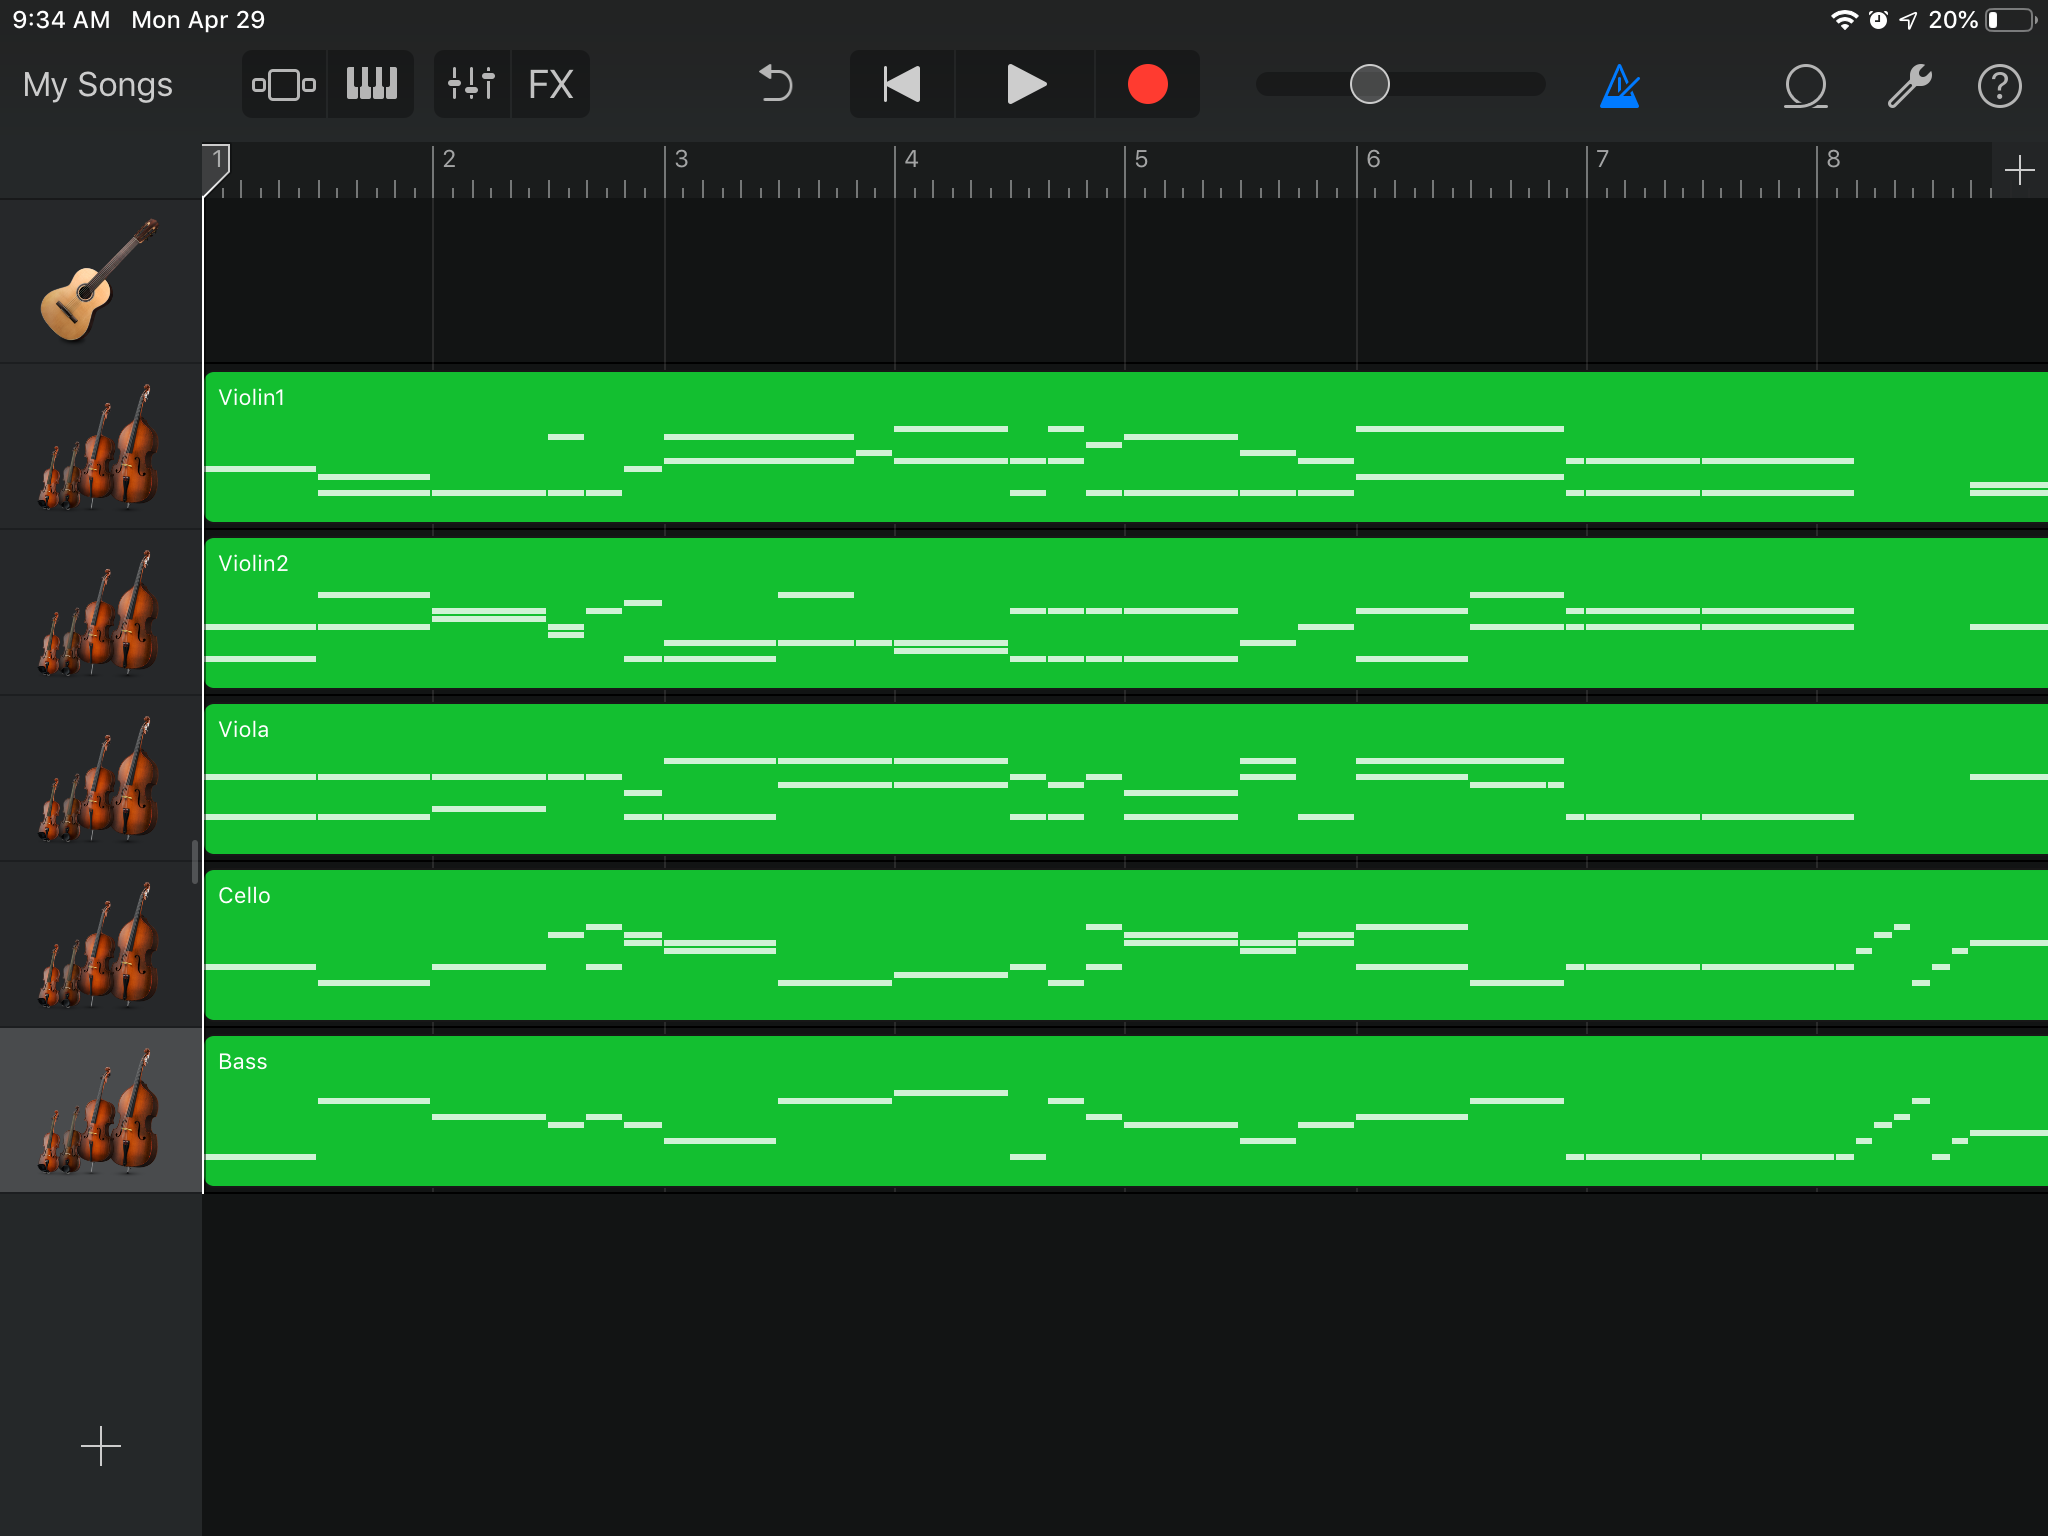
- Then drag it to create a new track.
- Now the MIDI file is imported to GarageBand. Go back to Song View by selecting My Song on top left.
- In Song List View, Touch & Hold the song you just created. Then Action Menu Bar will appear.
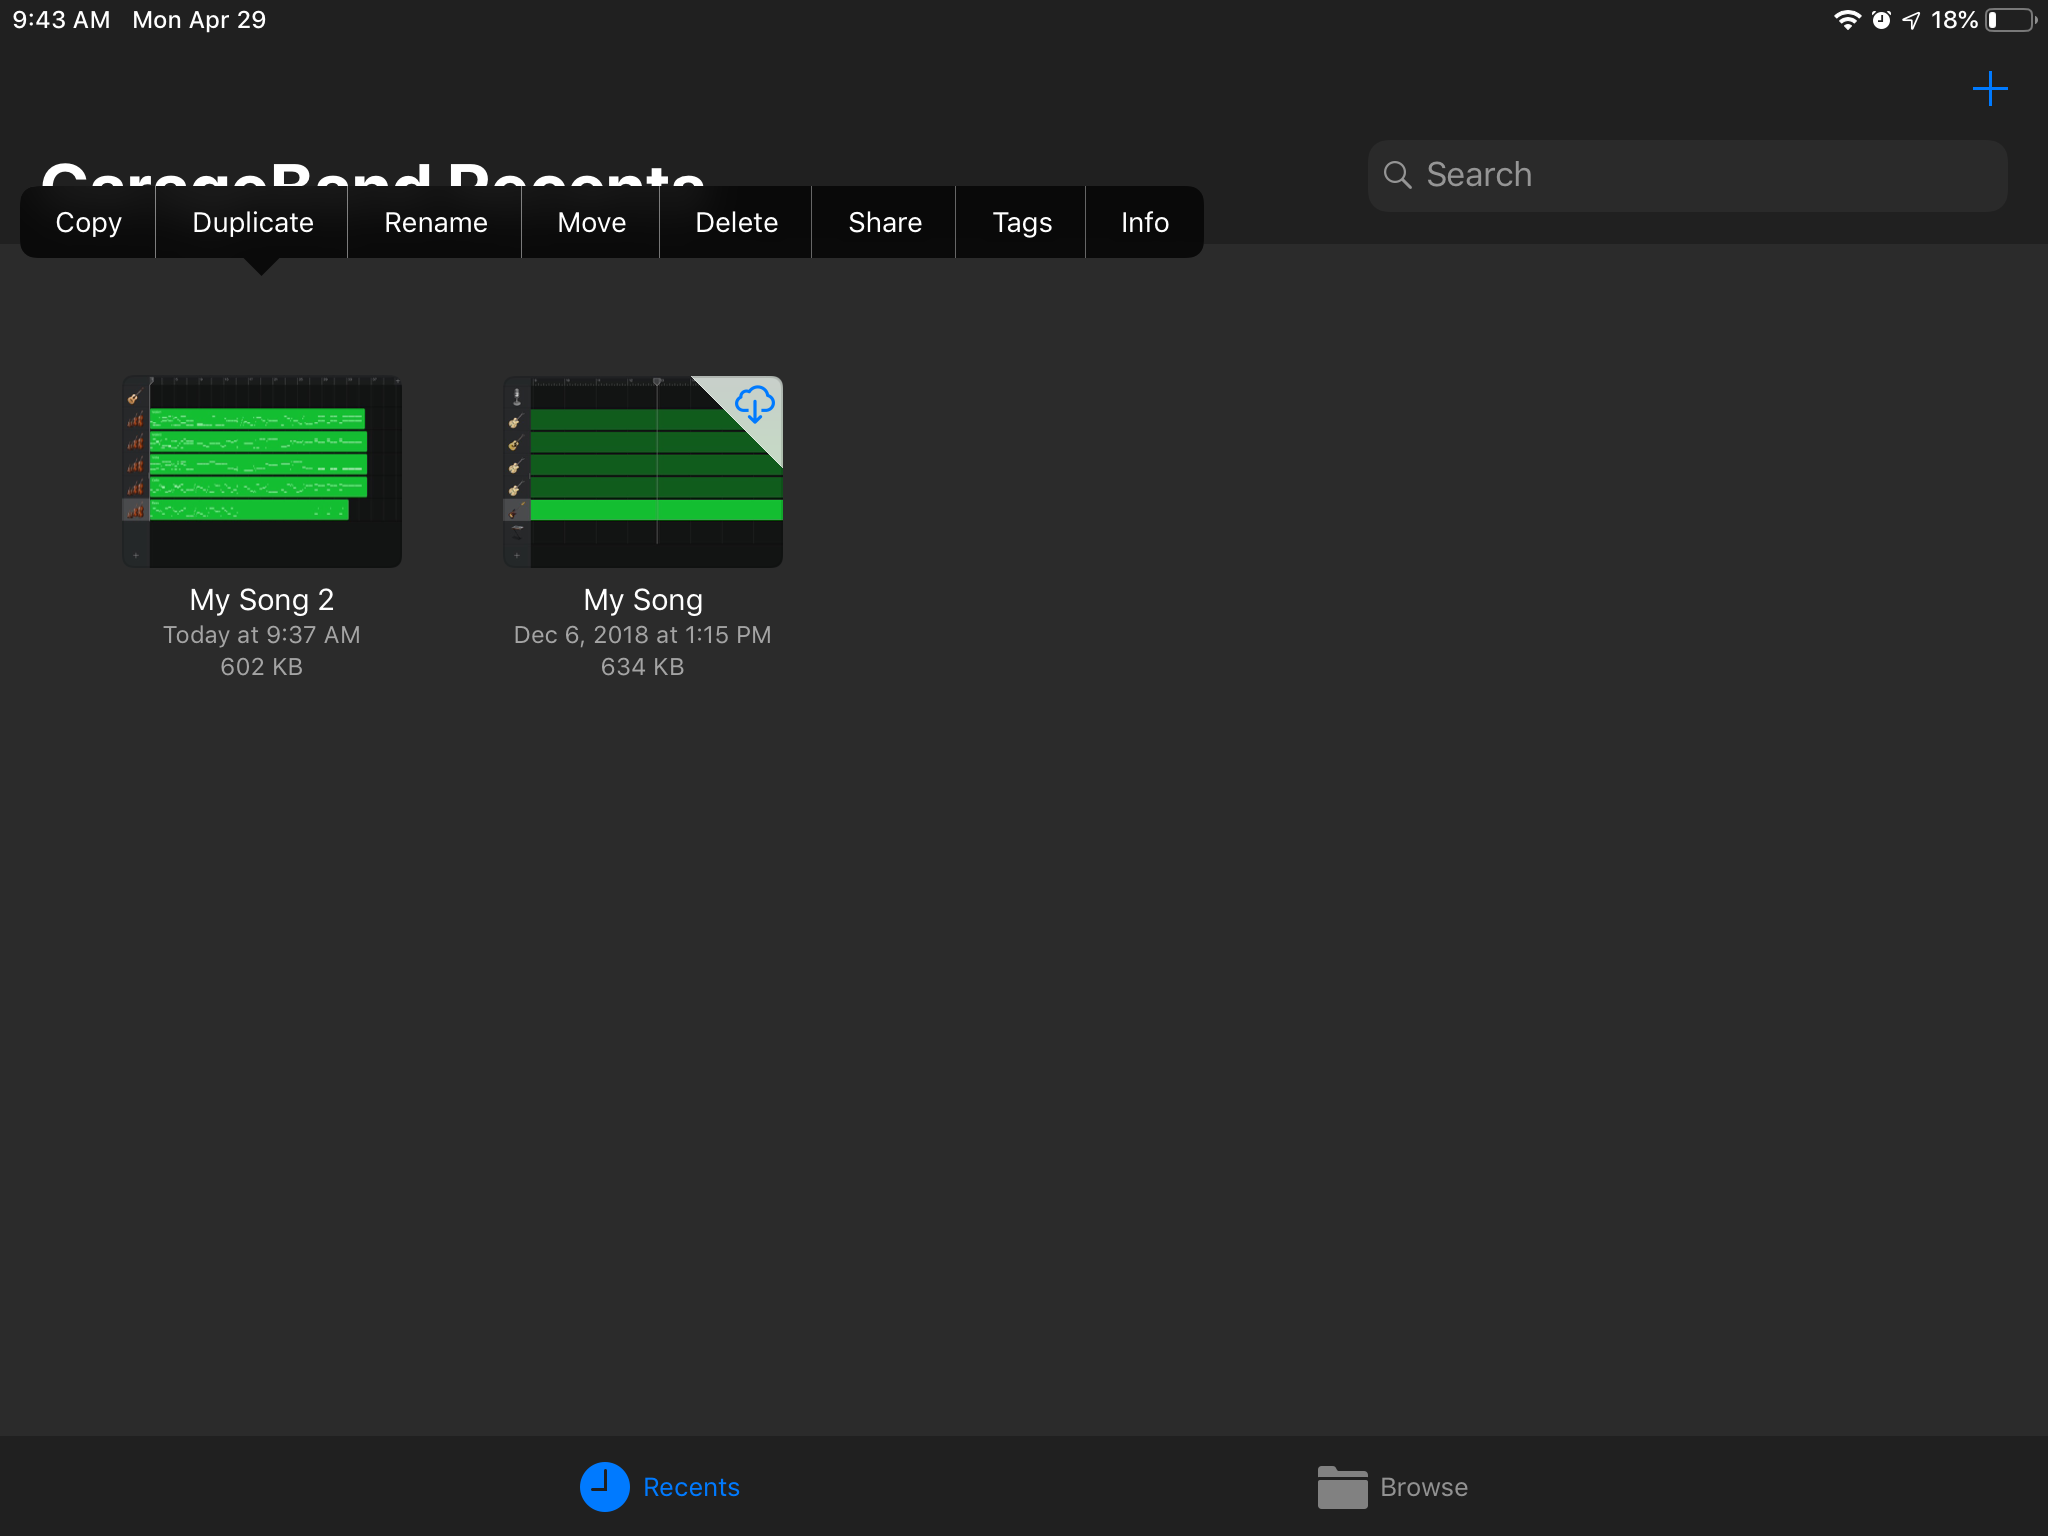
- Select "Share" then select Song in popup.
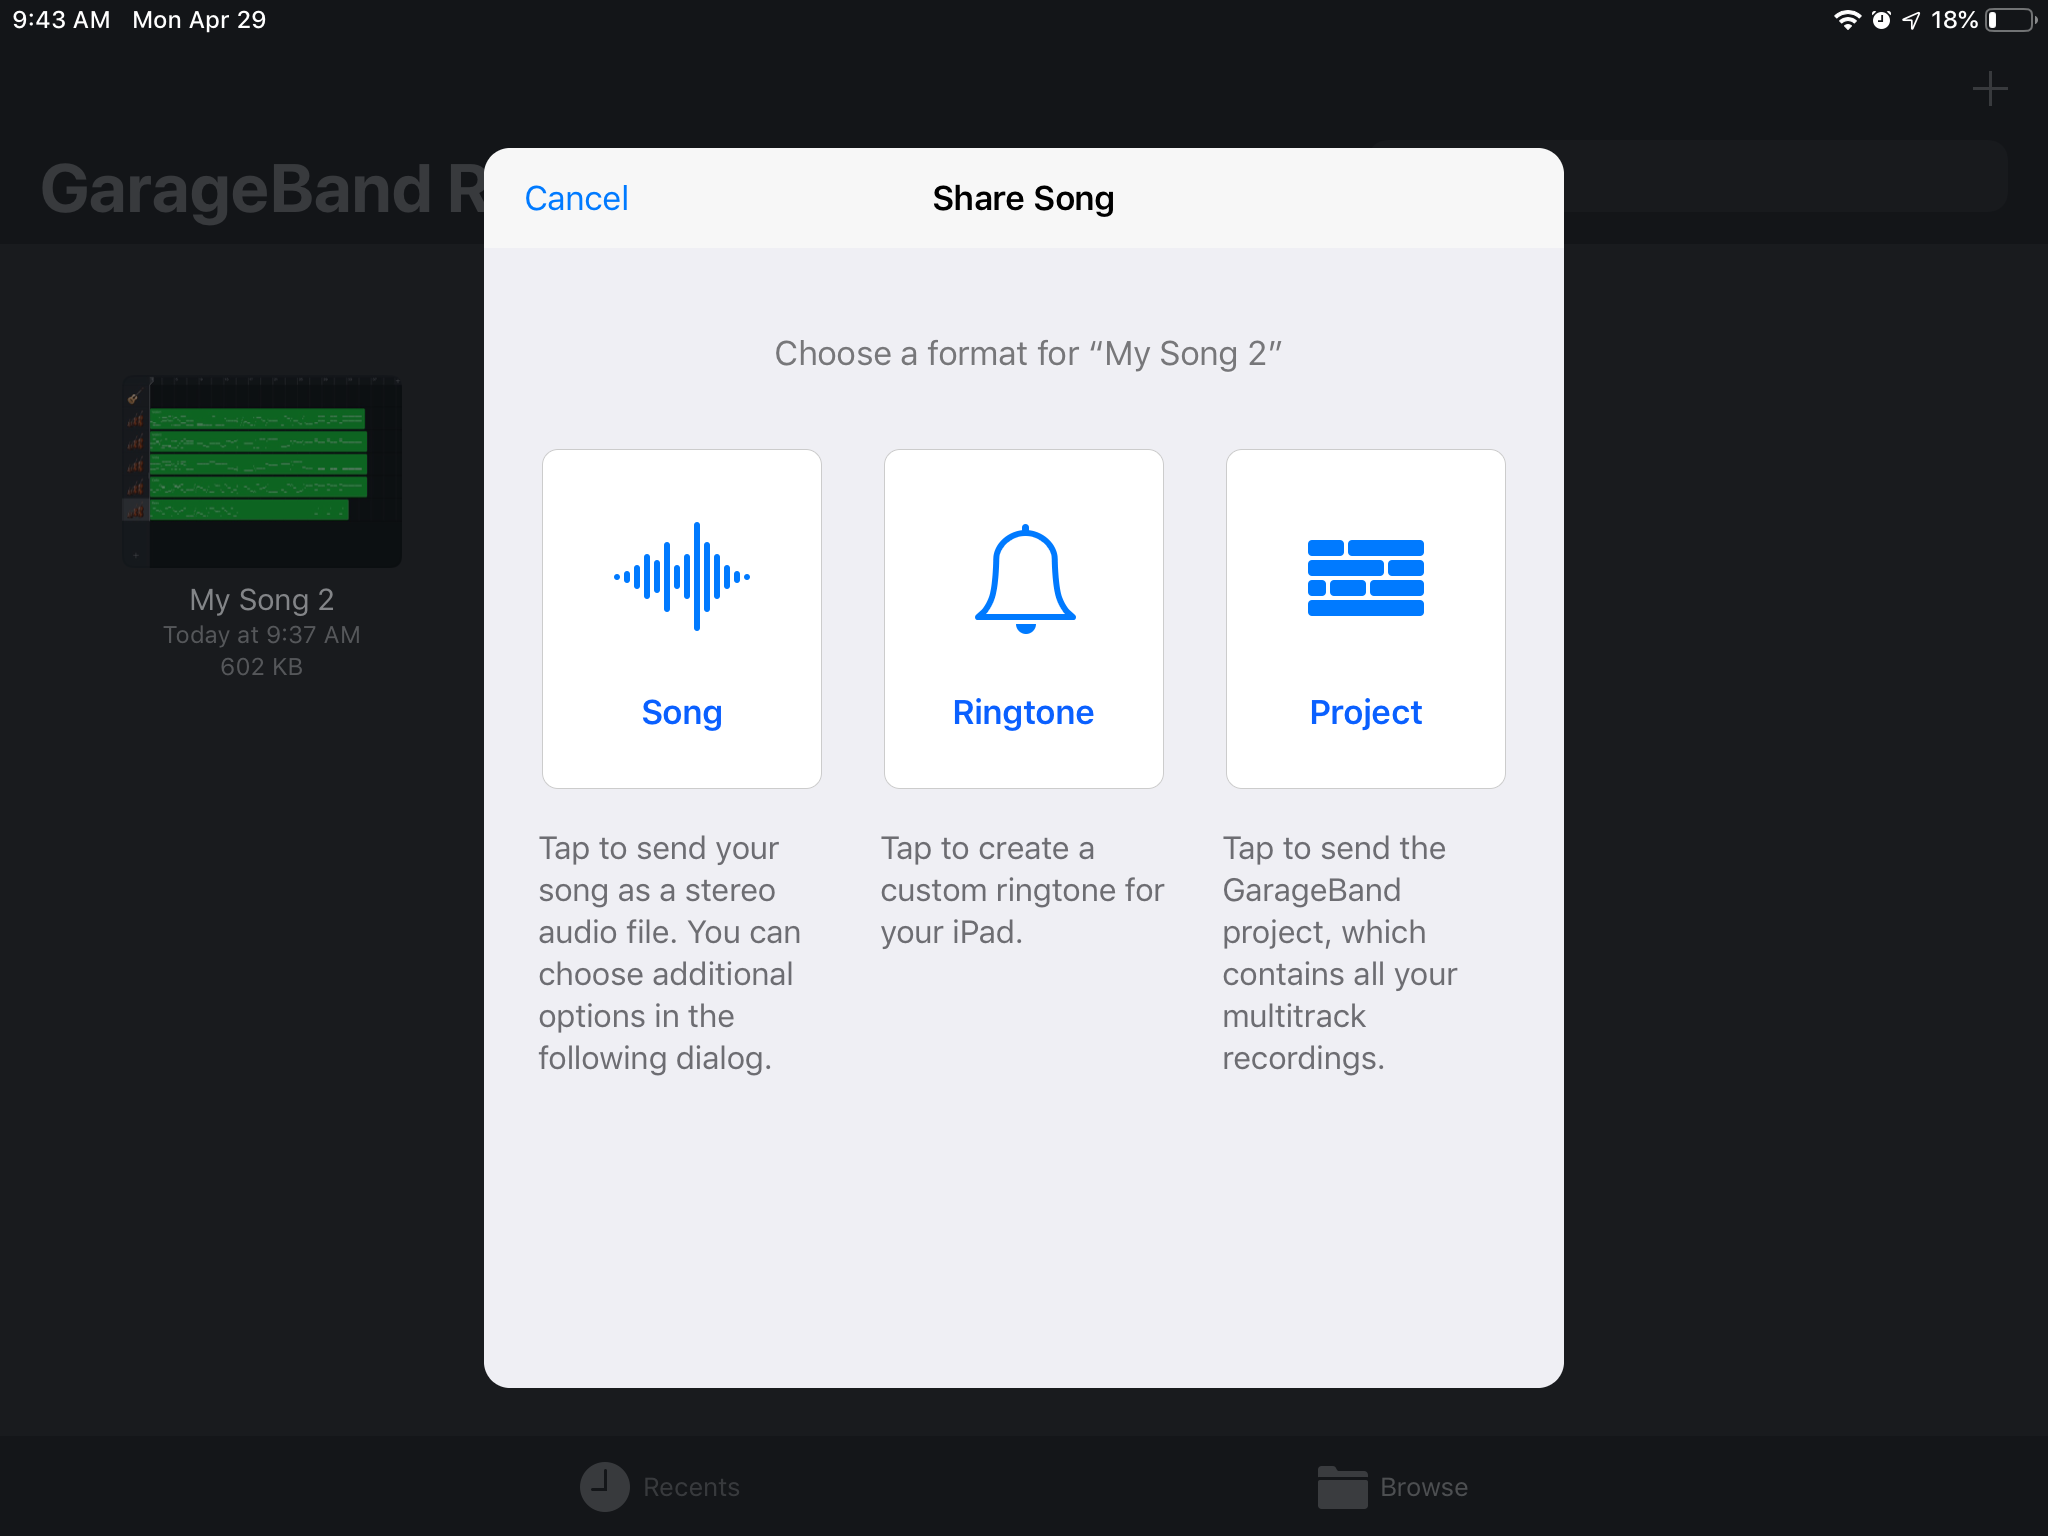
- Pick one. (right now, we select Email.)

- Now GarageBand is creating Audio File.

- Here is how it is attached to Email. Ready to Share!
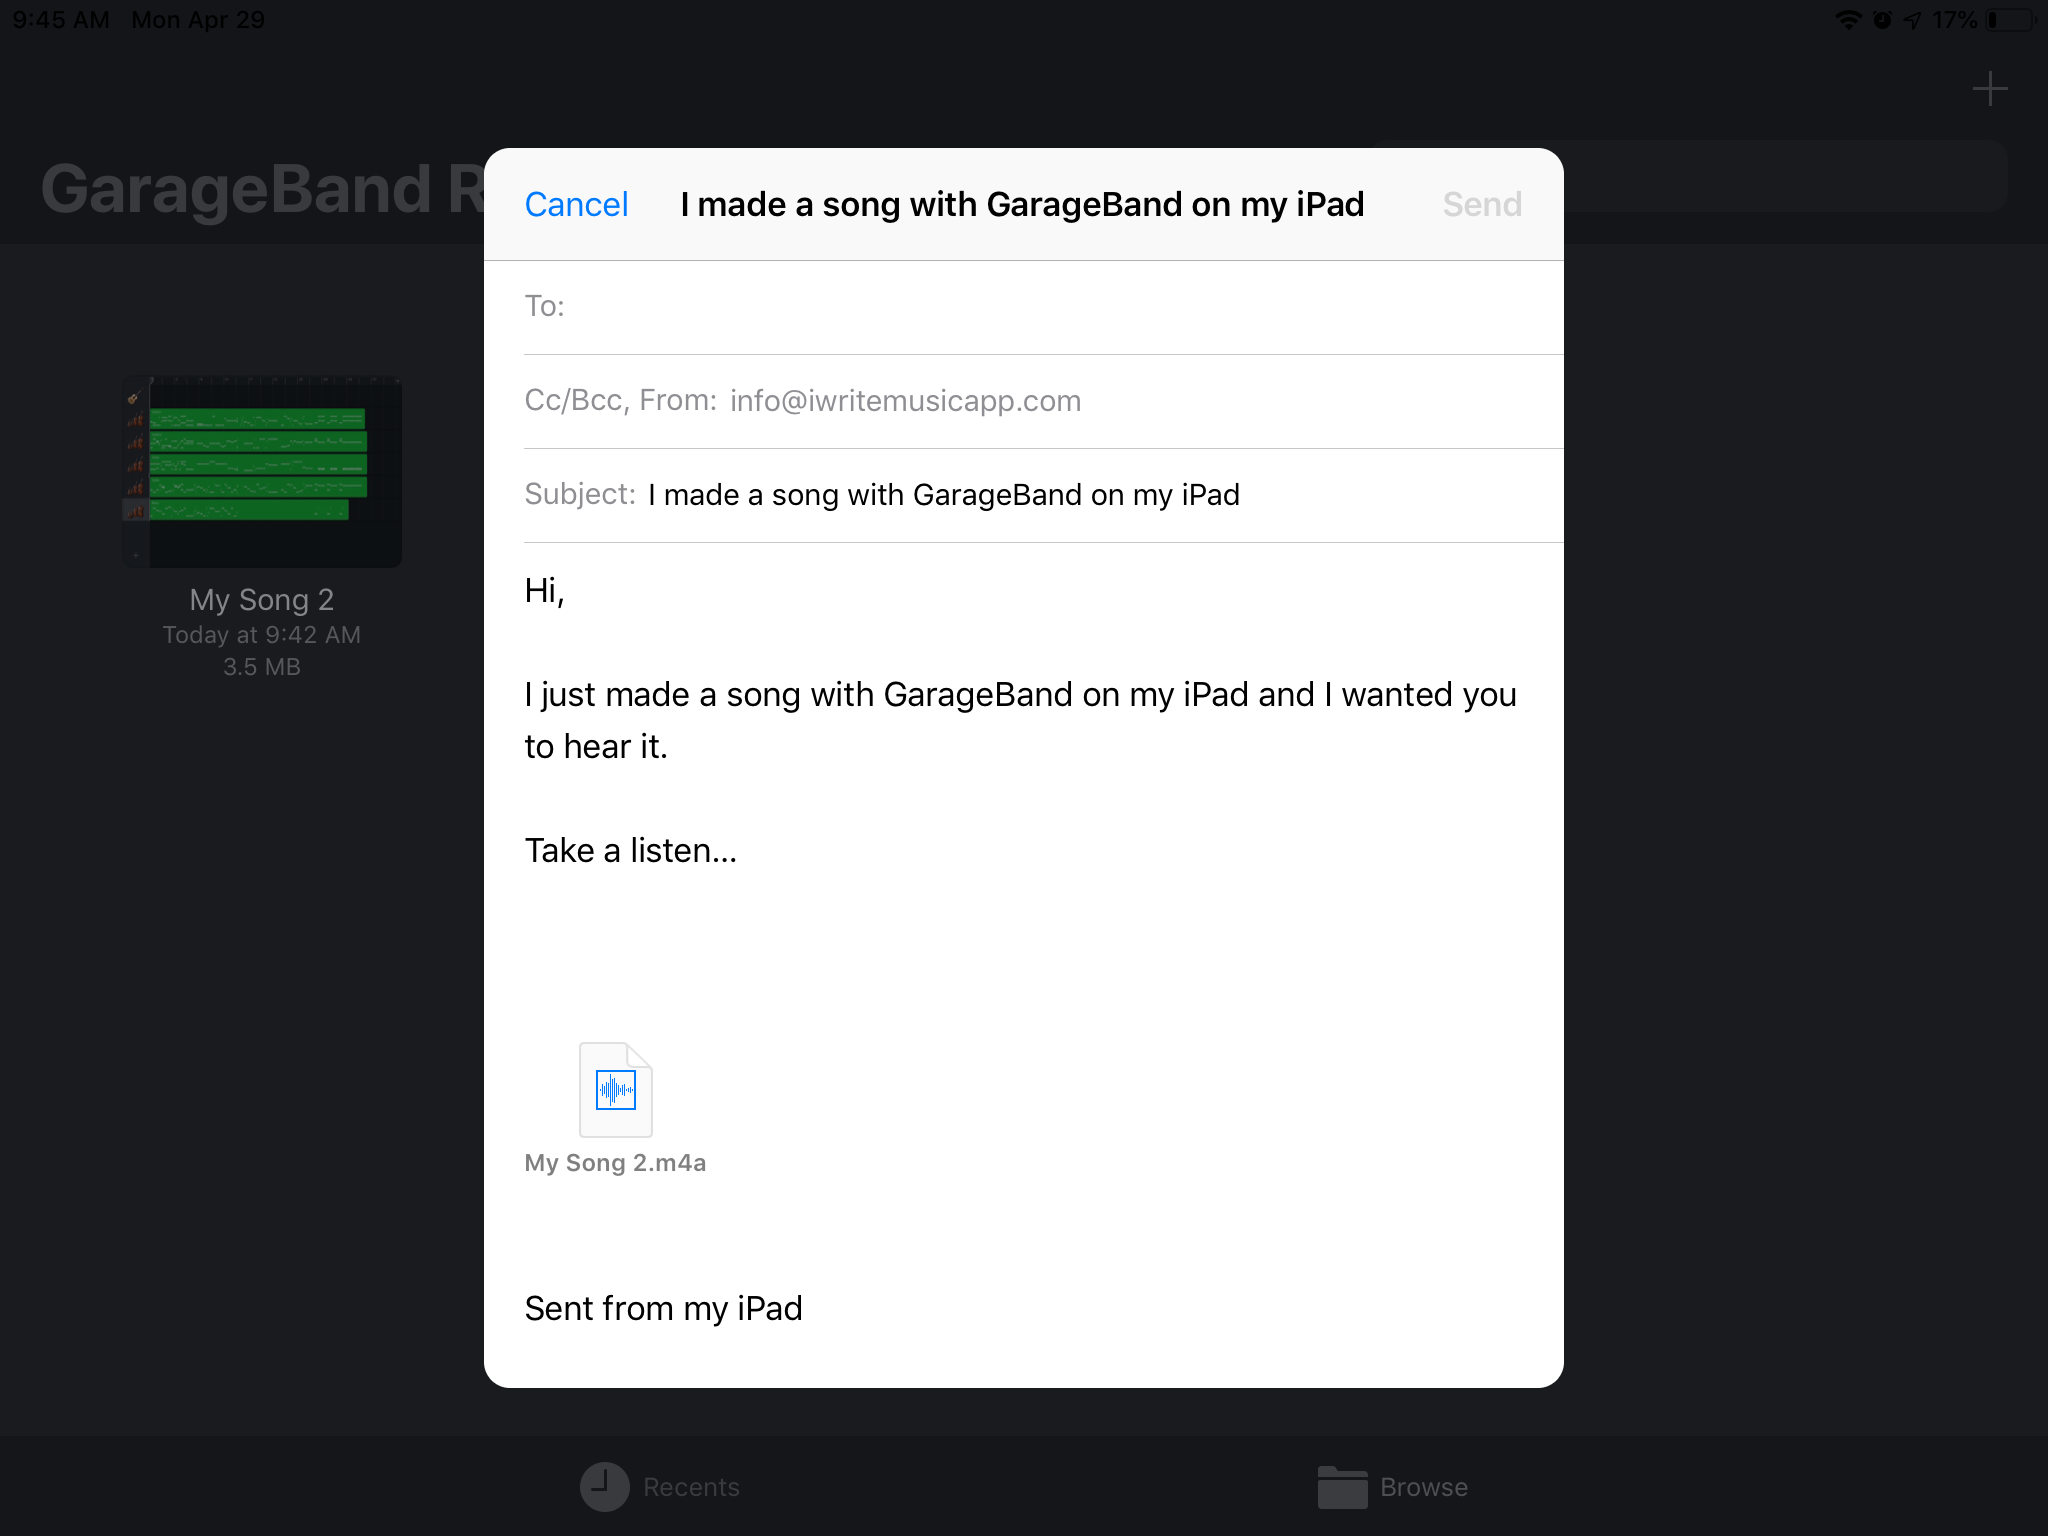
Note:
The sound of this audio file is different from what you hear in iWriteMusic as the file is created with MIDI Sound used in Garageband.