入门
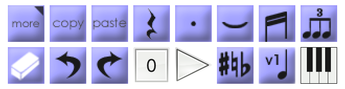
1. ToolBox
All Notation Tools are here. More (top left) will show Additional Tools.

2. PageView
Open PageView, chage the layout to print or share it.

3. Menu
Open Menu for all Settings (Score, Track, Playback, App), File Access, Data Exportion & Help.
OneFlick Entry Method
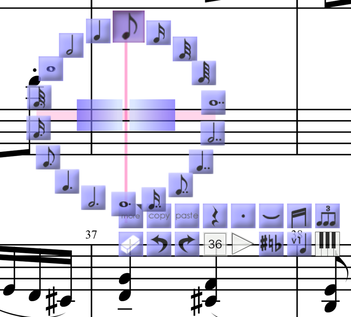
- The choices will appear when you touch the screen.
- Select a location & the value at once.
- The selection will change as you slide your finger to left/right.
- Recommended to those who are familiar with music notation apps and looking for faster and more efficient entry system.
Traditional Entry Method
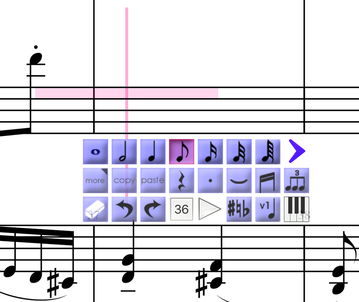
- The choices will appear with ToolBox.
- Select a value & the location separately.
- Recommended to those who are not yet familiar with any music notation apps.
To open Score Settings, select Menu - ScoreSettings in EditorView.
本视频将介绍:
- How to set primary Time Signature
- How to set primary Key Signature
- How to set primary Tempo Mark
To open Track Settings, select Menu - ScoreSettings - TrackSettings in EditorView.
本视频将介绍:
- How to add, delete or reorder tracks
本视频将介绍:
- How to add tracks
- How to change primary Clef
- How to group tracks
by showing the process of making Piano Grand Staff.
本视频将介绍:
- How to set a track of keyed insturment (ex. trumpet in Bb) shown as transposed while it is played in concert key on playback
请使用 CC 进行解释。
(多语种支持无语音解说)
从版本3.6.0开始,选择的乐器/打击乐器在“触摸+按住”时会播放示例音。
内容时间表
- 0:00 介绍
- 0:08 选择旋律乐器时
- 0:42 选择打击乐器时
使用设备:Galaxy S22 Ultra (Android Phone)
iPhone 和 iPad 的显示会有所不同。
此应用程序可分别处理歌曲标题和文件名。
内容时间表
- 0:00 导言
- 0:10 文件名 vs 歌曲标题
- 0:50 标题和荣誉
- 1:45 标题空间调整
- 2:10 页脚
在第一次保存歌曲之前设置歌曲标题时,系统会提示您使用歌曲标题作为文件名。
命令(工具)锁
显示测量滑块
请使用 CC 进行解释 (多语种支持无语音解说)
使用设备:Galaxy S22 Ultra (Android Phone)
iPhone 和 iPad 的显示会有所不同。
内容时间表
- 0:00 引言
- 0:23 手指输入(传统模式)
- 1:20 自动滚动
- 1:43 取消输入的手势
- 1:58 添加和声
- 2:10 更改音符时值
- 2:18 插入音符
- 2:26 长按移动音符上下
- 3:03 输入休止符
- 3:14 双击锁定工具以连续使用
- 3:30 橡皮擦
- 4:18 使用笔输入
- 4:58 临时记号
- 5:49 连档(梁)、延音线、连音符
- 6:27 手指输入(单击模式)
- 7:36 键盘输入(传统模式)
- 8:50 键盘输入(单击模式)
- 9:35 键盘“无输入”模式
请使用 CC 进行解释 (多语种支持无语音解说)
使用设备:Galaxy S22 Ultra (Android Phone)
iPhone 和 iPad 的显示会有所不同。
Contents Timetable
- 0:00 Introduction
- 0:15 Beam
- 1:14 Tuplets
- 2:43 Tie
- 3:07 Dot
Click Here to learn about Multi Voice Writing
however, covers all of the above in about 6 minutes.
本视频将介绍:
- Note Entry
- Rest Entry
- Eraser
- Undo / Redo
- Auto Scroll (Menu-Application Settings)
- Command Lock
- OneFlick Entry vs Traditional Entry
- Touch + Hold to move note pitch
- Changing Note/Rest Duration
- Dot
- Adding Harmony
- Accidental
- Beam
- Tuplet
- Tie
- Voice Change
- Multi-Bar Rest


使用设备:Galaxy S22 Ultra (Android Phone)
iPhone 和 iPad 的显示会有所不同。
本视频将介绍:
- How to use Accidental Tool not just for Sharp, Natural and Flat but also for Double Sharp/Flat.
- How to show / hide Courtesy Accidental
附加工具 (MORE)


本视频将介绍:
- How to add/insert Barline
- How to apply different Barline type
- How to remove a Barline
- How to remove a Bar
- How to add Repeat Signs
- How to remove Repeat Signs
- Please refer to this link if you want to play the song form that isn't automatically recognized by the app.


本视频将介绍 how to change:
- Clef
- Time Signature
- Key Signature
- Tempo
within a song.

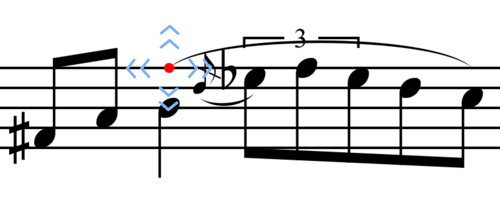
- Touch + Hold an item for a second, then arrows ( << >> ) will appear.
- Tap an arrow to move the item.
- Select other location of screen to deselect the item.
- This command is always locked until other command is selected.
- To move a note up/down quicker, check Note Command
Additional features (available from version 3)
- You can change Start/End point of Slur with Item Mover.
- You can change the stem length of Note/Grace Note.

- When you select CM7, chord entry bar will appear.
- When you select a button, Chord Selector will appear.
- Create a chord symbol, then select OK.
- To Erase a chord symbol, select Eraser, then select a chord symbol.
Go to Score Settings to change:
- Font size
- Default Location of Chord Symbols
- Minimum Devision of Harmonic Rhythm

- Select a note to start writing lyrics from, then Lyrics Writing view will appear.
- Hit 'Return' to enter / update lyrics.
- Use

 to move entry location.
 - Select 'Line' to change line1 to line 10.
- To modify, select a note and line number of the syllable you want to modify.
- To erase, select Eraser, then select a syllable.
Go Score Settings to change Font size.

- 使用垂直和水平线确定位置后,将显示文本输入界面。
- 要修改已输入的文本,请选择该文本。
- 要删除文本,请选择橡皮擦,然后选择要删除的文本。
请使用 CC 进行解释 (多语种支持无语音解说)
使用设备:Galaxy S22 Ultra (Android Phone)
iPhone 和 iPad 的显示会有所不同。
关于版本3.6.0的新增功能(斜体和全轨显示)
内容时间表
- 0:00 介绍
- 0:09 使用“斜体”输入文本。
- 0:40 使用“全轨显示”输入文本。
- 1:02 使用“全轨显示”时,各个文本可以单独移动。
- 1:50 使用“全轨显示”时,所有文本可以用橡皮擦一次性删除。

- Select two notes to set the region to transpose. then set how you want the notes to move.
- This command has no way to clear / remove. Use Undo.

- Grace Note Entry is the same as Note Entry except you don't need to select the duration.
- Select the location with horizontal + vertical line.
- The shape of Grace Note will automaticall become to 16th-type when Multiple Grace Notes are enterd.

- Select first and the last notes to set the region, then select 'Apply'
- To Clear, do the same and select 'Clear'

- Select the first and the last notes to set the region.
- Can't including any rests in the group.
- To Remove it, select Eraser, then select the space between the notes.
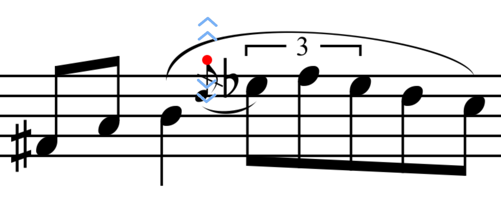
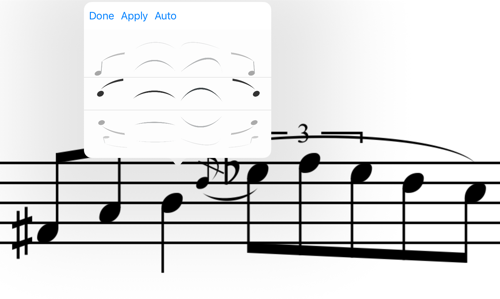
Adjusting Slur Location and Shape
- You can change Start/End point of Slur with Item Mover.
- You can change the Shape of Slur
(To show Slur Shape Box, with Slur Tool, select the first or last note of the slur group.)


Dynamics Marks
- Select a type, then select a note.
- To remove, select Eraser, then select a mark.
Dynamics Arrows
- Set start and end locations with horizontal+vertical lines.
- To remove, select Eraser, then select a mark.


- Select a type, then select a note.
- To remove, select Eraser, then select a mark.


- Select a type, then select the first and the last notes to set the region.
- To remove, select Eraser, then select a mark.


- Select a type, then select a note.
- To Erase it, Select Eraser then select a tempo mark.
- Select the first and the last bar to set the region.
- In EditorView, Multi Bar Rest doesn't appear but is shown as the indication (ex. 4/15).
- In PageView, Multi Bar Rest will appear only when you show the single track.
(In other words, Multi Bar Rest won't appear if you have more than two tracks.) - There is no way to remove Multi Bar Rest directly,
but it will be automatically removed when any modification is made on any member of the group.

- To hide a rest, select a rest with blue X mark.
- Hidden rest won't appear in PageView, but appear in blue color in EditorView.
- To set a hidden rest back to visible, use this tool and select it.
- This tool is intended to be used along with Multi-Voice Writing (Click for more details).


- Select a type, then select a note.
- To Erase it, Select Eraser then select a mark.


- Select a type, then select an empty space on staff.
- To Erase it, Select Eraser then select a mark.


- Select a notehead style, then select a note head.
- No way to remove. Apply Normal Head Style to set back to normal.
This is not for Percussion Notation
To write Percussion/Drums,
- Go to Track Settings
- Set Percussion Notation ON
- Select a type, then select staffs of the first and the last tracks to set the region
- To remove, select Eraser, then select a Brace/Bracket.
文件列表视图
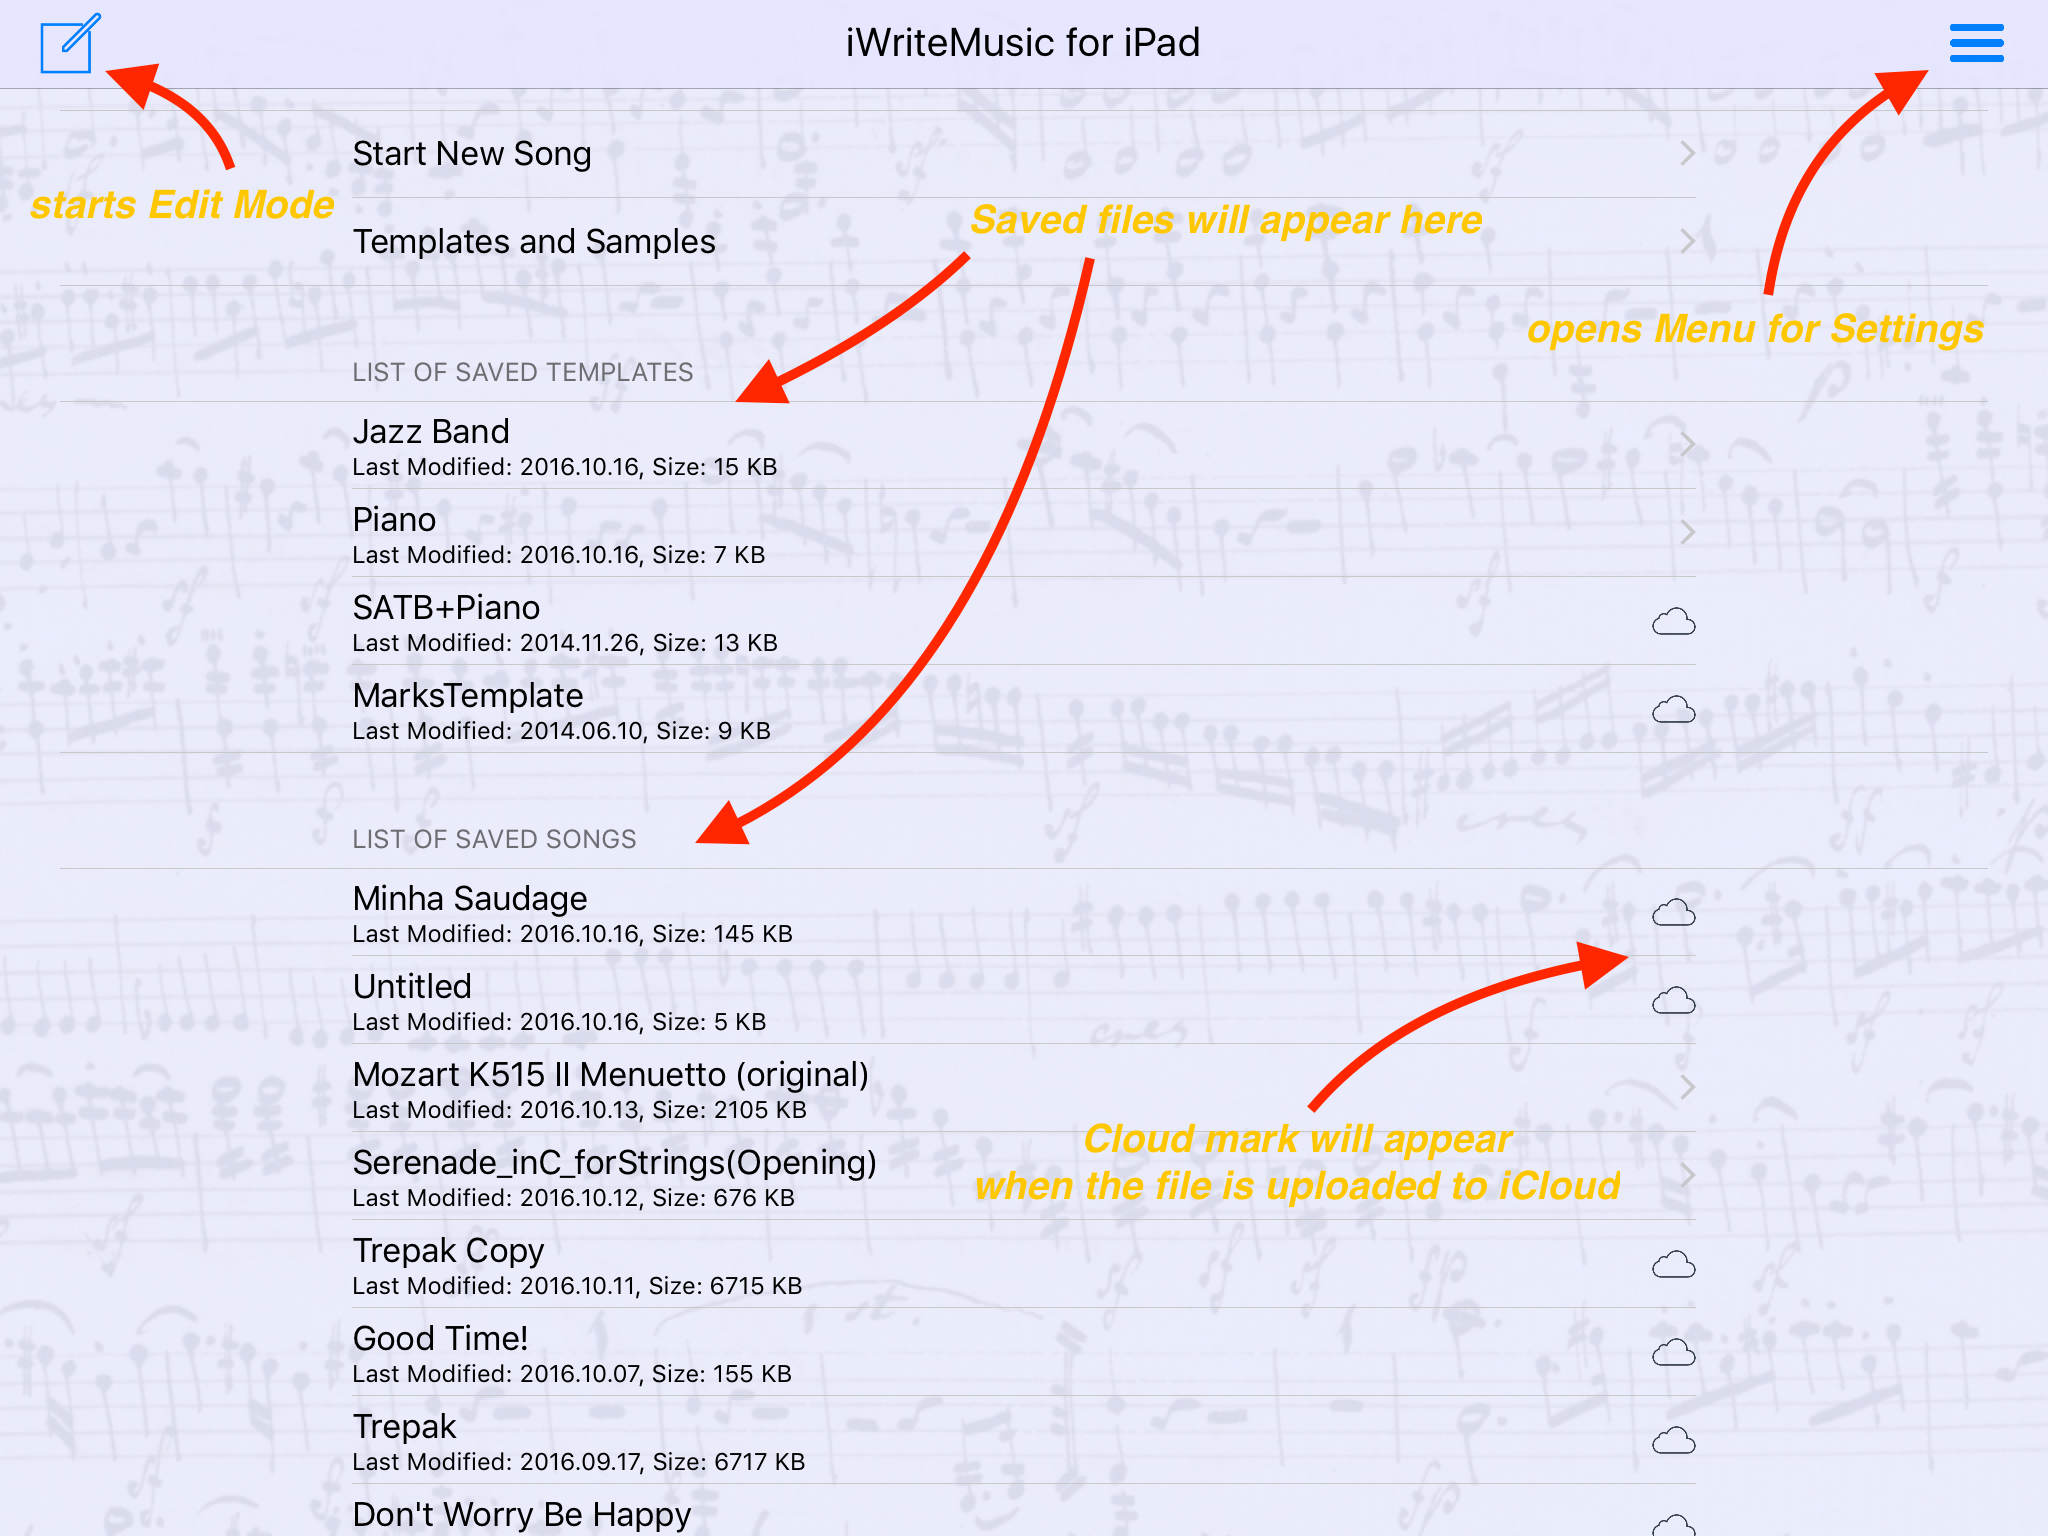
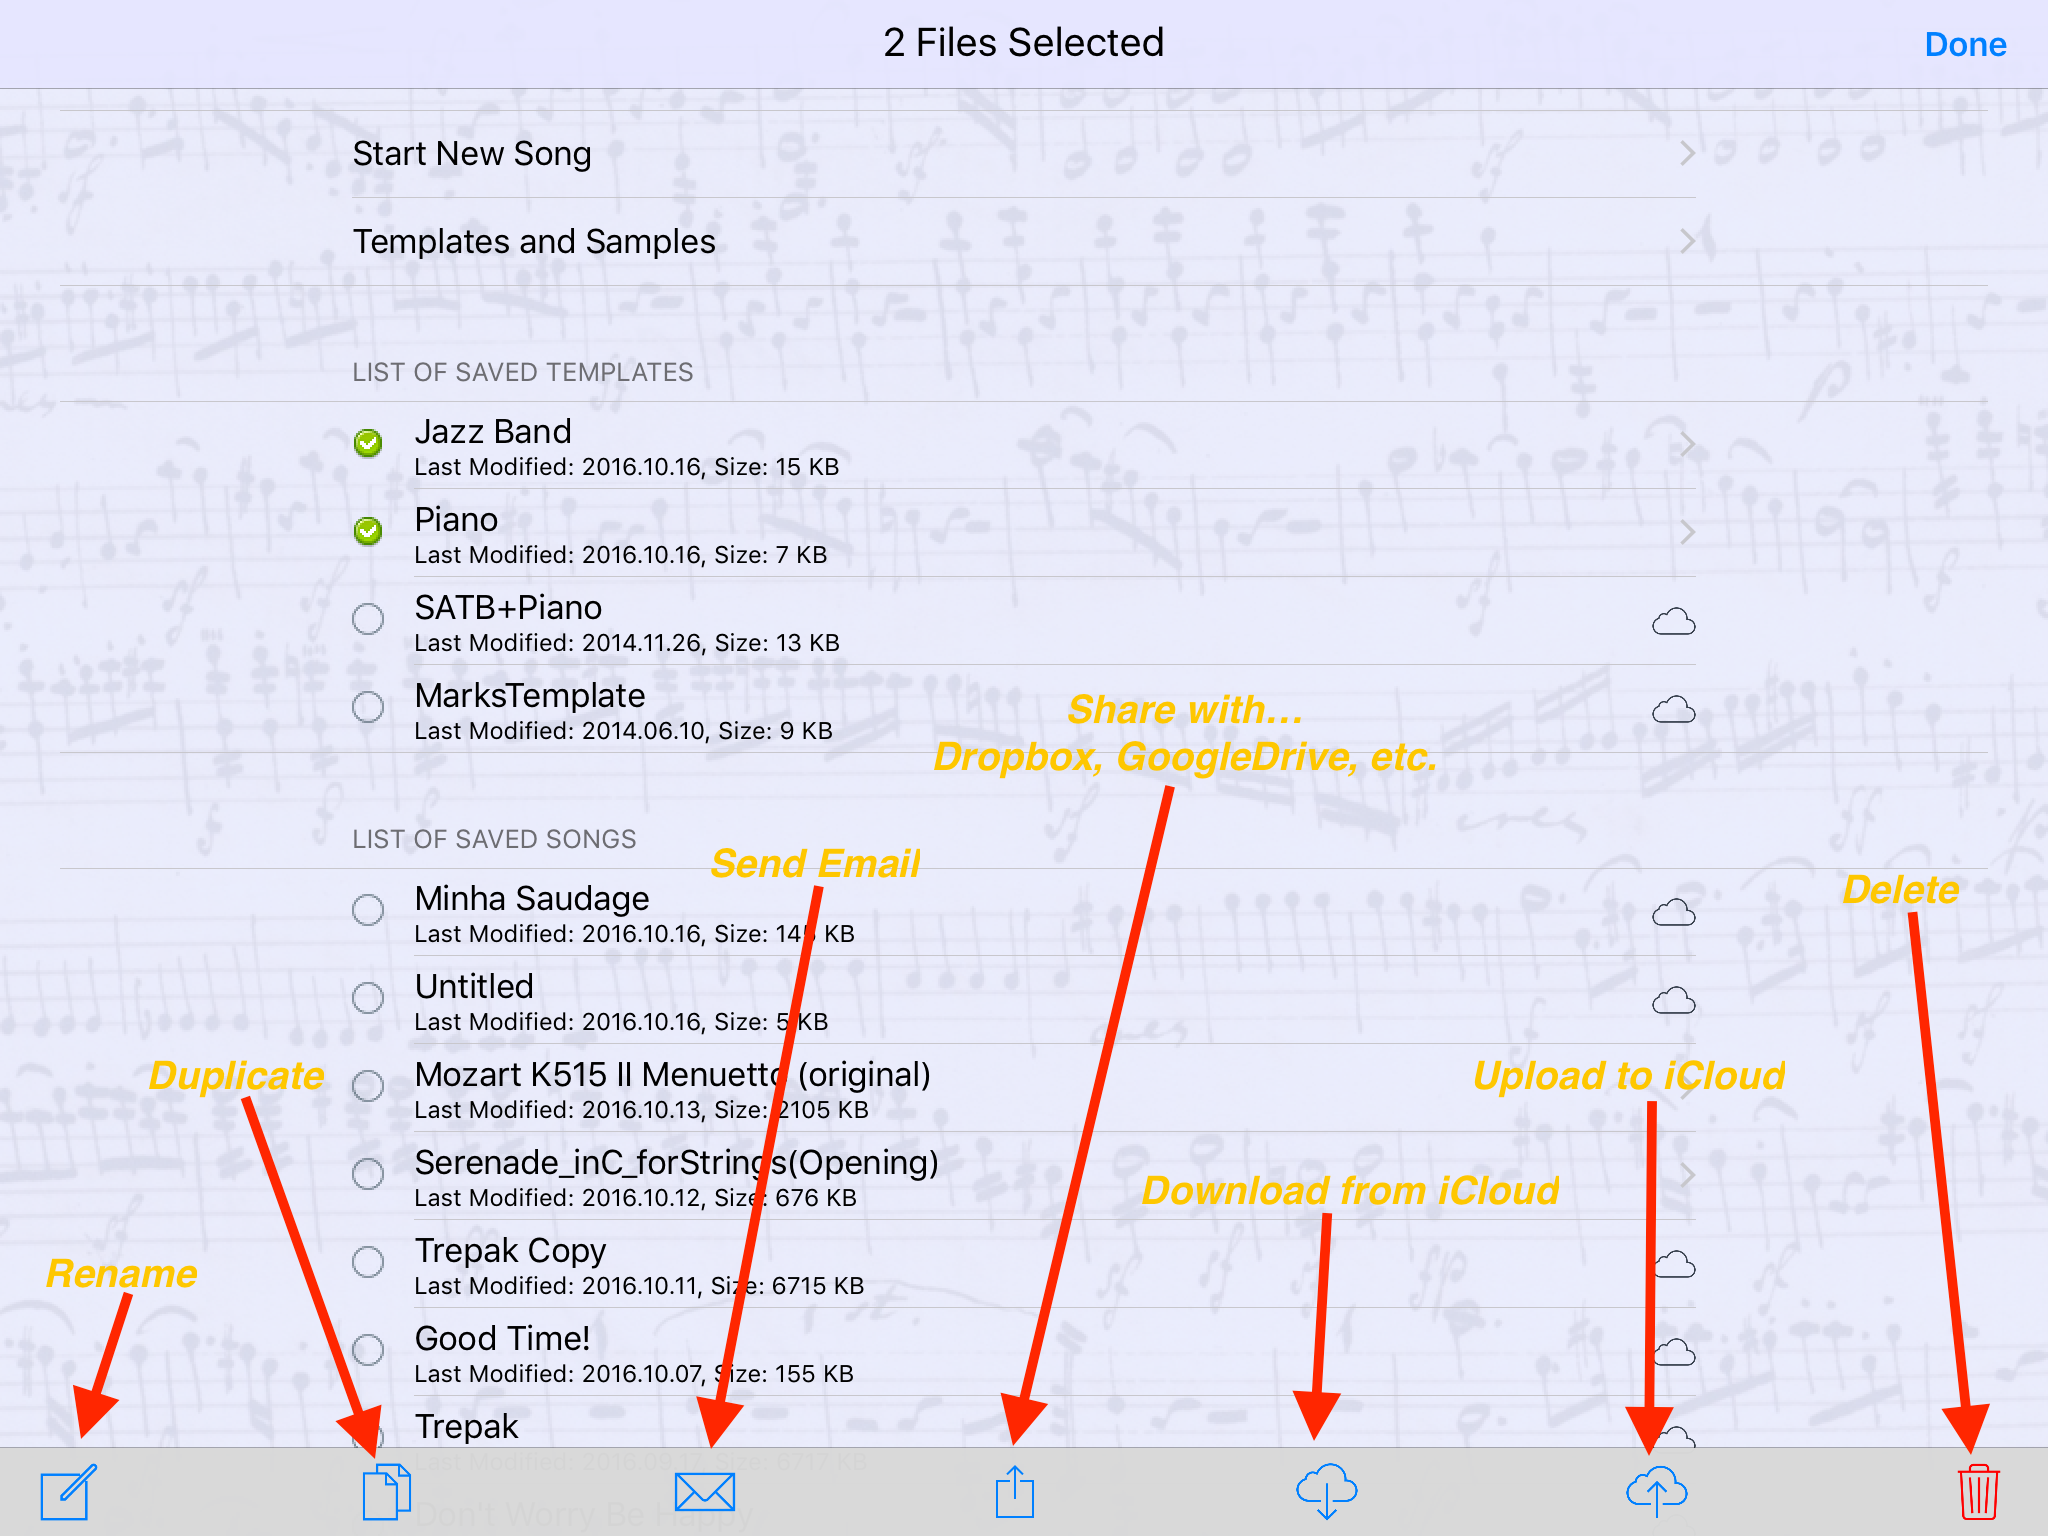
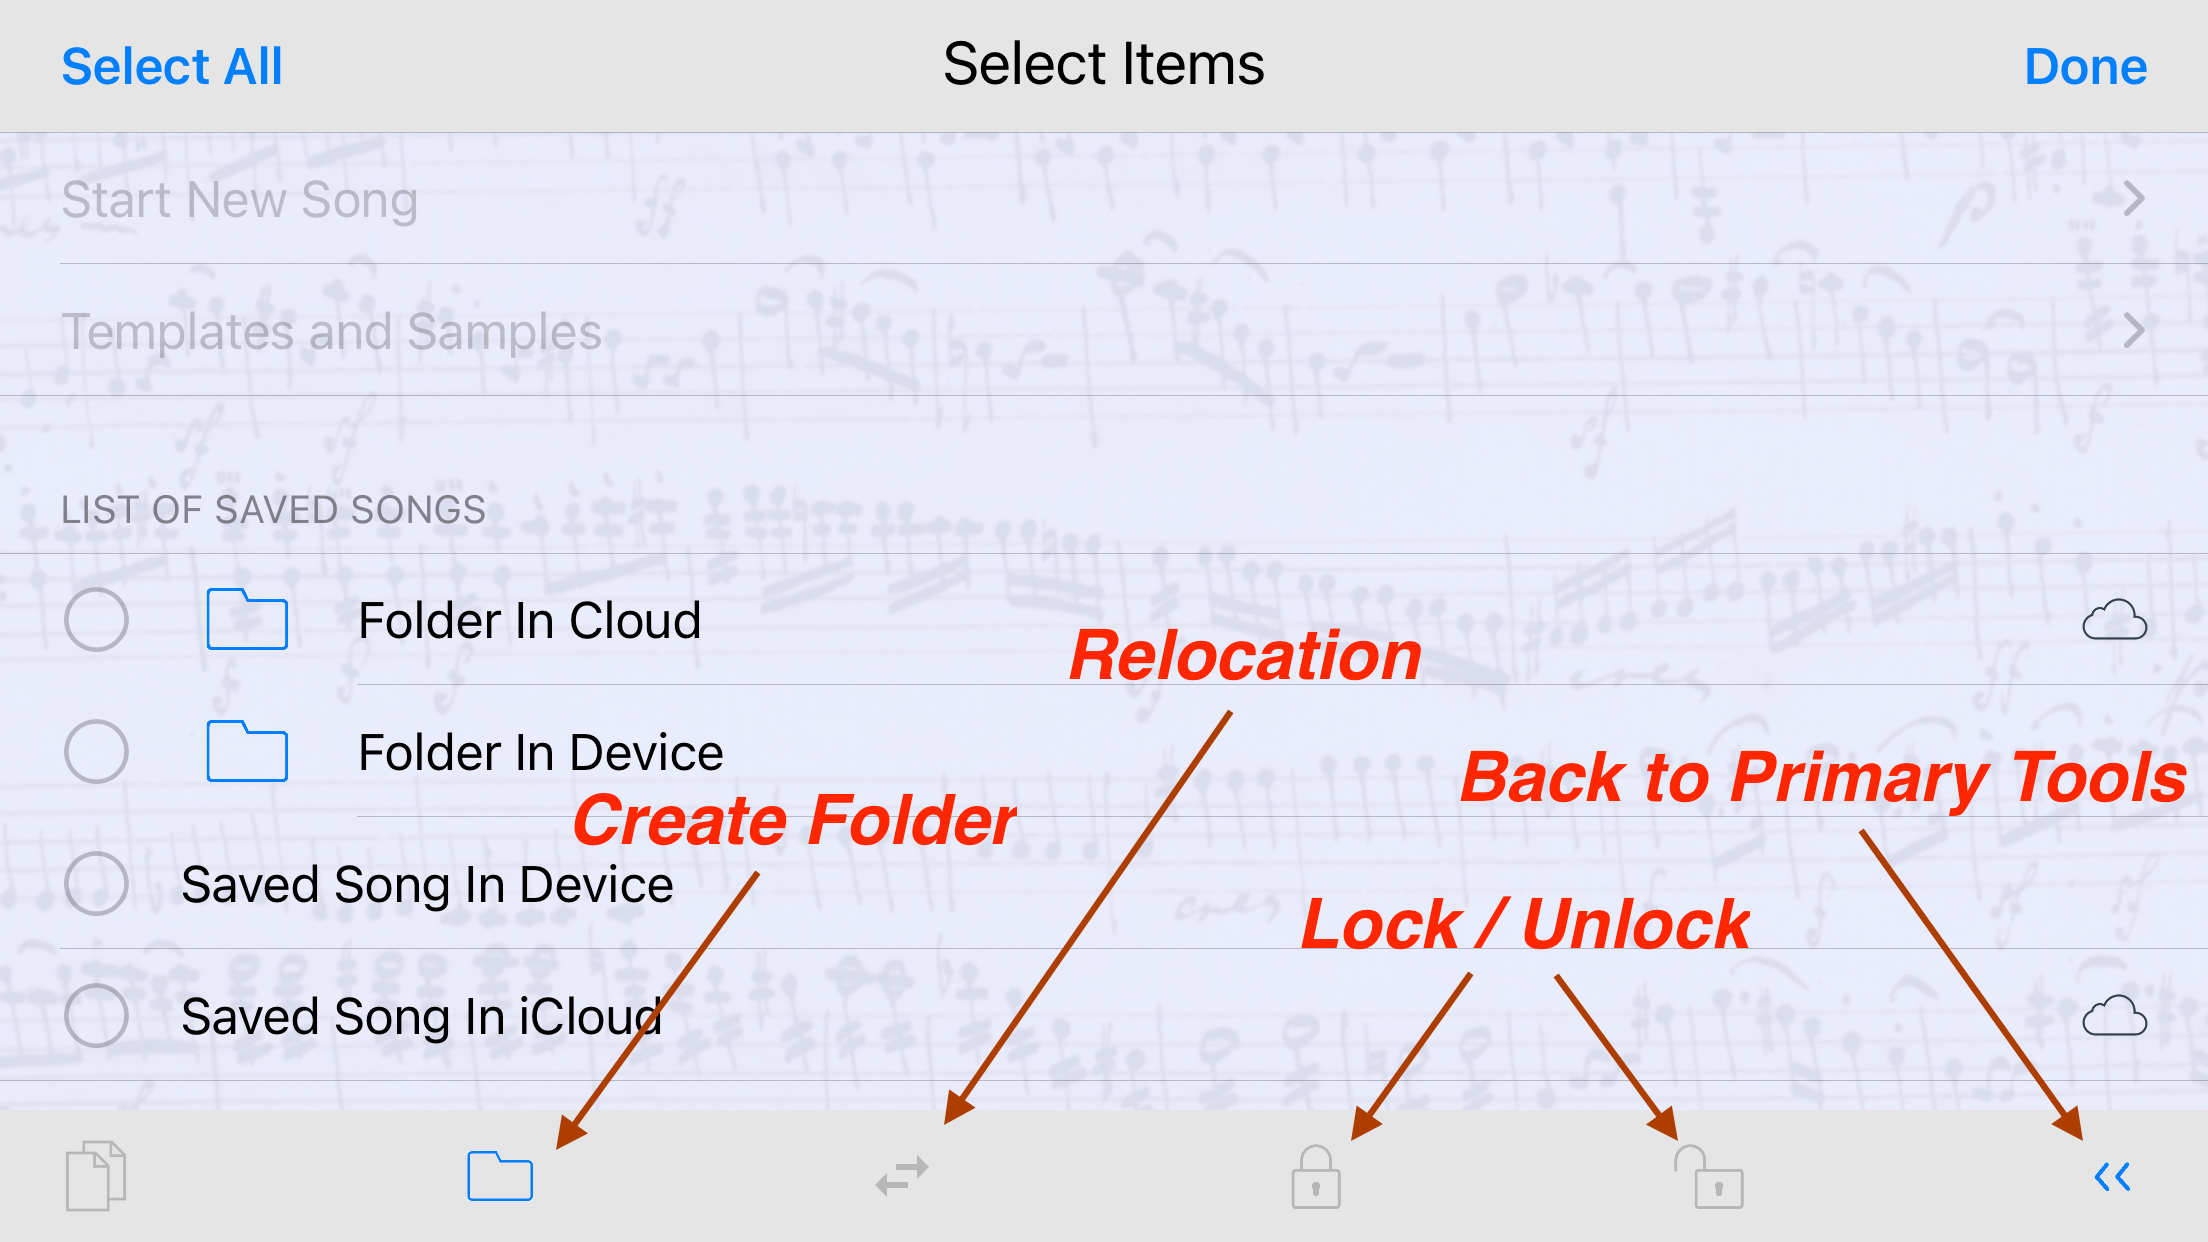
- AFM is Not Available on SE (Free version) as it doesn't support In-App Purchases.
- Non-AFM devices can can access to folders and the contents created and iCloud-shared by AFM devices (can not change them with AFM).
- Tool Layout is different on Android devices as it doesn't support iCloud.
页面查看
本视频将介绍:
- Parts are automatically generated.
- Layout settings are INDEPENDENT on score & each part
- How to change visible tracks on EditorView & PageView
- How to create a custom part
Export to GarageBand to create Audio File
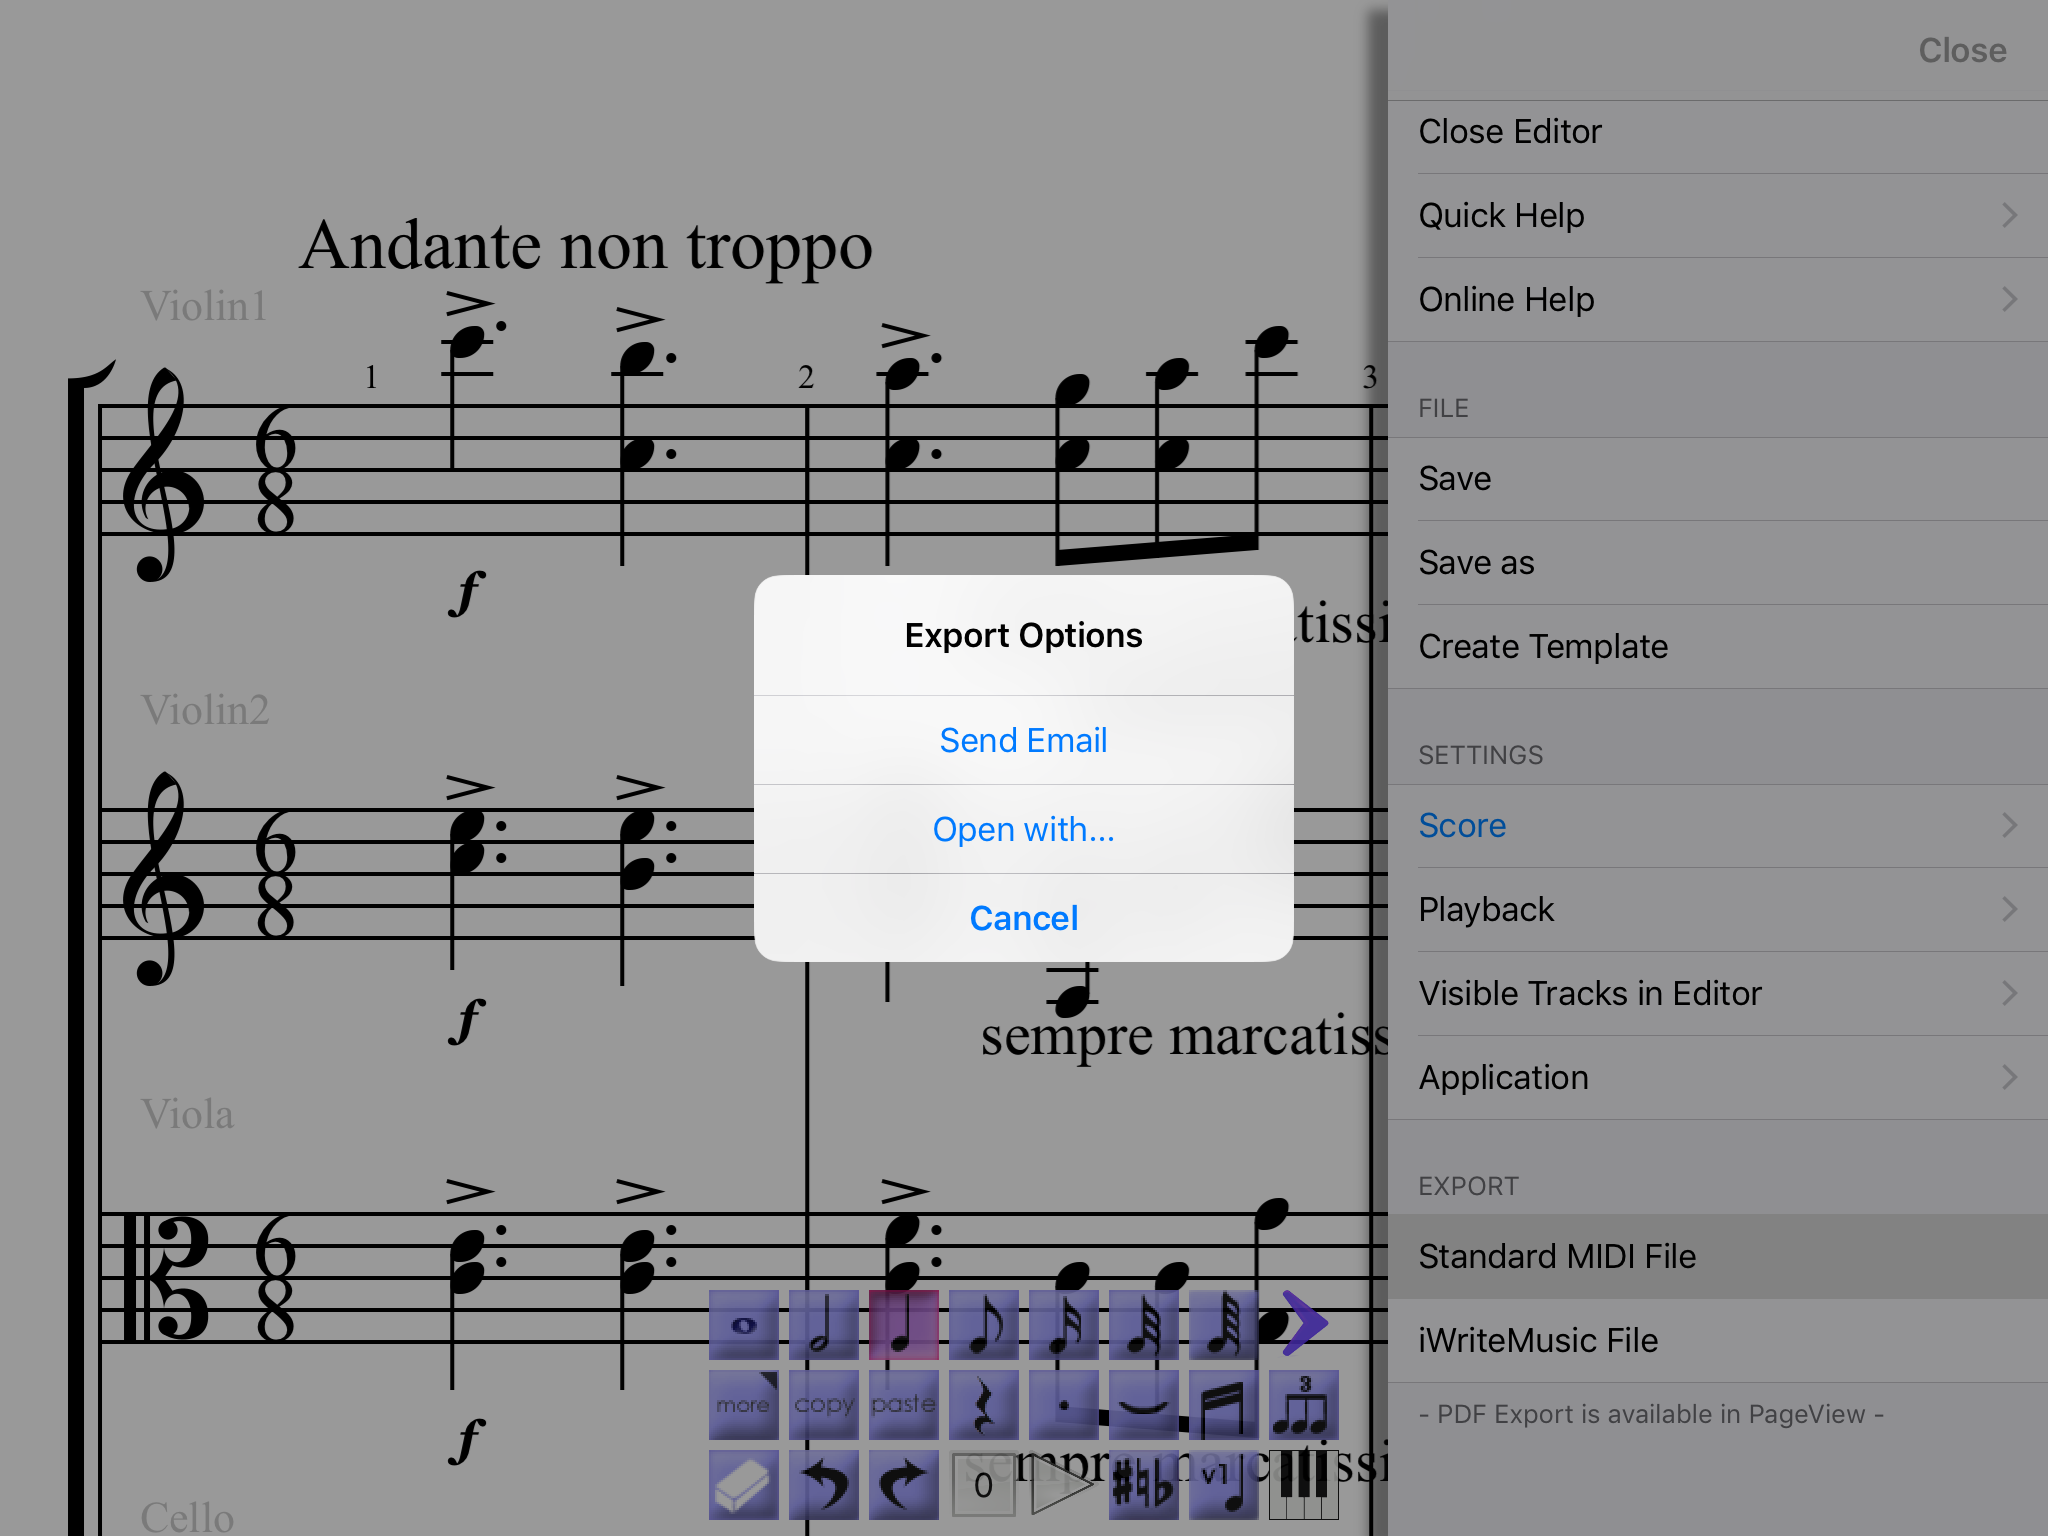
- Select Standard MIDI file in Export section, then select Open with...
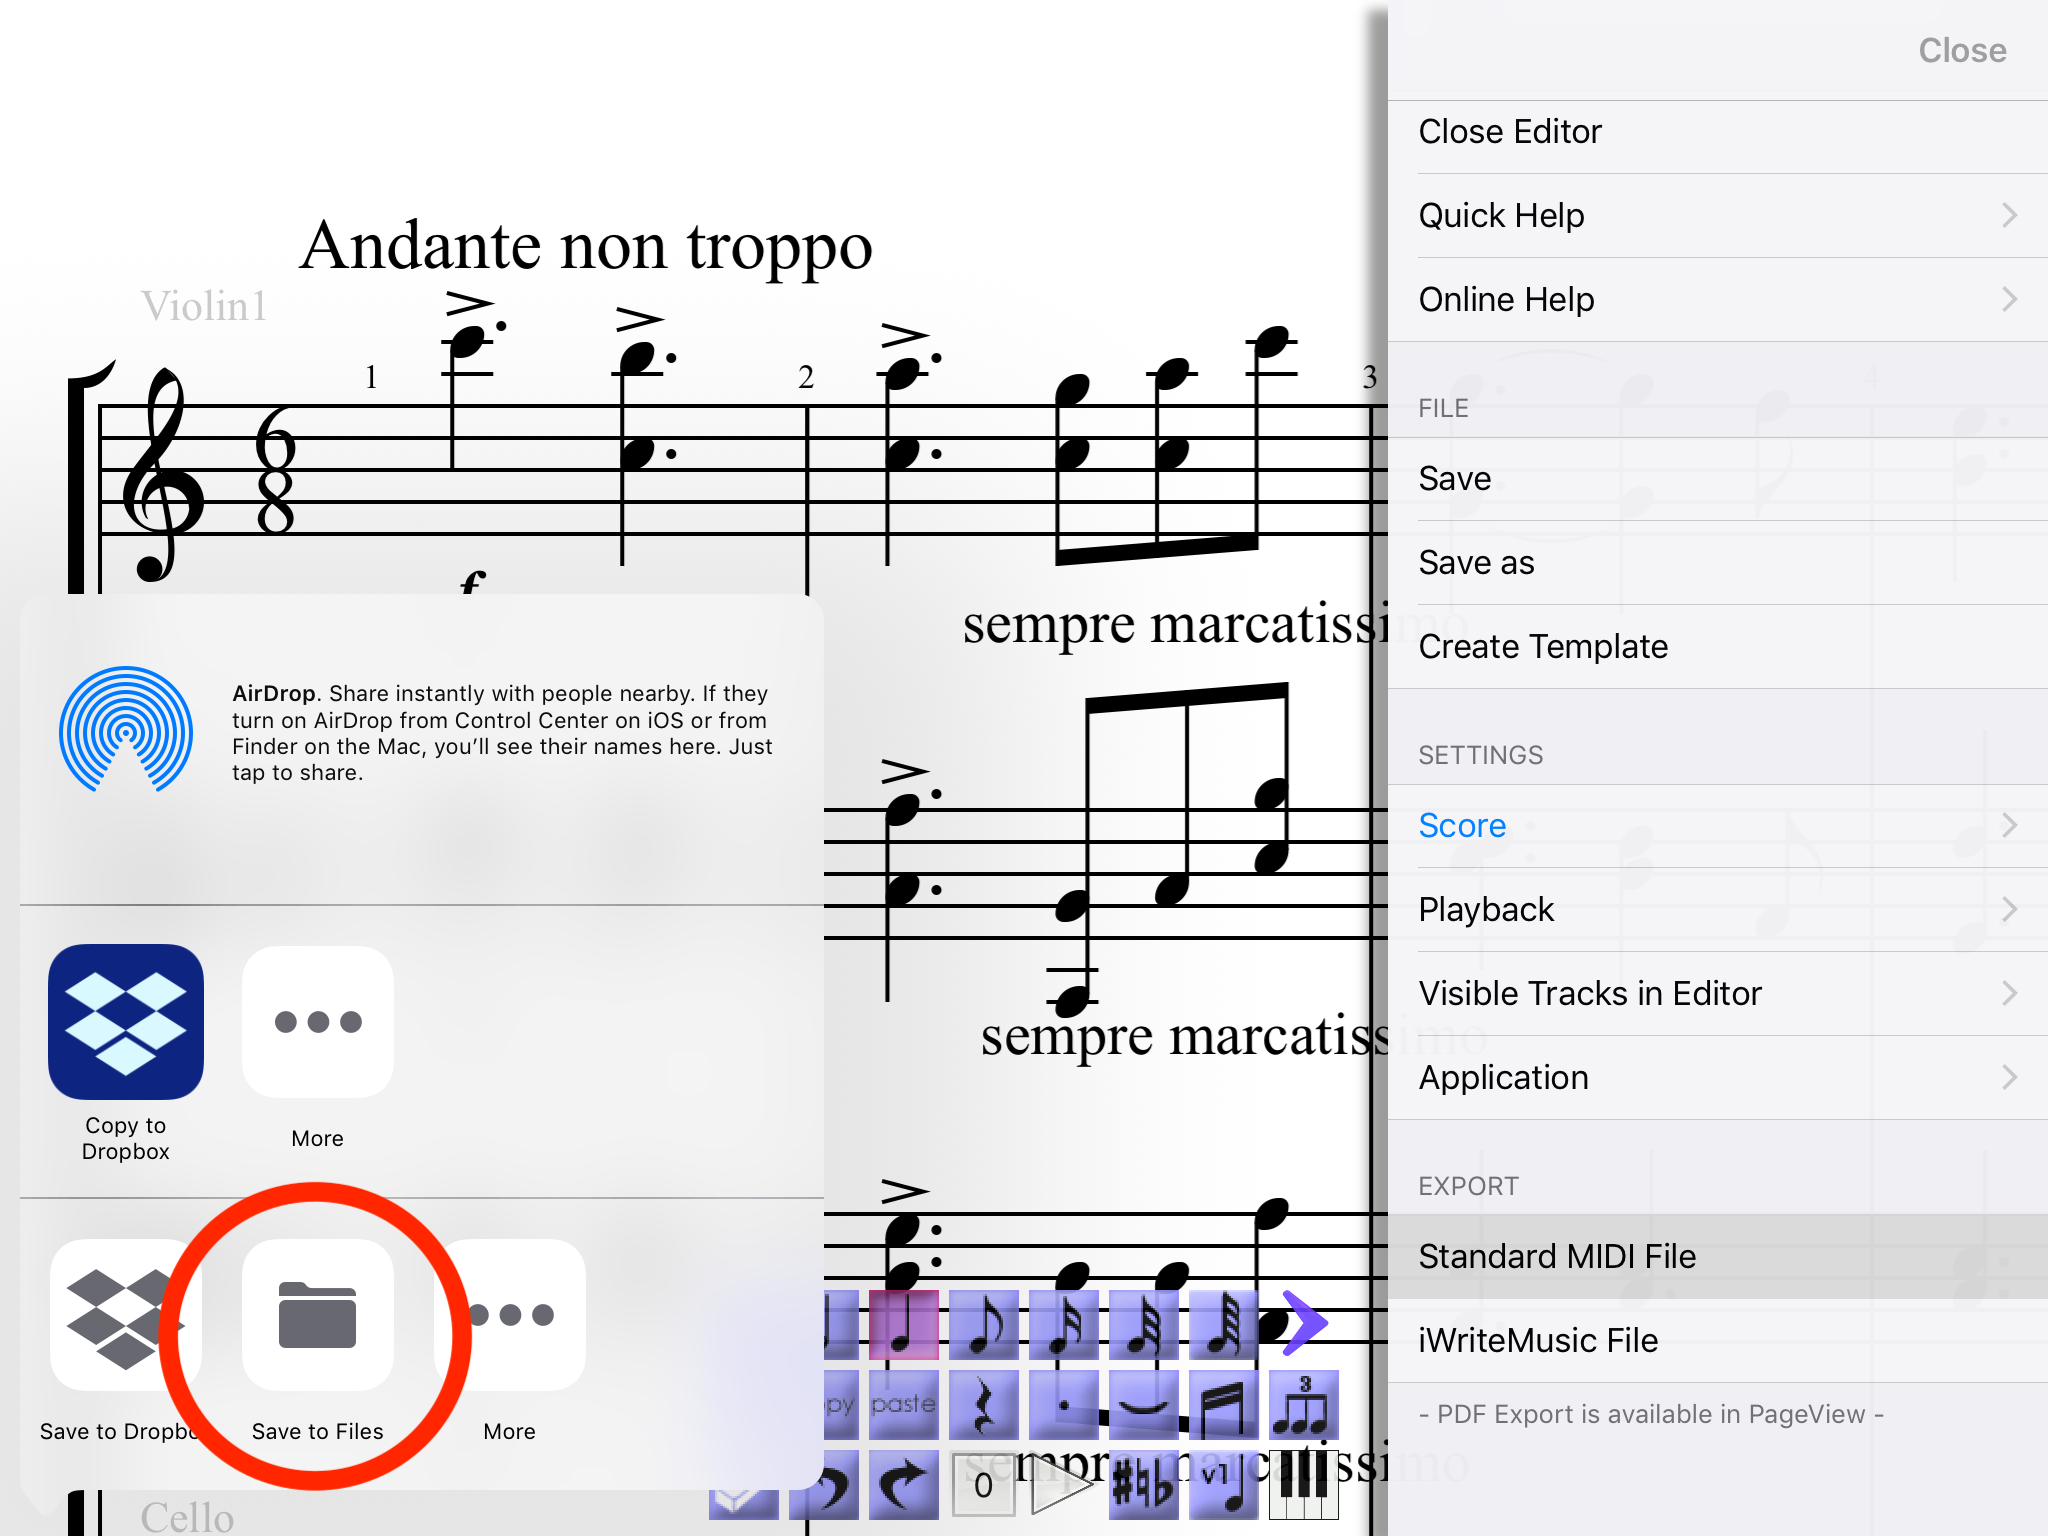
- Select Save to Files.
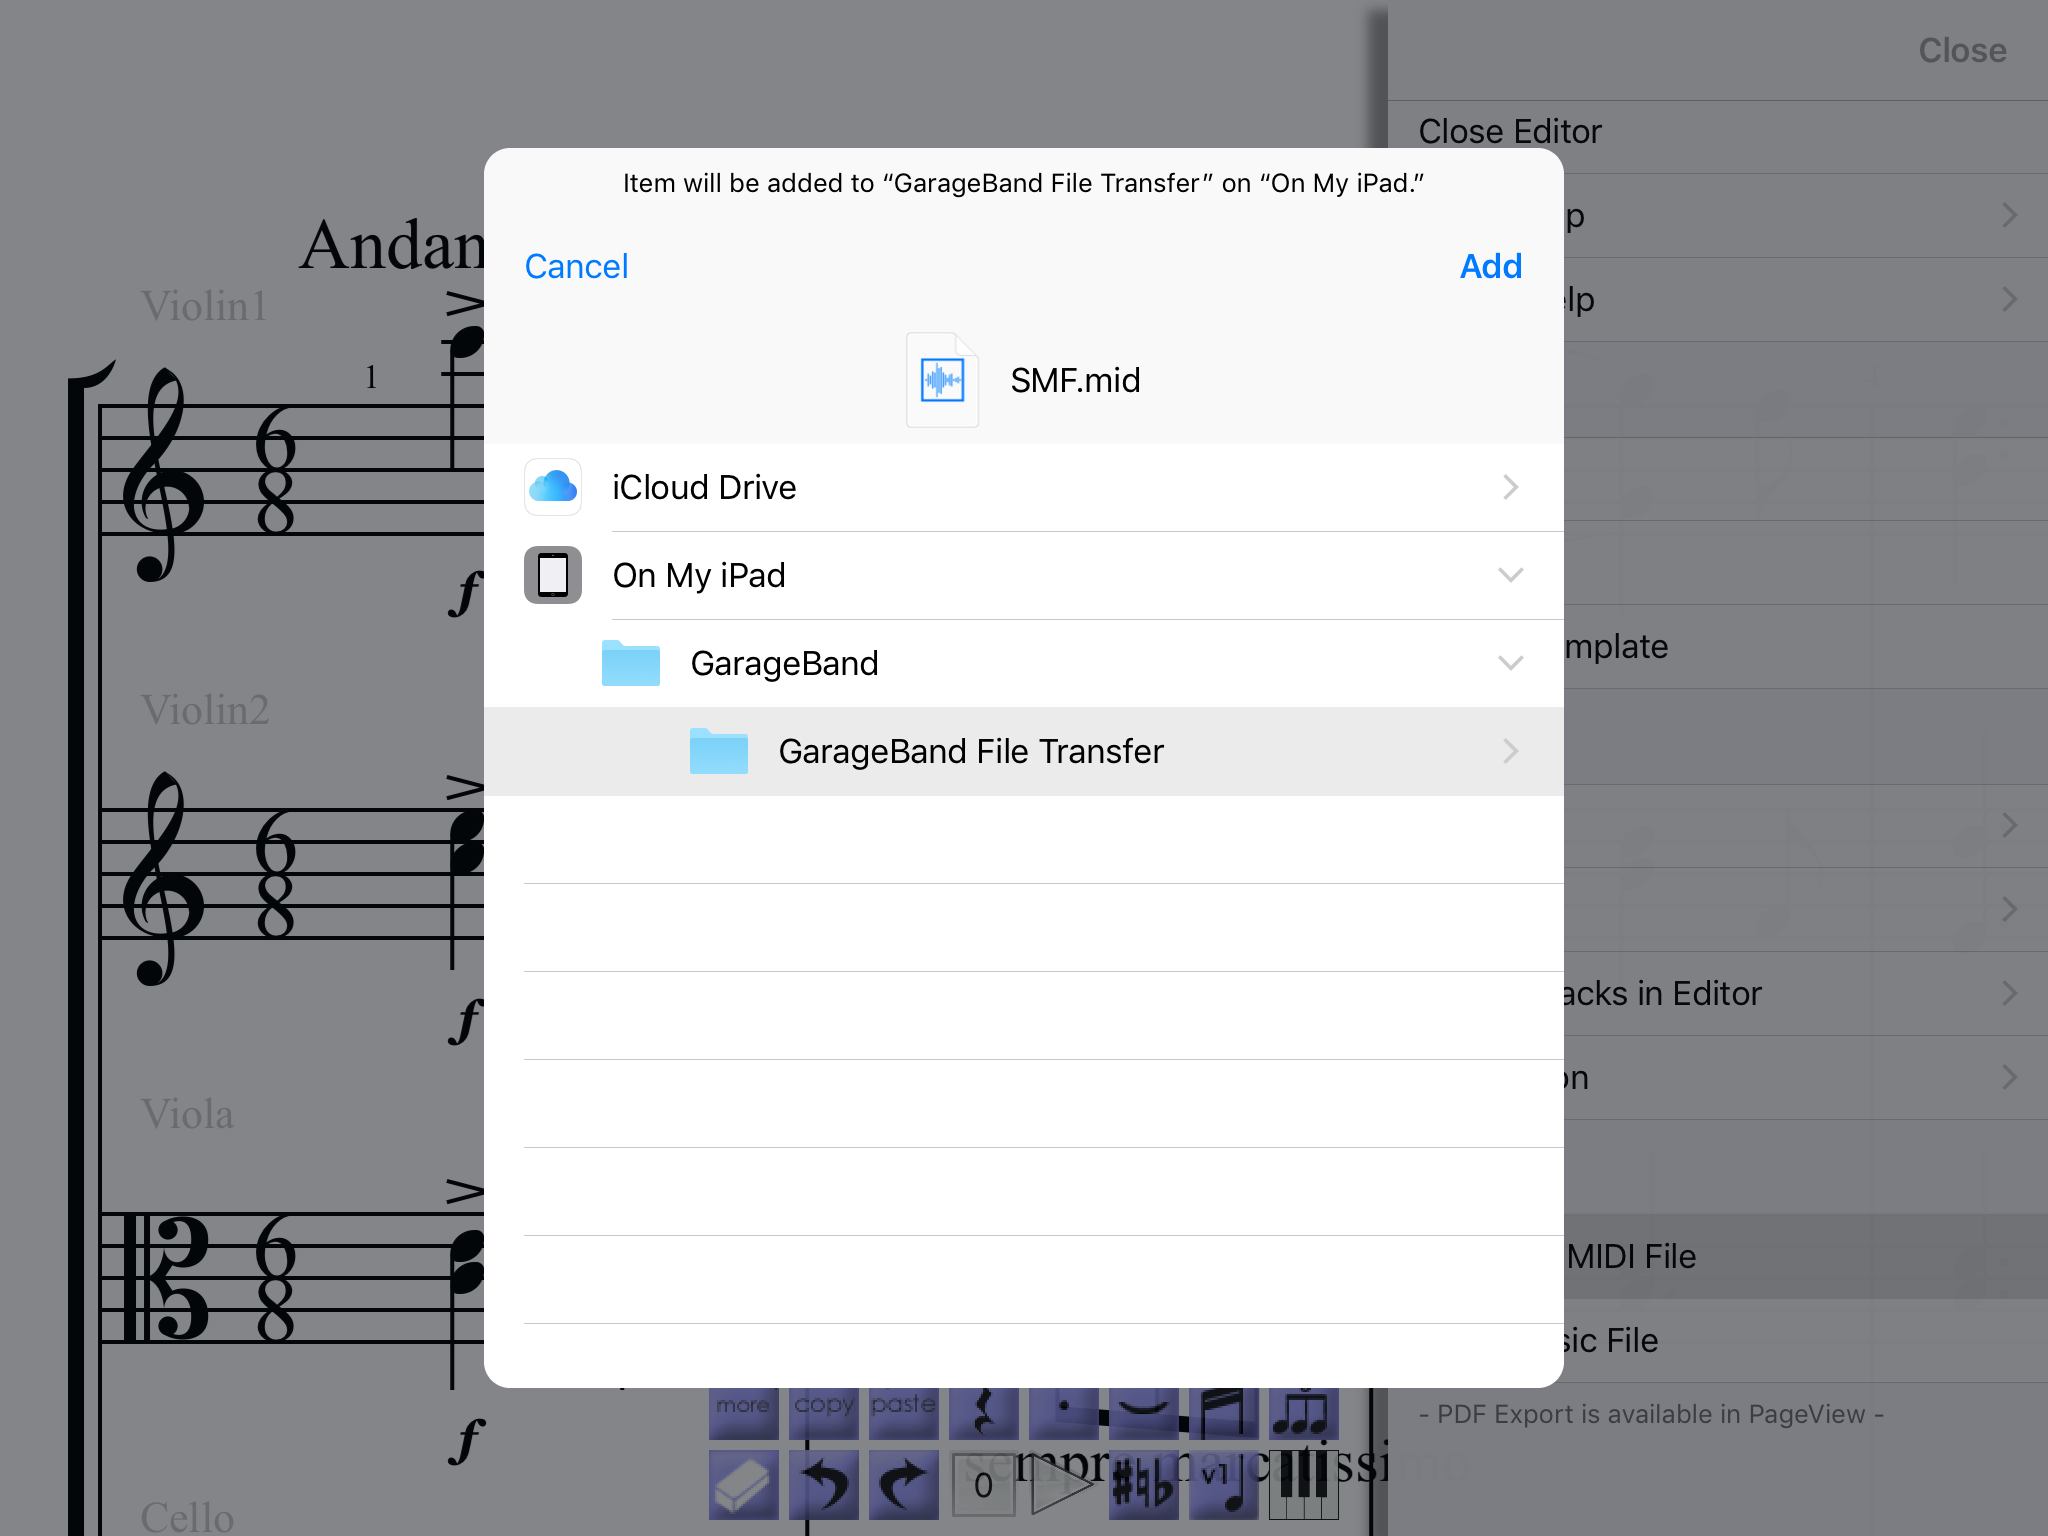
- Open My iPad/iPhone, select "GarageBand File Transfer" then select "Add".
- Open GarageBand, select + at top right to create a New Song.
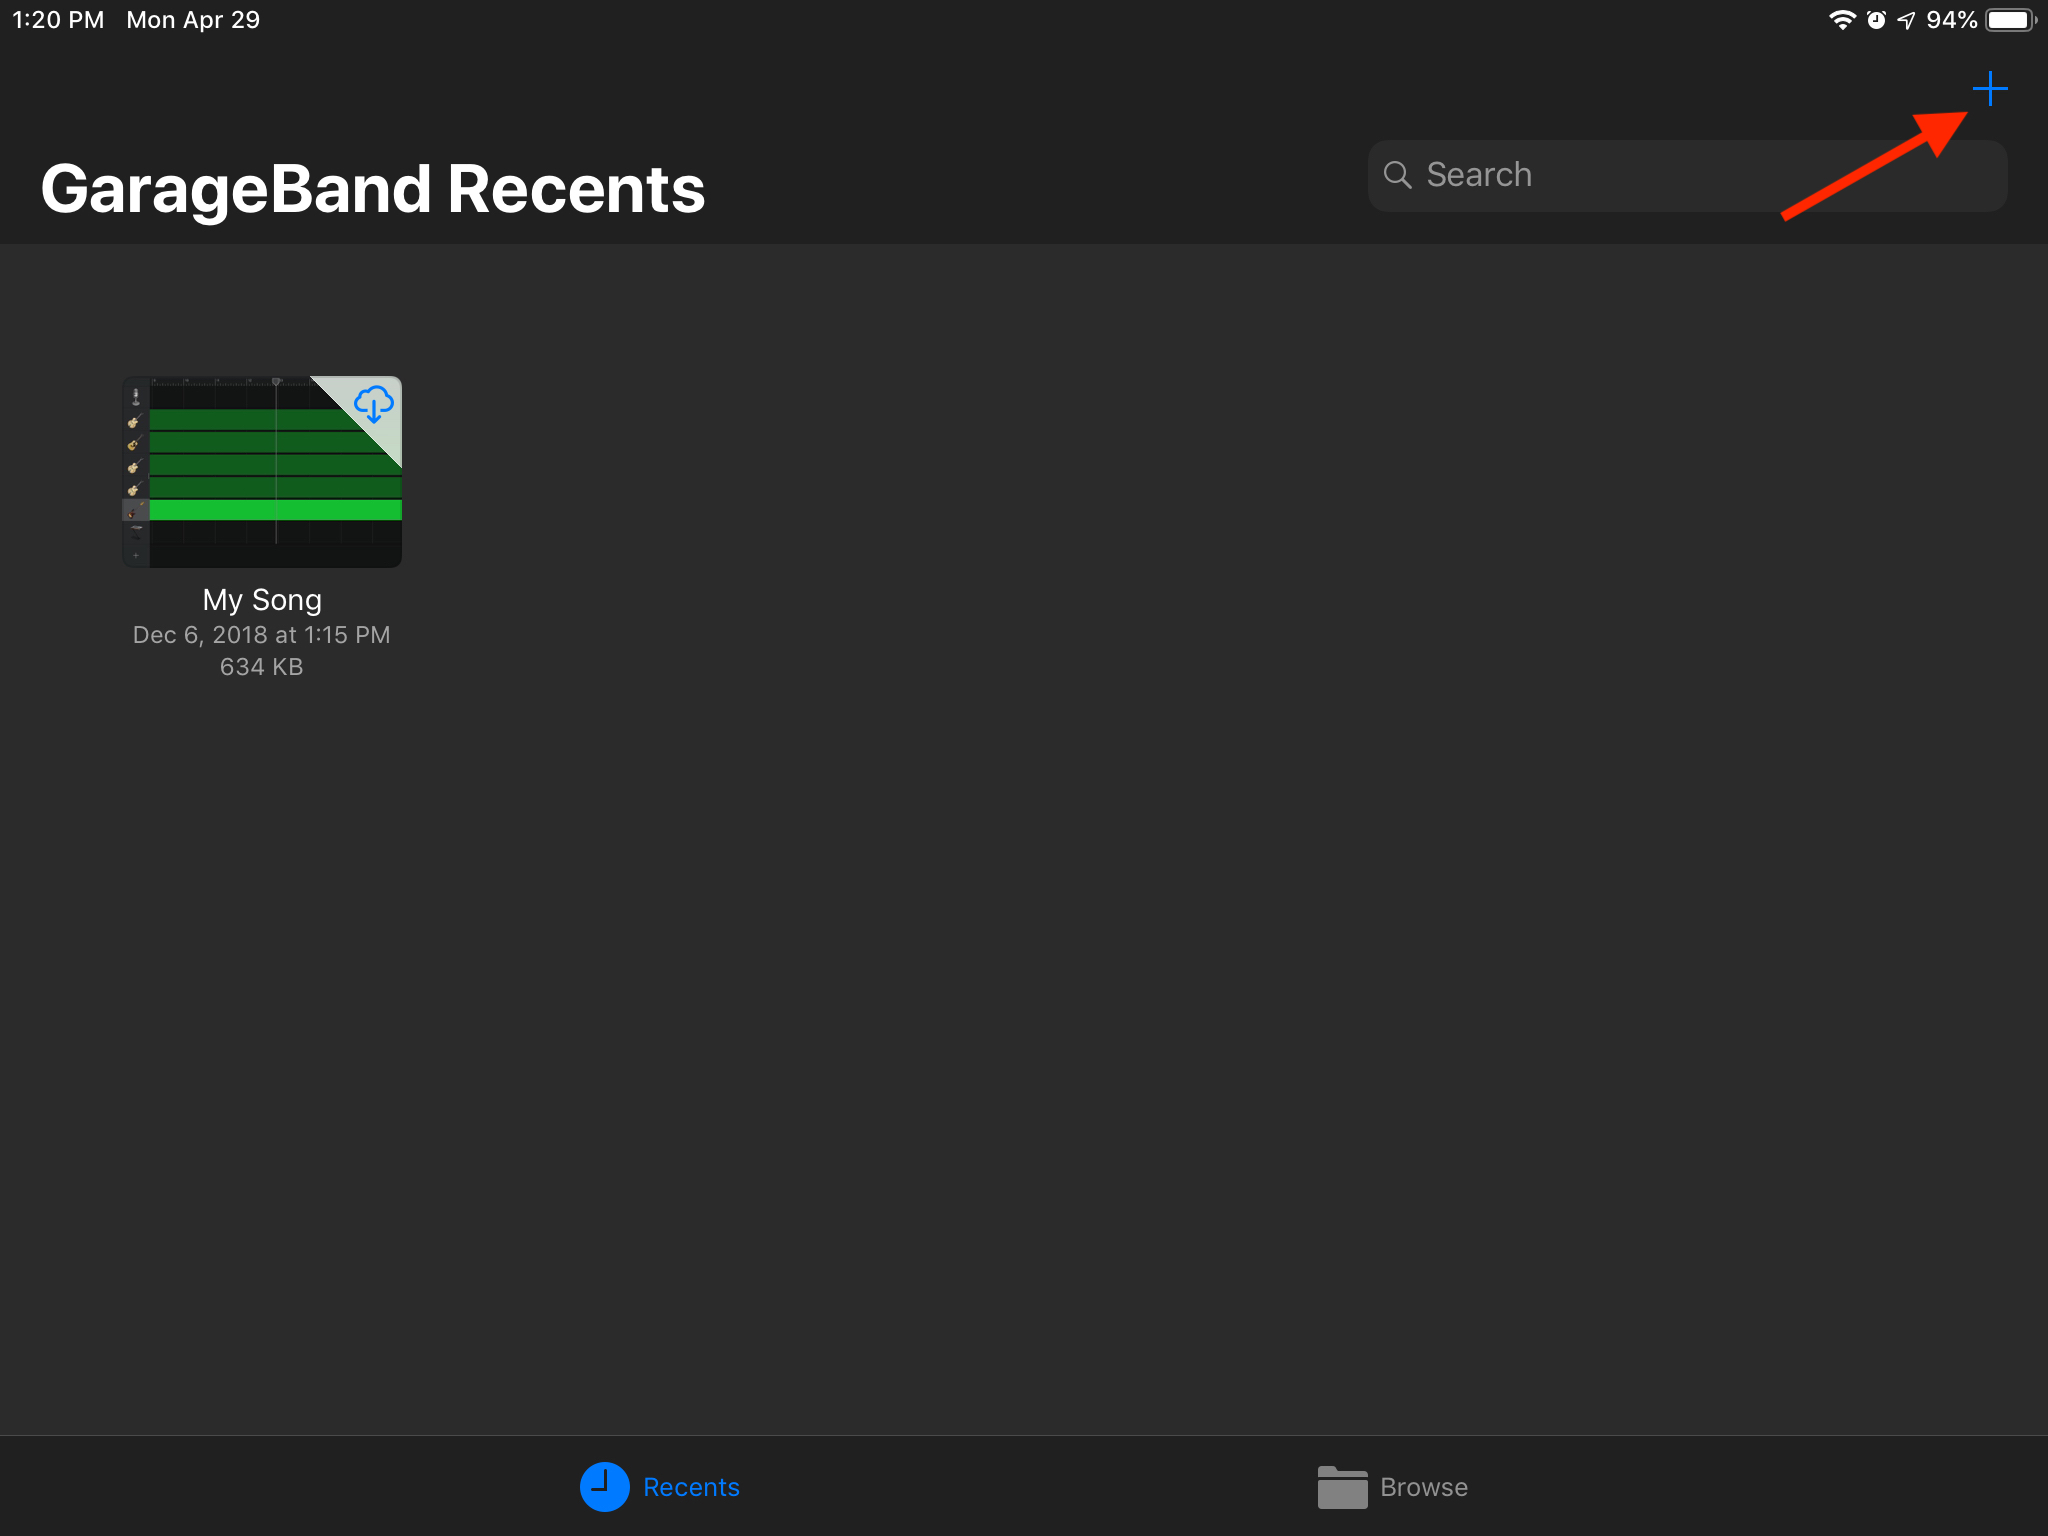
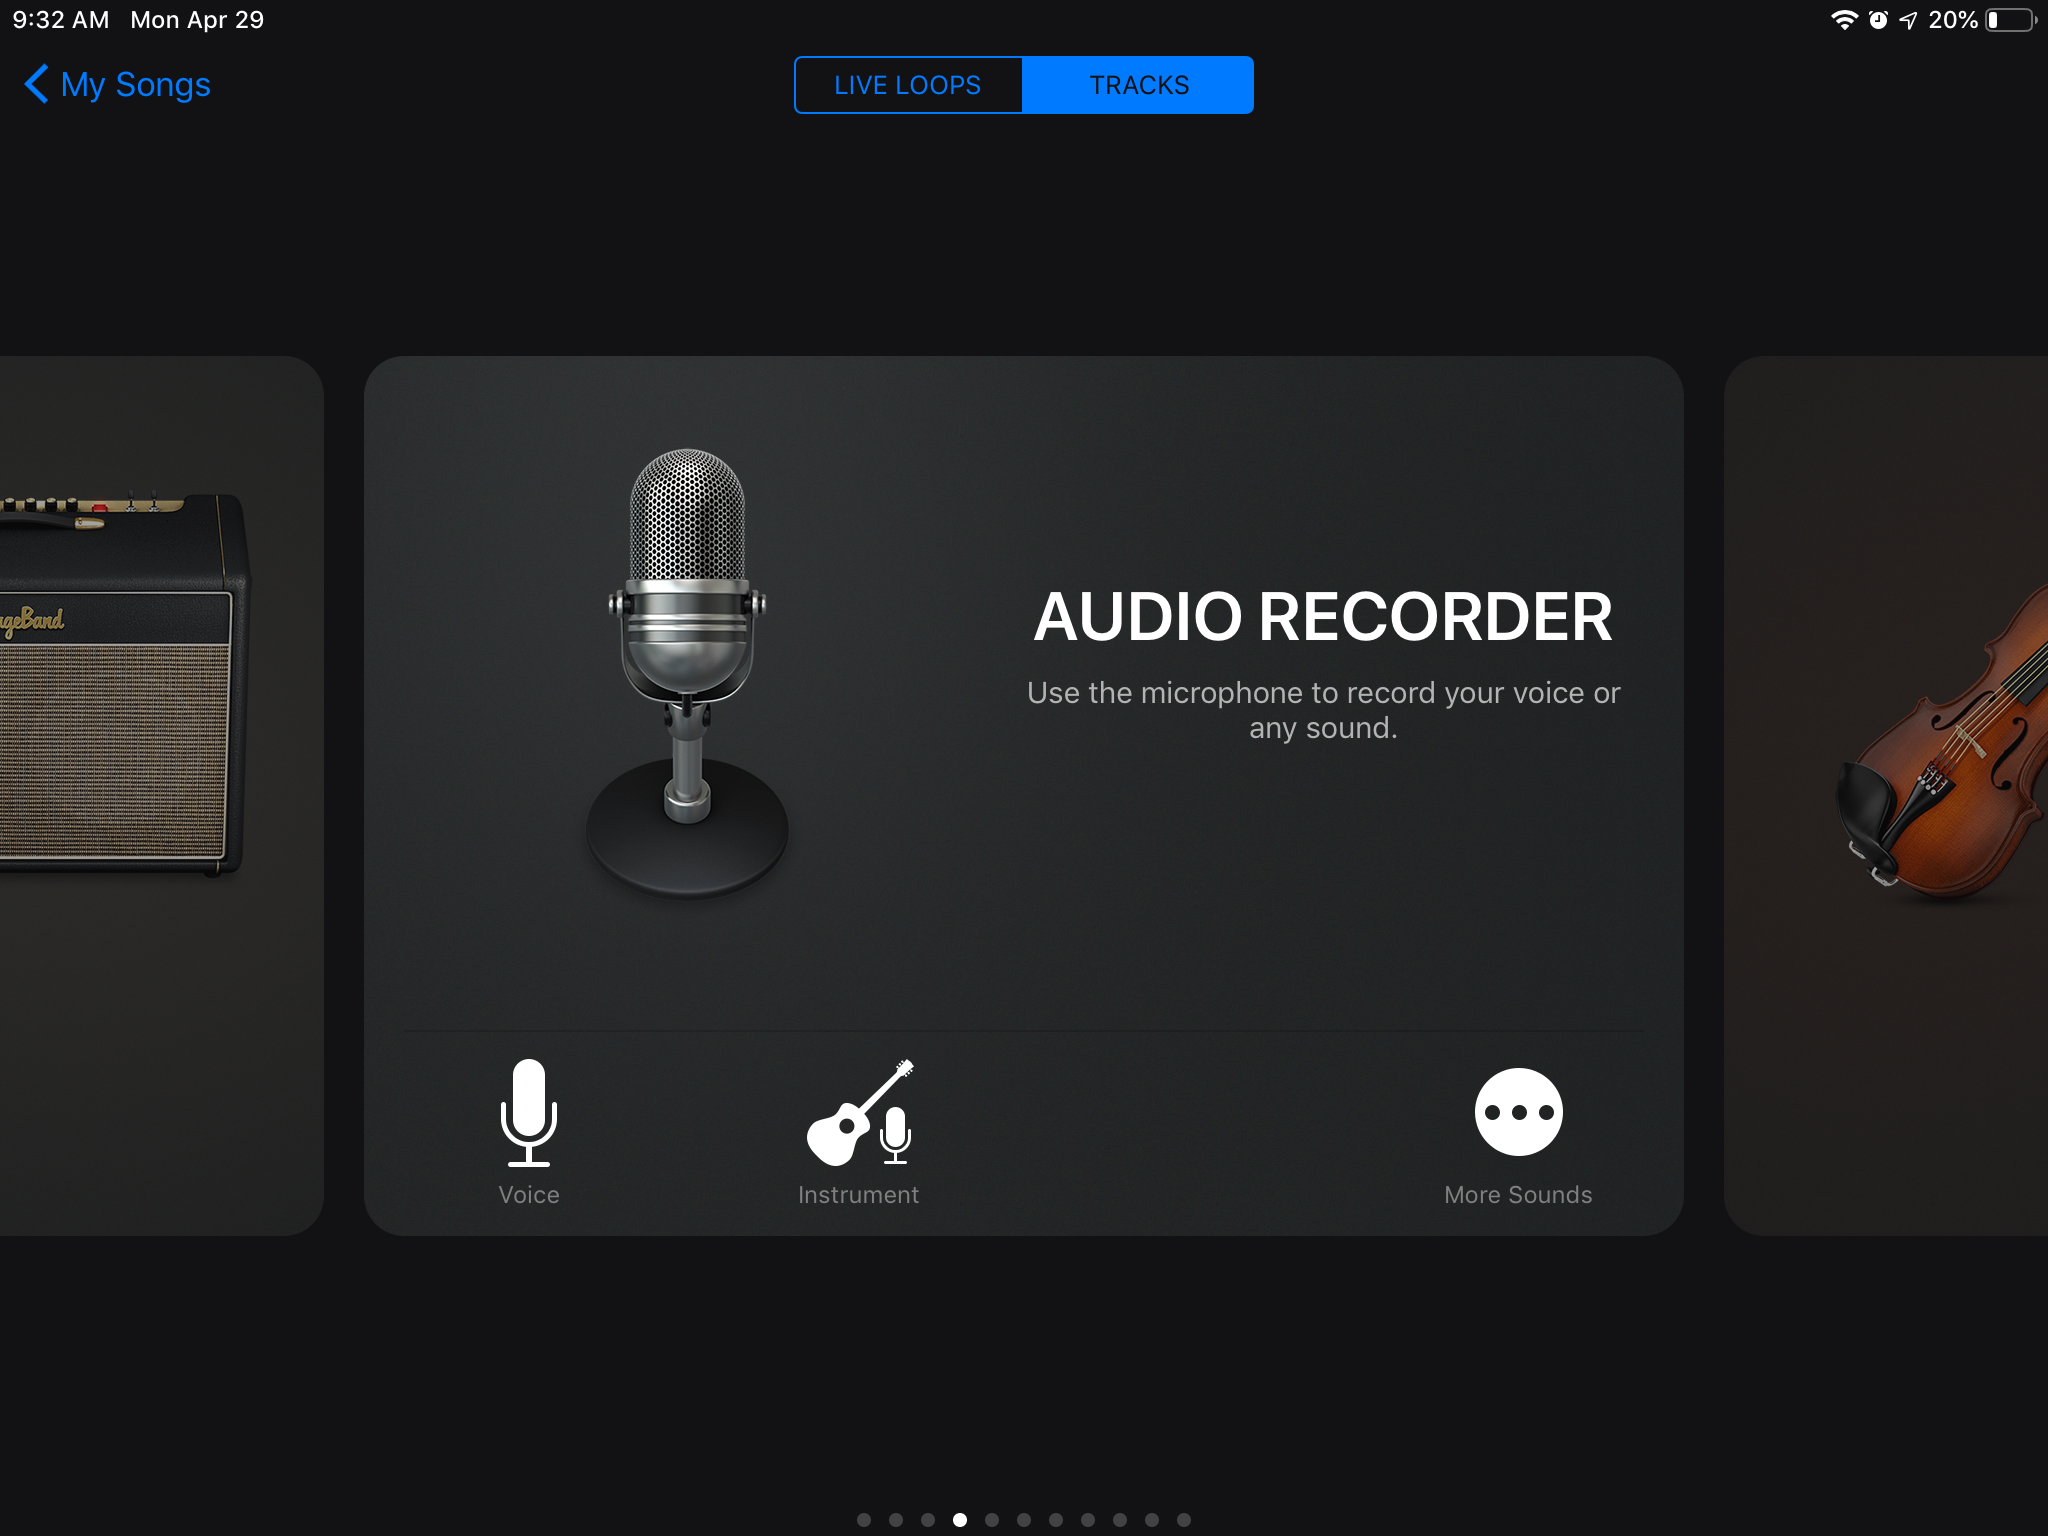
- Select Audio Recorder.
- Select Loop icon from top right, then select Files at the top of popup.
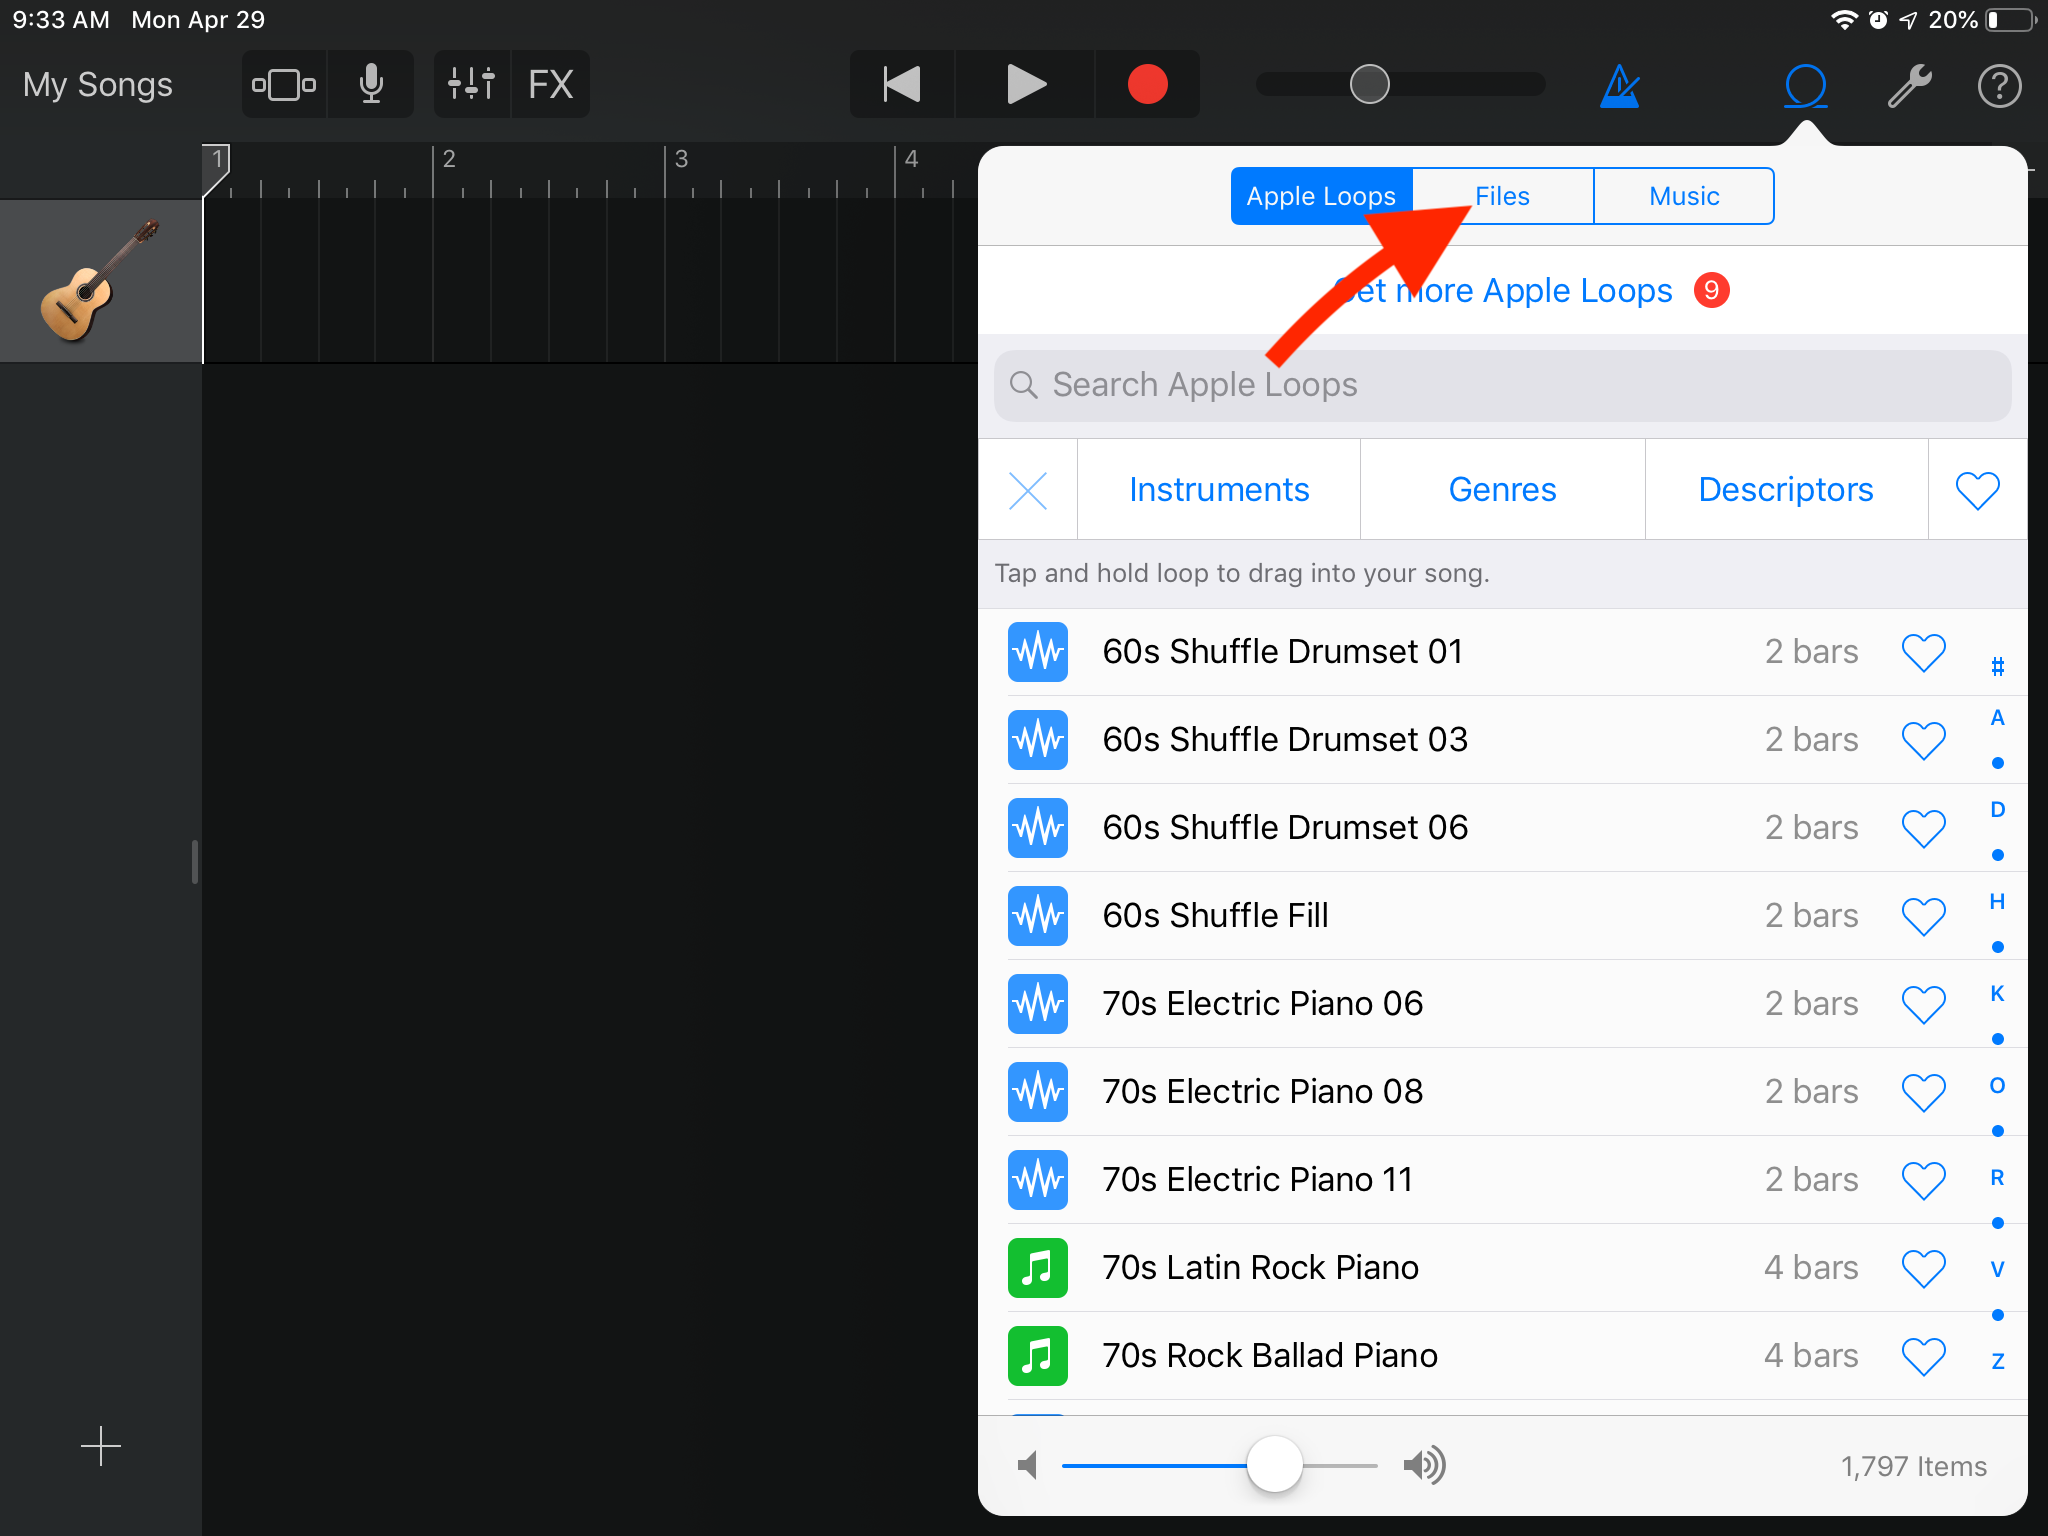
- You'll find SMF.mid, which you've just exported from iWriteMusic. Touch & Hold it.

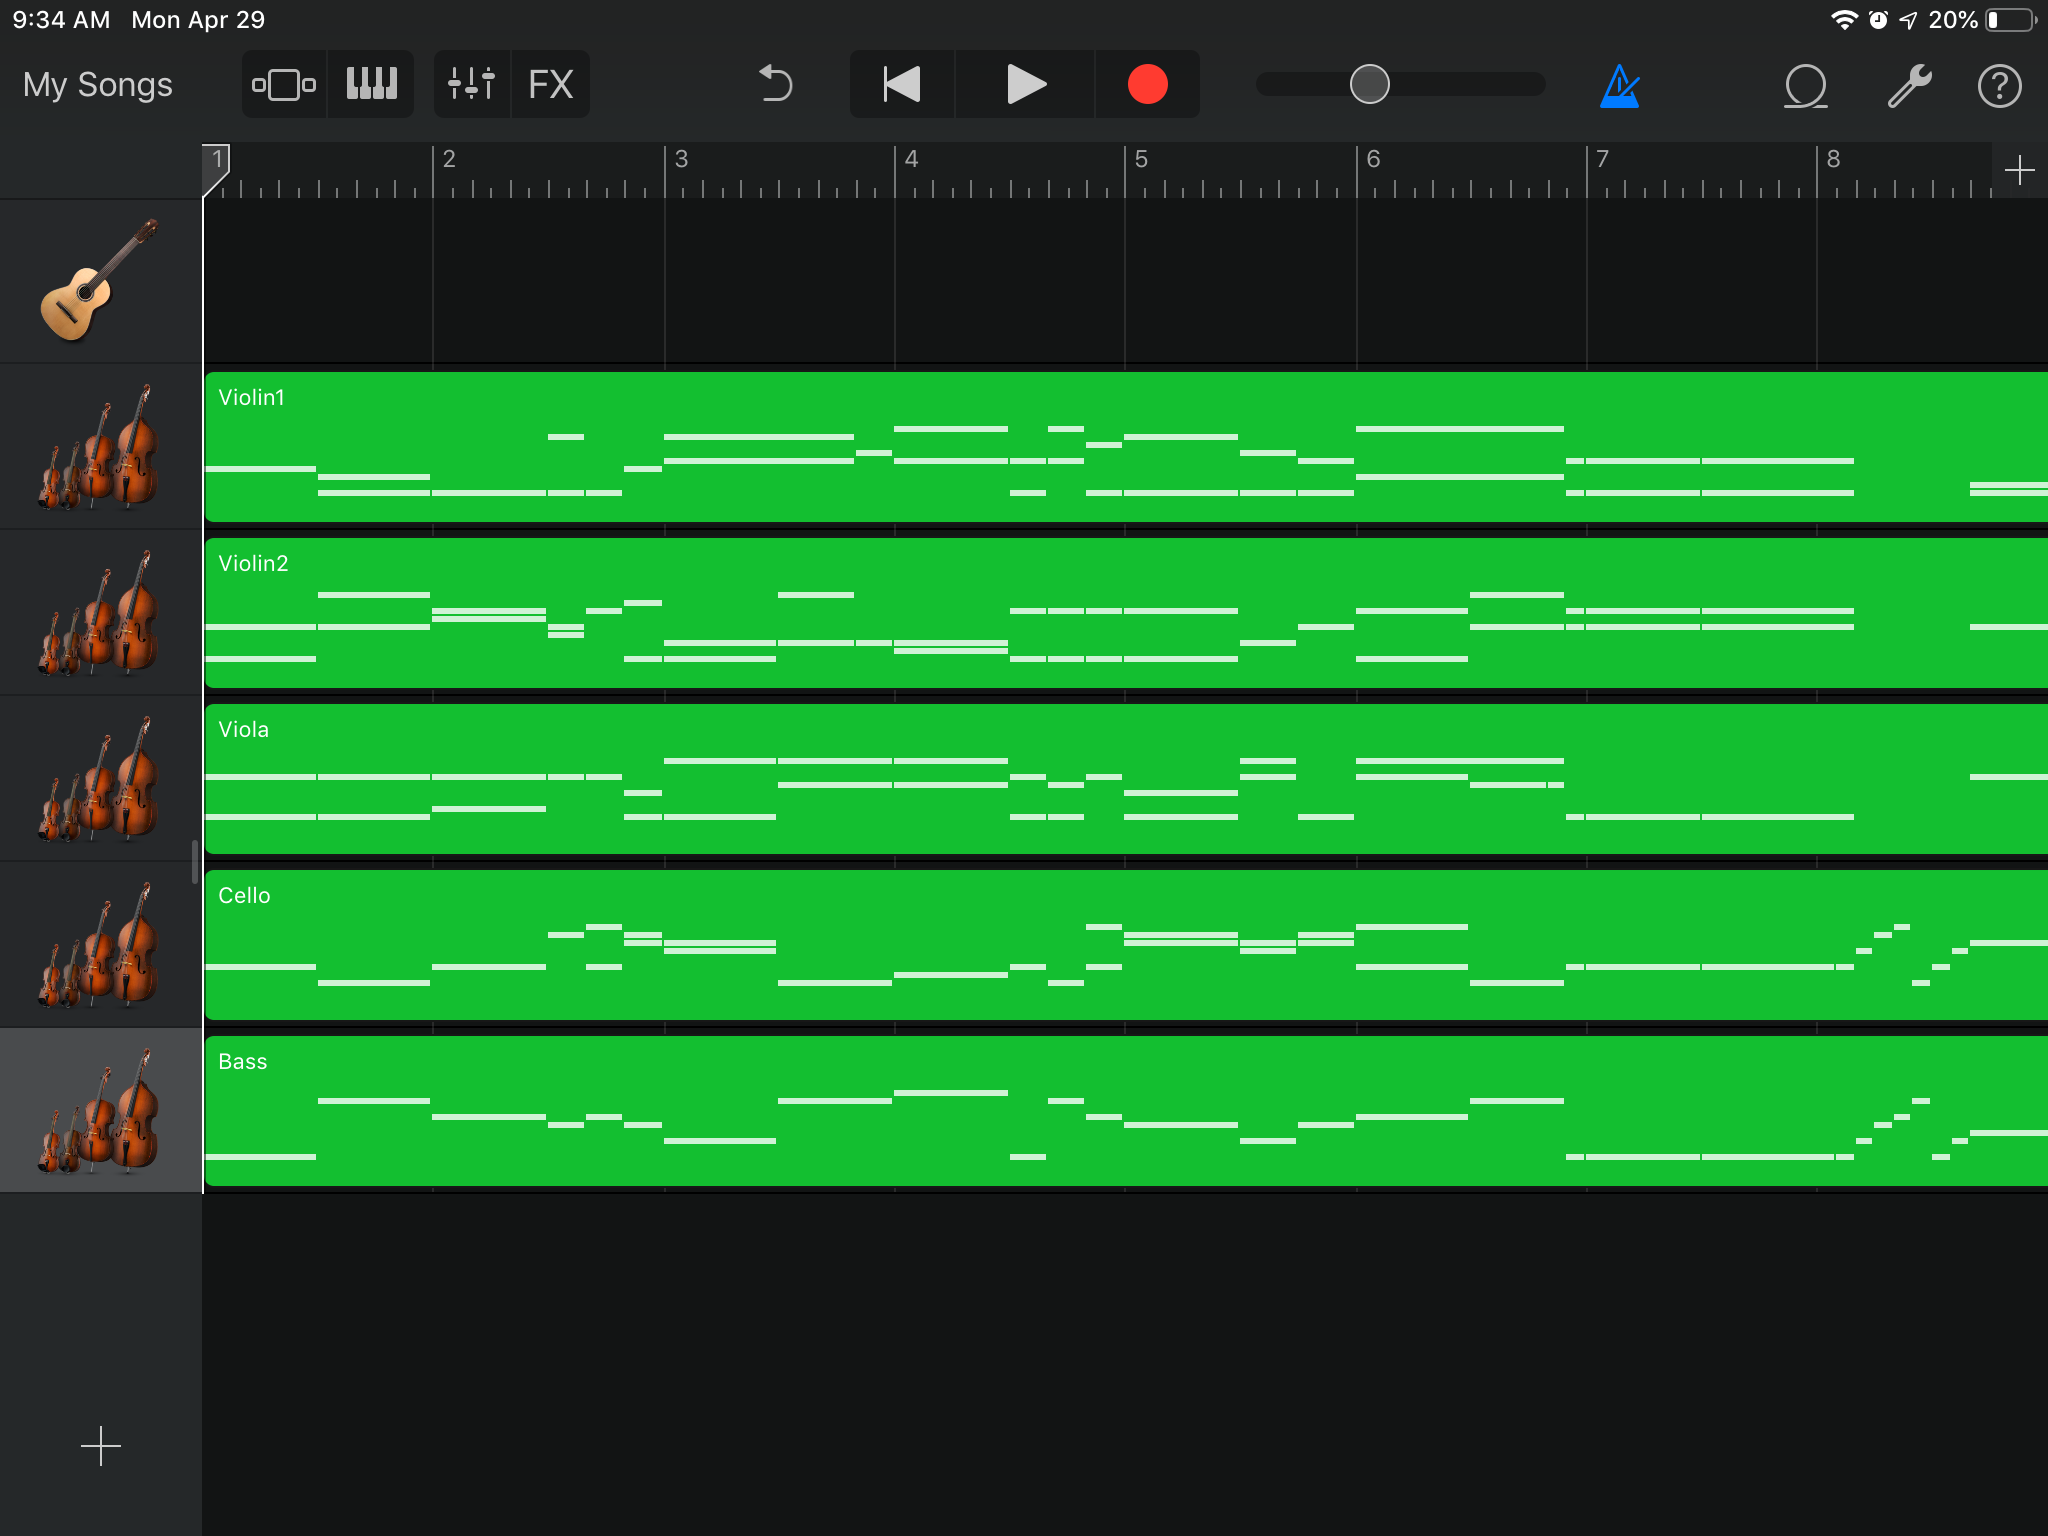
- Then drag it to create a new track.

- Now the MIDI file is imported to GarageBand. Go back to Song View by selecting My Song on top left.
- In Song List View, Touch & Hold the song you just created. Then Action Menu Bar will appear.
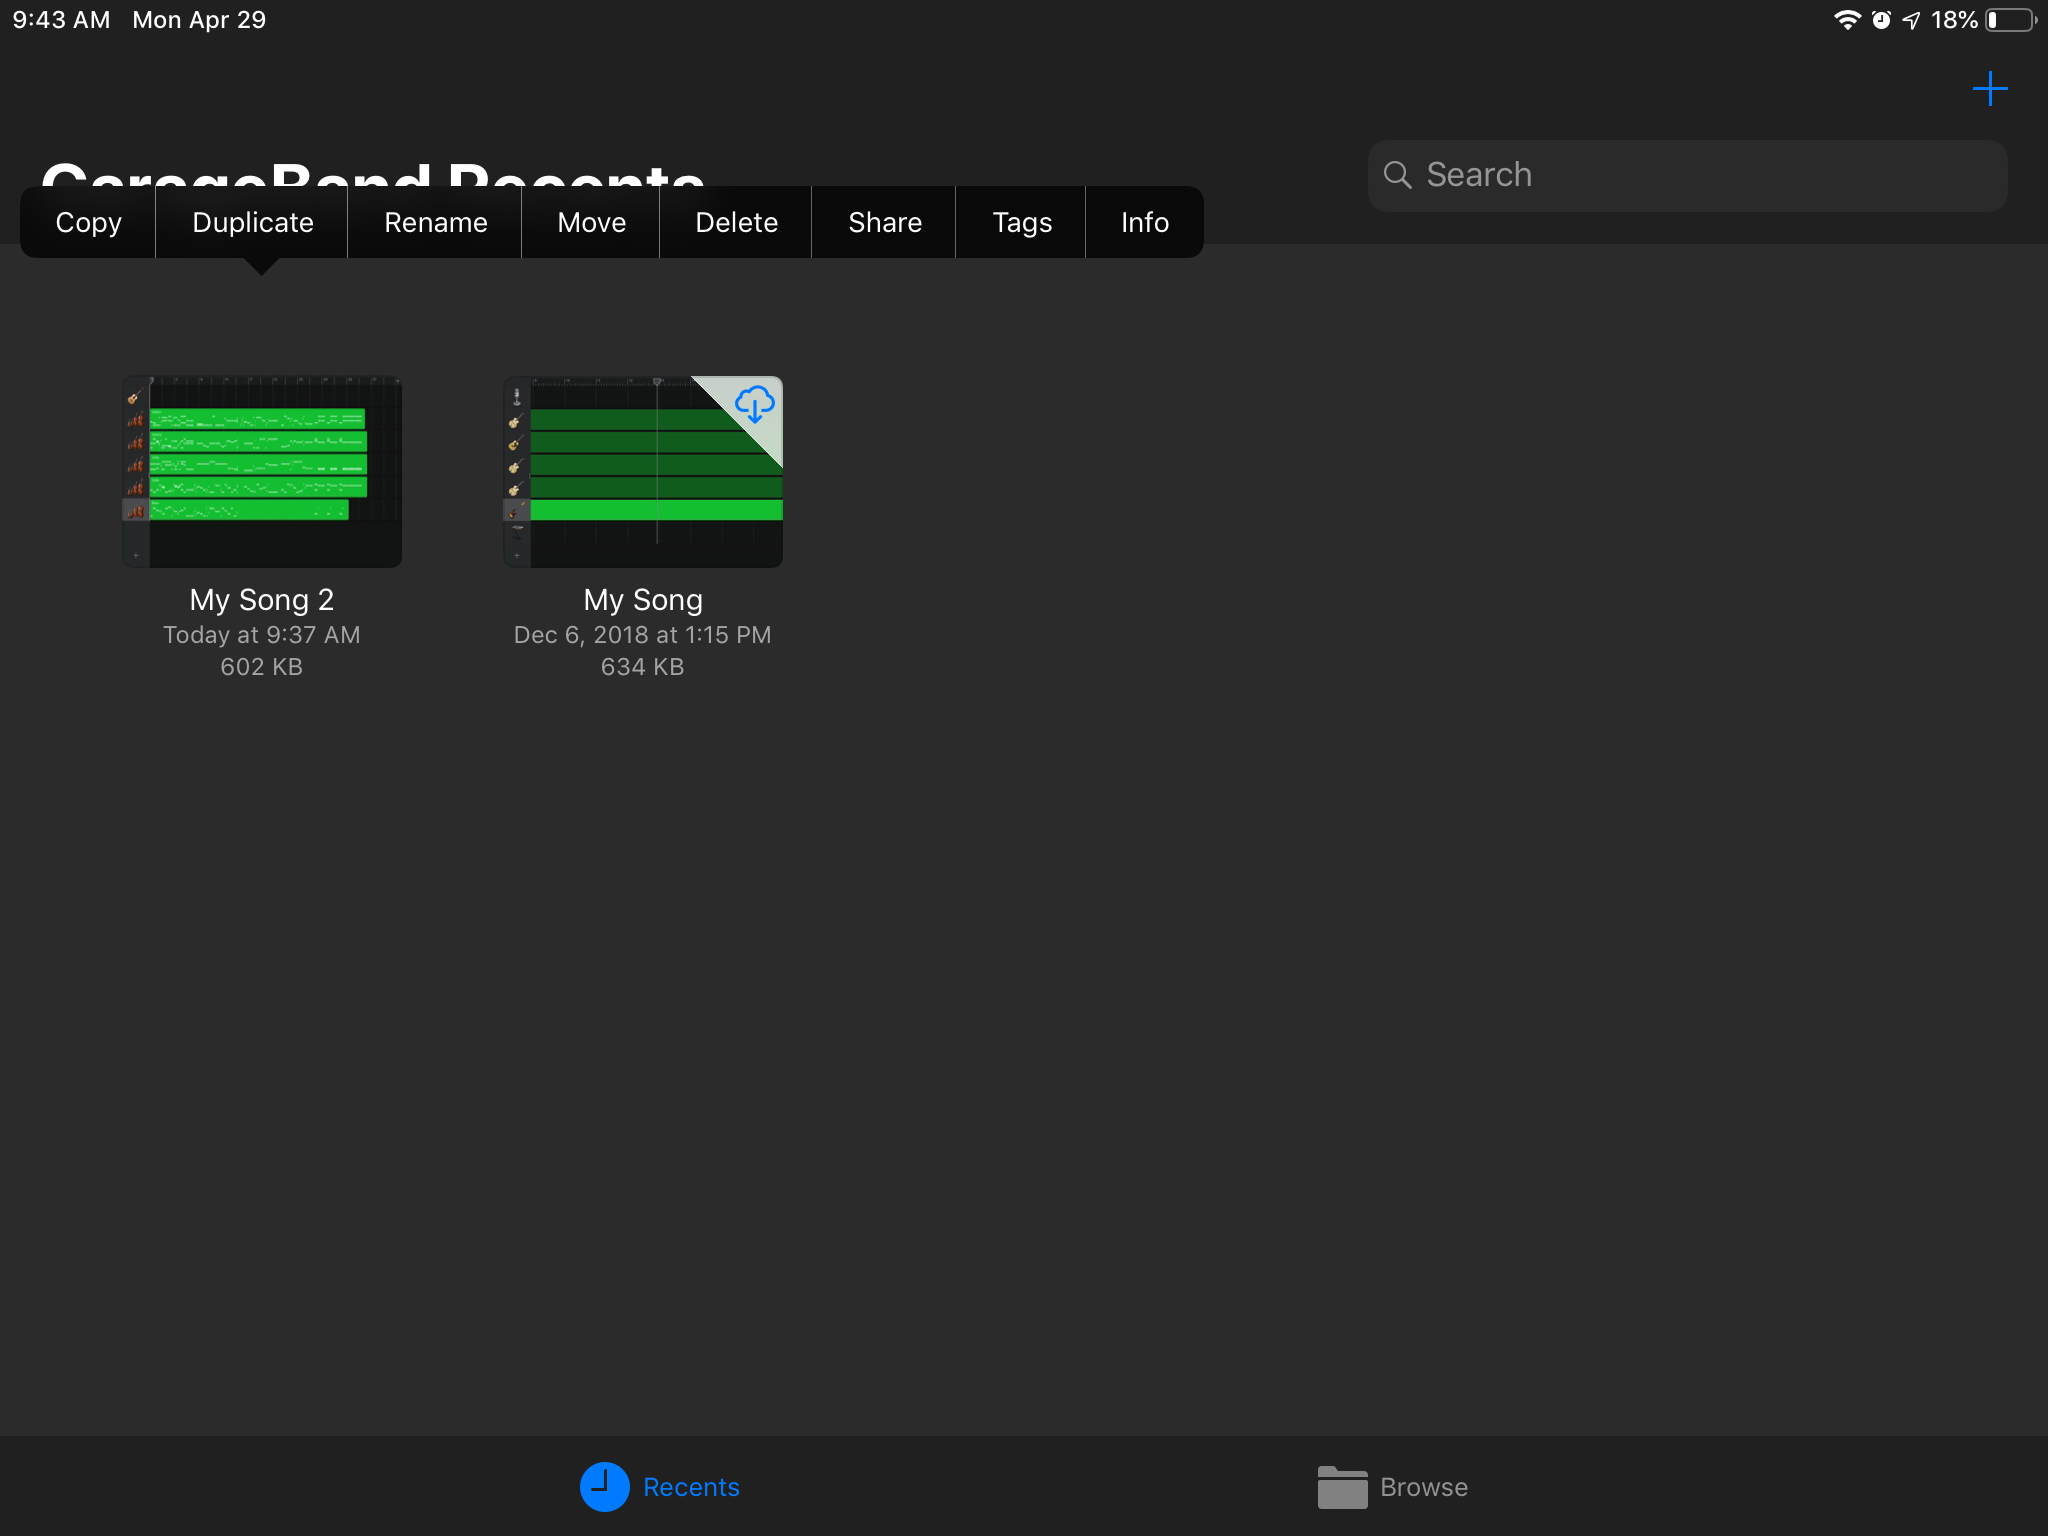
- Select "Share" then select Song in popup.
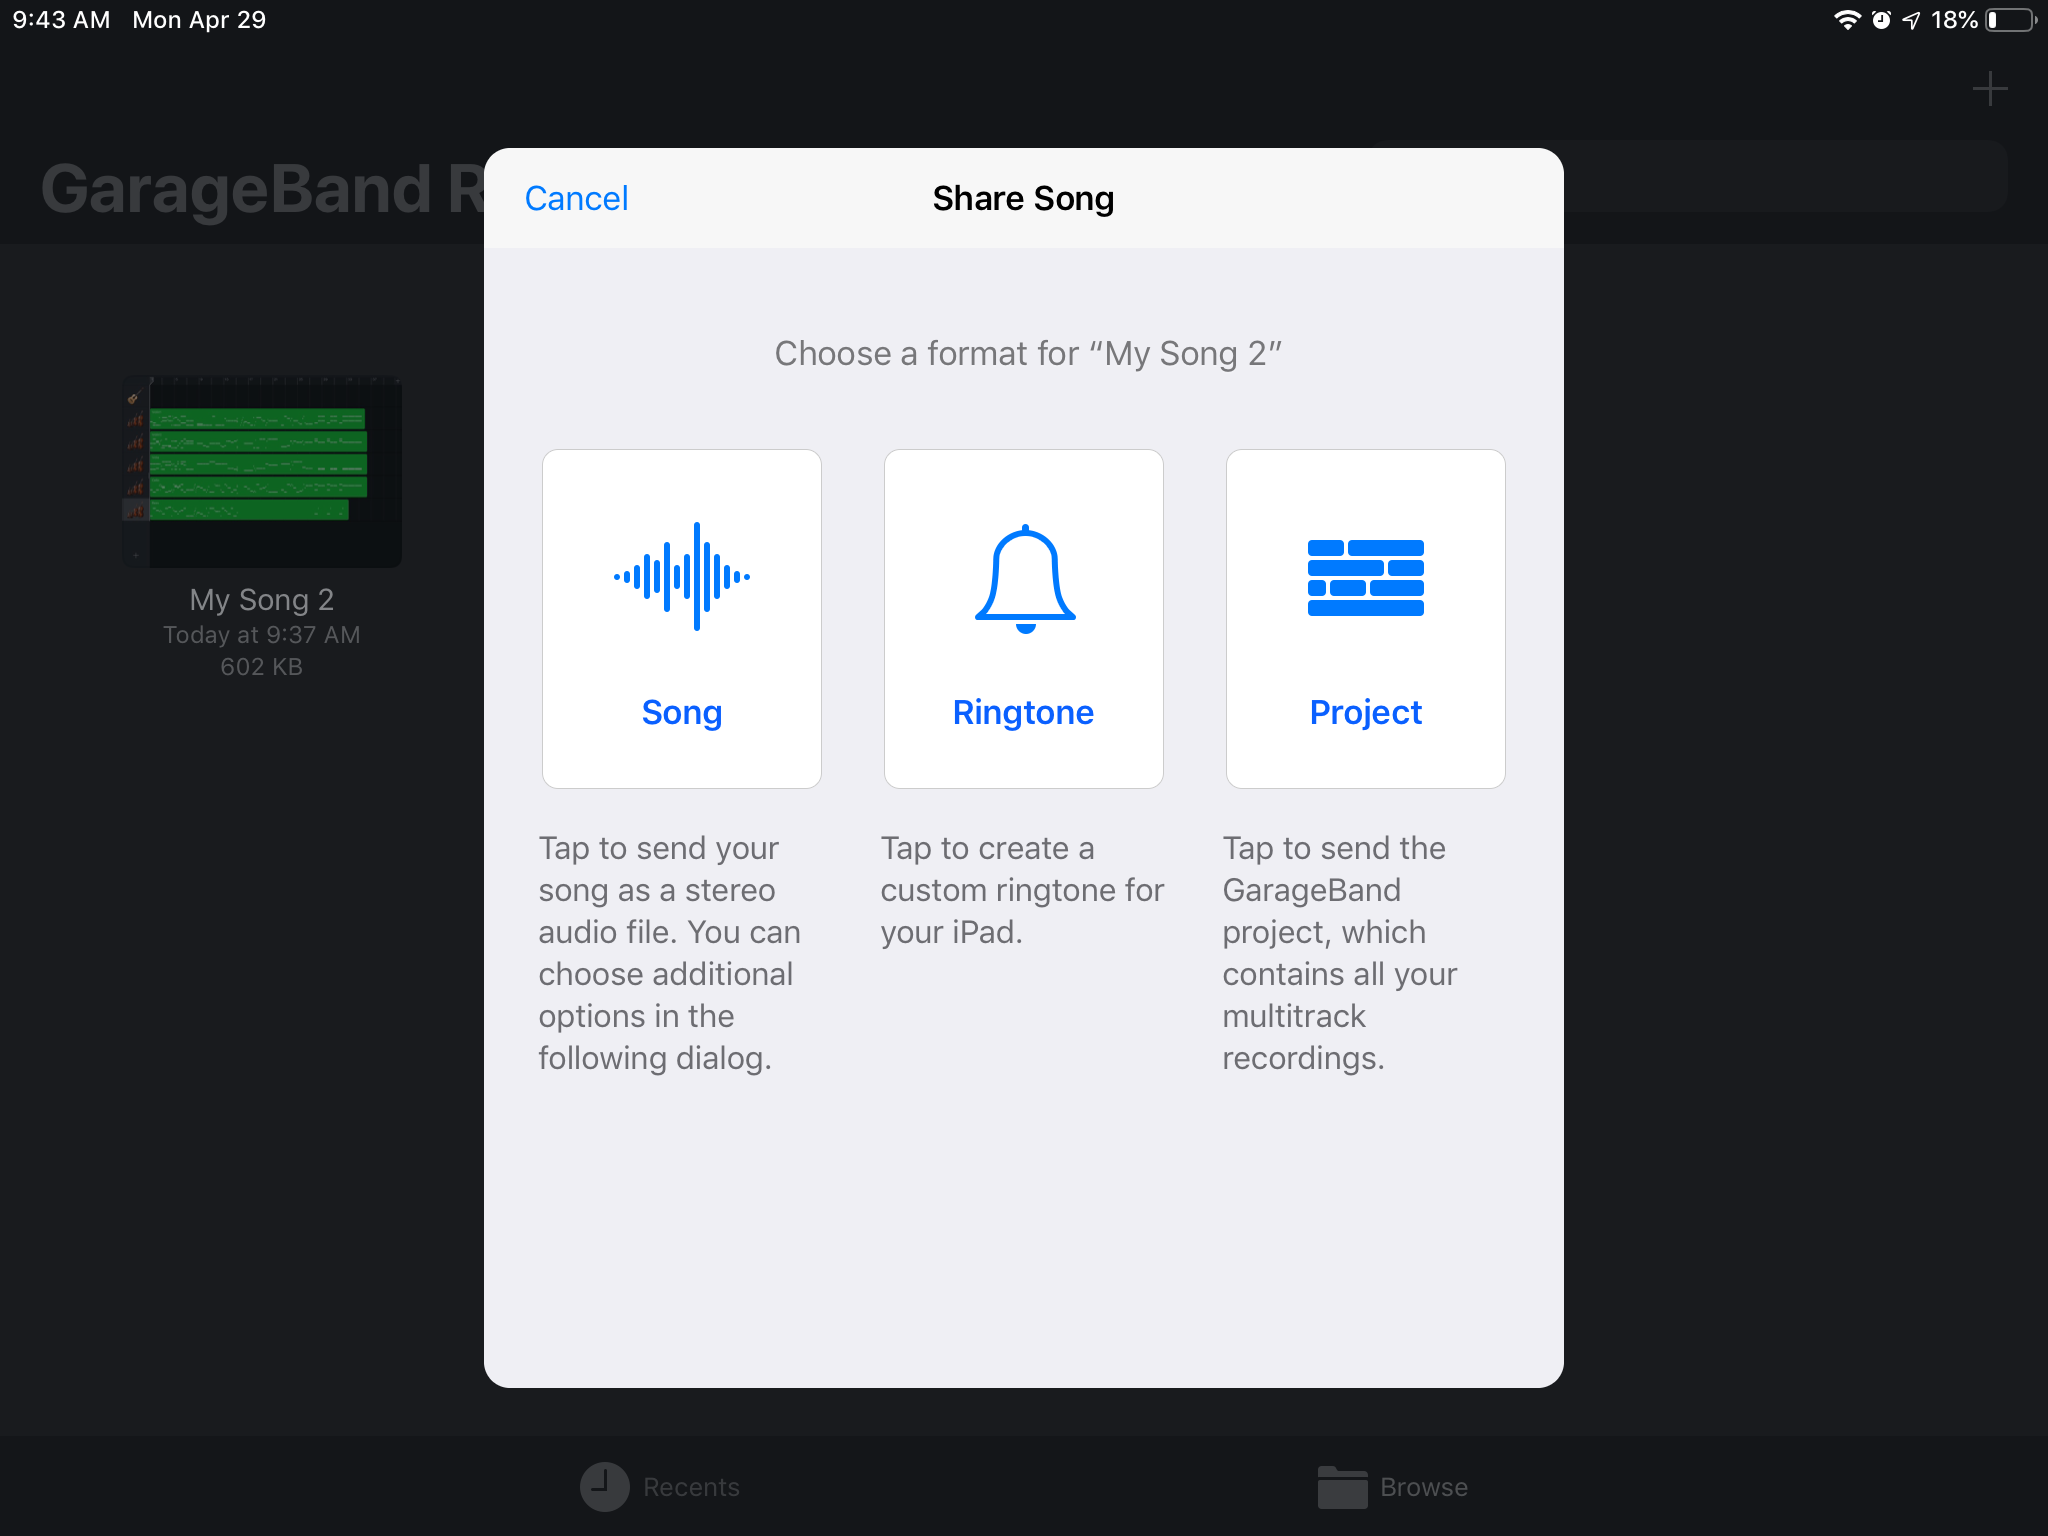
- Pick one. (right now, we select Email.)
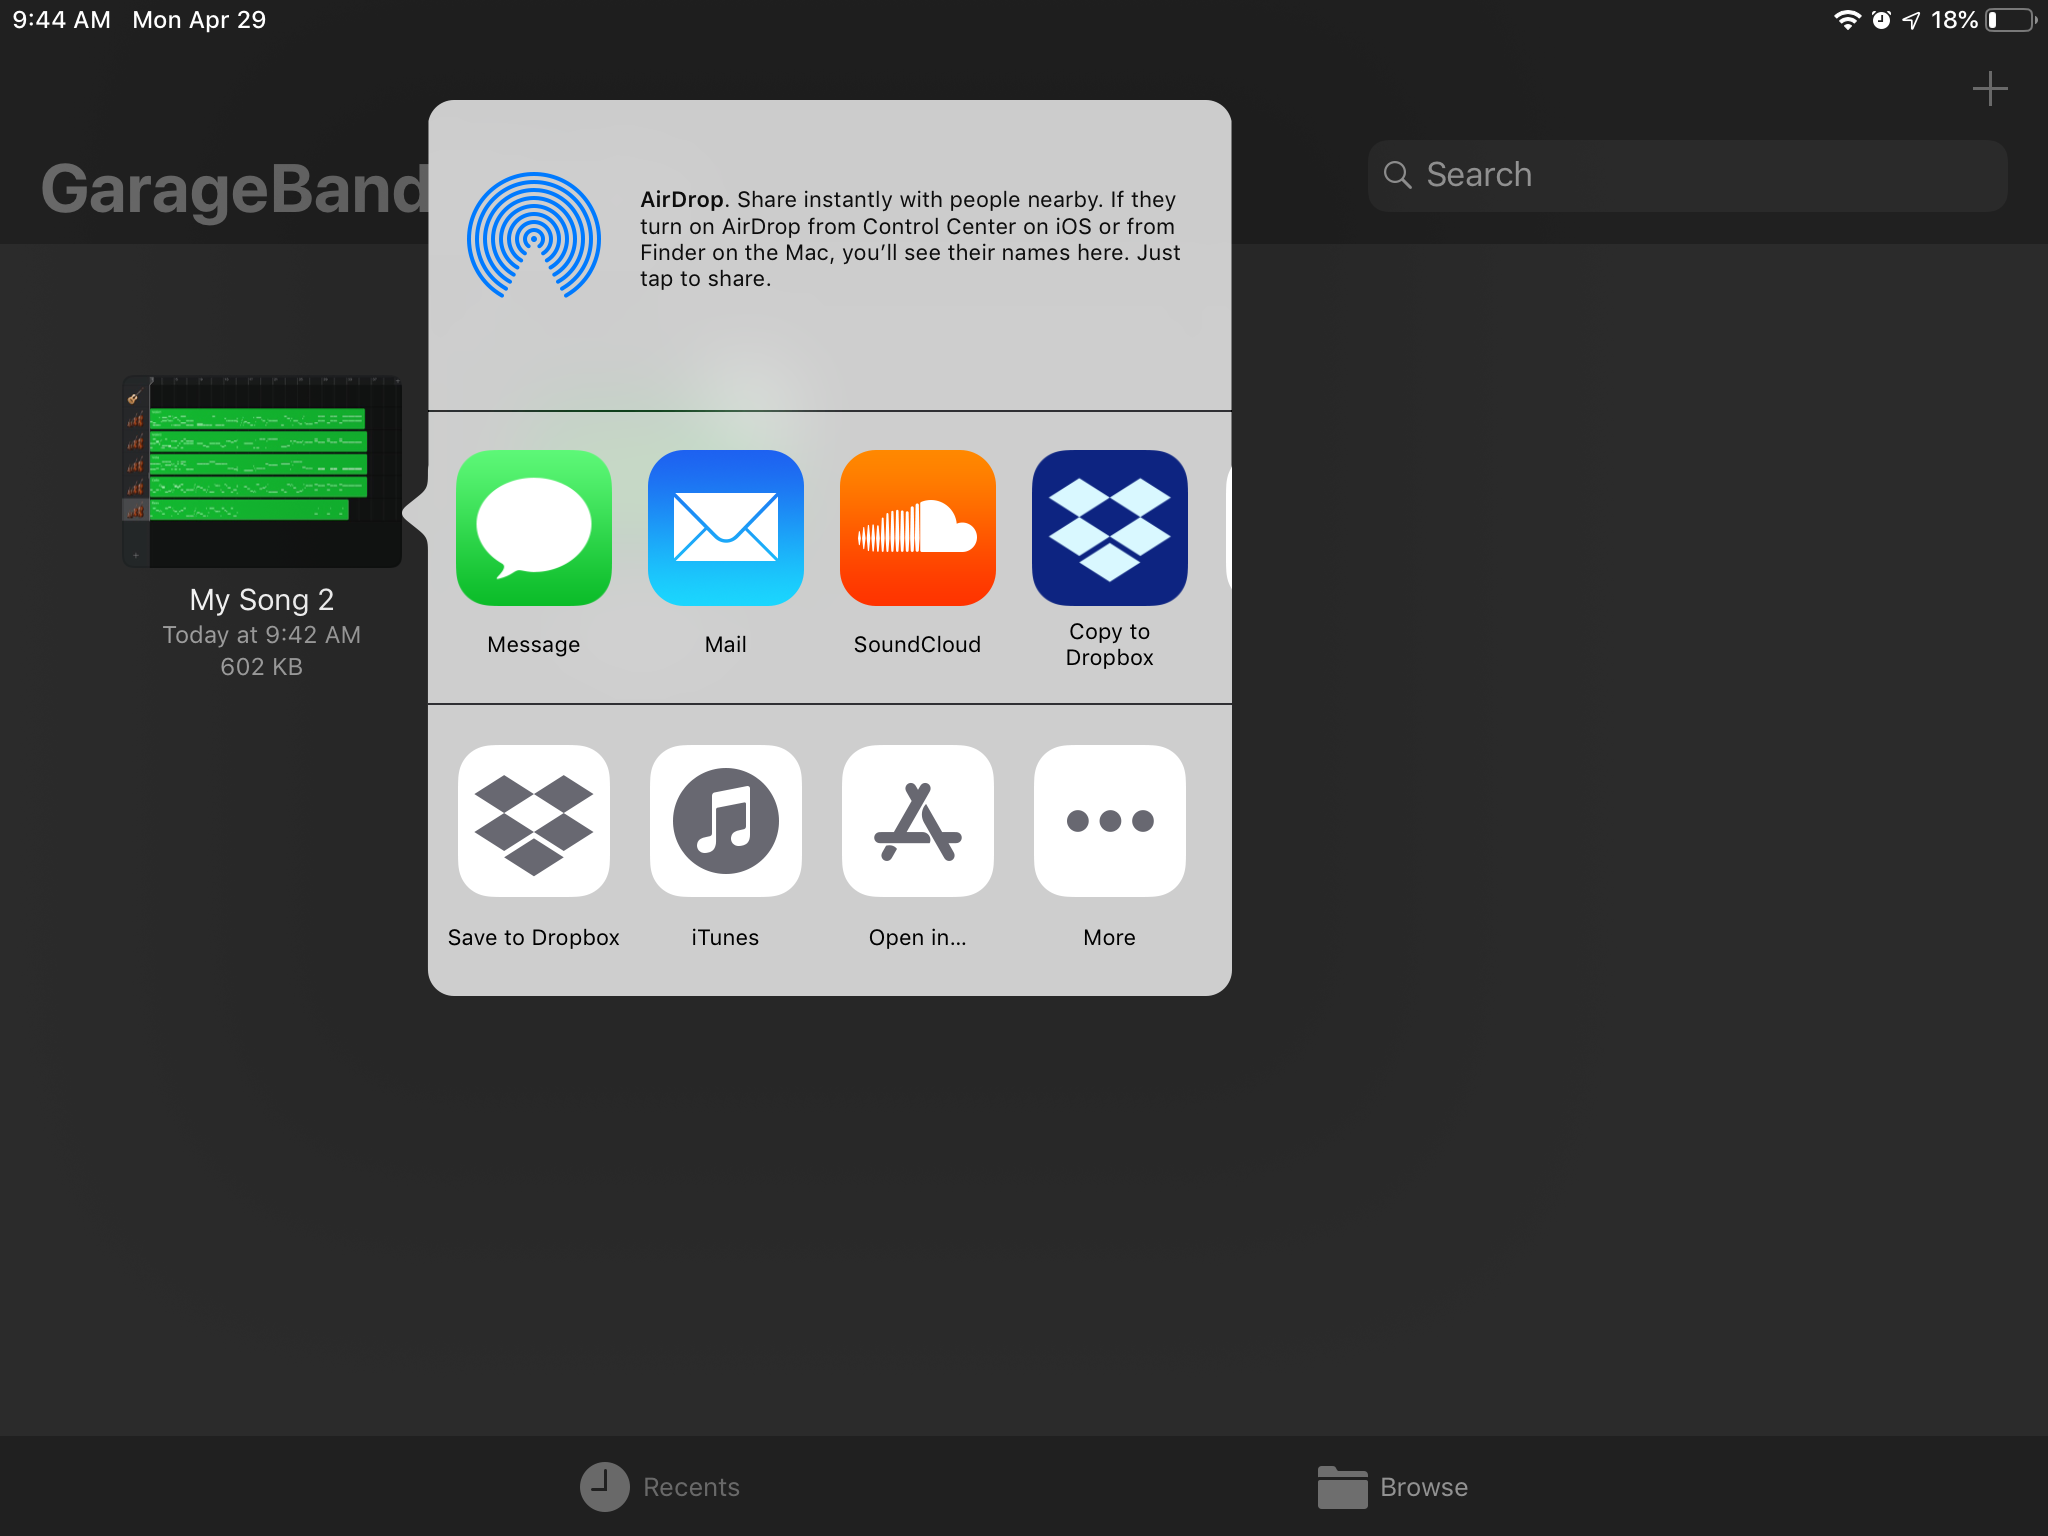
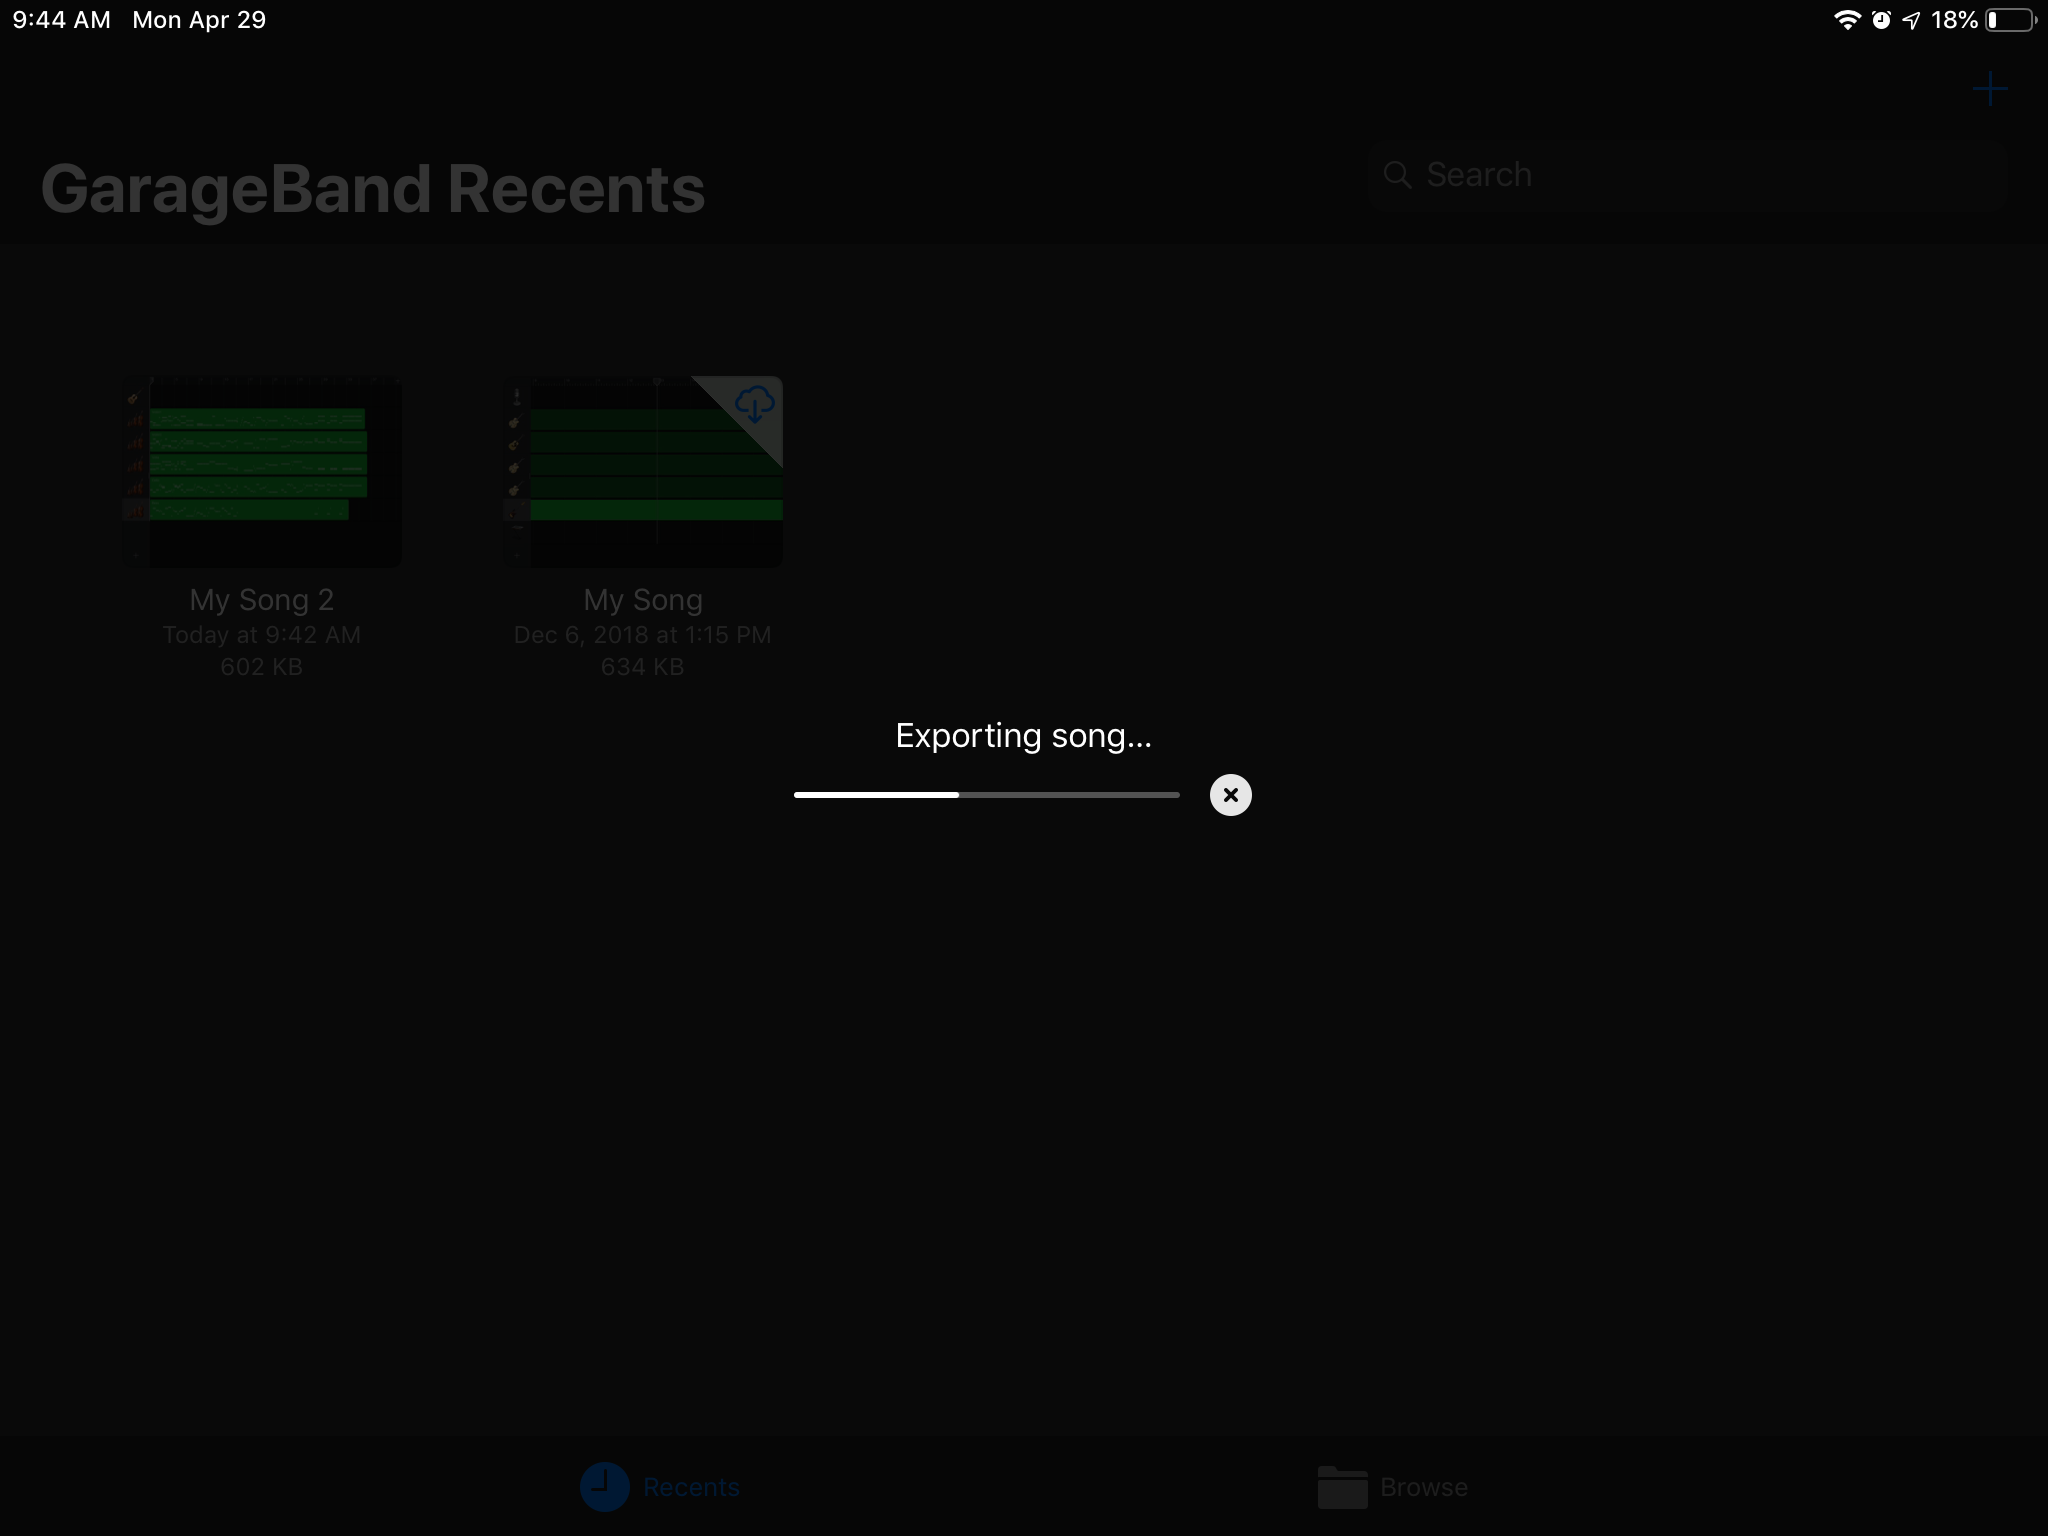
- Now GarageBand is creating Audio File.
- Here is how it is attached to Email. Ready to Share!
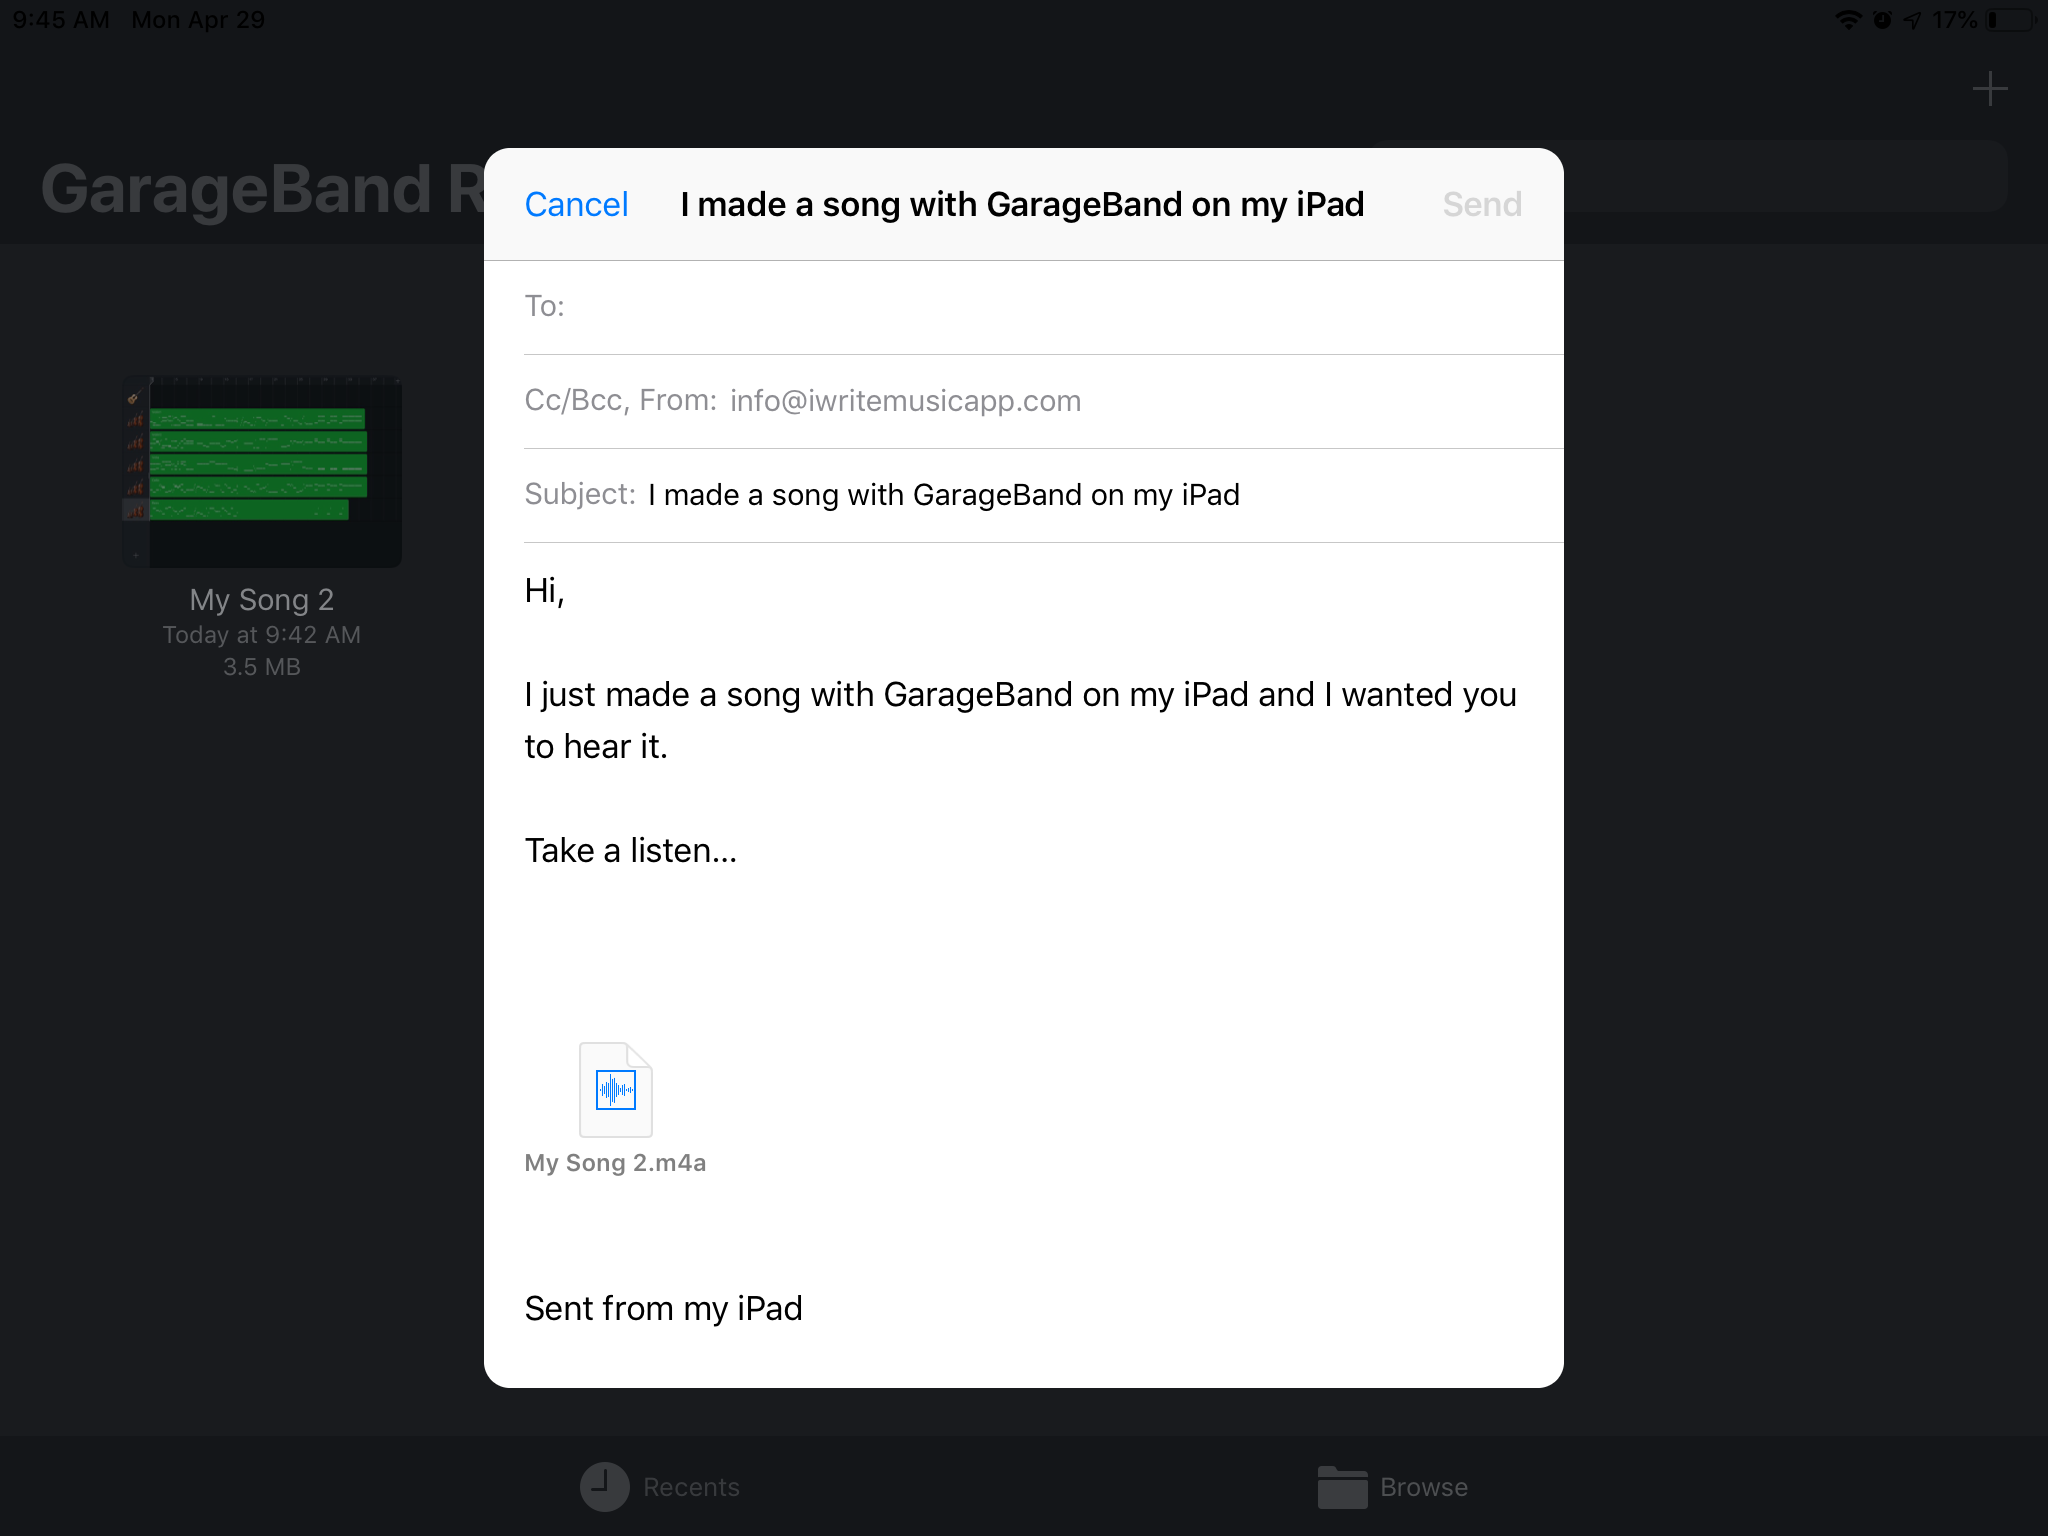
Note:
The sound of this audio file is different from what you hear in iWriteMusic as the file is created with MIDI Sound used in Garageband.